Understanding Mechanical Loosening


Mechanical loosening is the progressive loss of clamping force, interference-fit tension, or structural rigidity in a connection that was originally assembled correctly. Over months or years of service it develops through vibration, thermal cycling, material relaxation, corrosion and wear. It is important to separate it from initial mechanical looseness caused by sloppy assembly: loosening is the slow deterioration of a joint that started out tight and properly torqued.
This gradual nature is exactly what makes loosening dangerous. Because it creeps up over thousands of operating hours, it usually goes unnoticed until vibration climbs sharply or a fastener fails outright. Understanding the underlying mechanisms lets you put inspection protocols and preventive measures in place — catching loosening while it is still a torque-wrench fix rather than a broken-stud failure.
1. Definition: Loosening vs. Looseness
The two terms are often confused, and the distinction matters for diagnosis. Looseness is a state — excessive clearance or play that is present from the start, for example a bolt that was never torqued to specification or a bearing fit that was machined too loose. Loosening is a process — a joint that began life correctly clamped but has surrendered that clamping force in service. In the field both end up looking similar in a vibration spectrum, yet the corrective action is different: looseness points to assembly or design error, while loosening points to an operating condition that is actively working the joint apart. Recognising which one you have is the difference between a permanent fix and a repeating problem. Loosening shares a family resemblance with pedestal looseness and a distorted machine frame from soft foot, all of which degrade the structural stiffness a machine relies on.
2. Mechanisms of Mechanical Loosening
Vibration-Induced Loosening
This is the most common mechanism in rotating machinery. Vibration drives microscopic slip at the thread interface: each cycle allows the nut or bolt to rotate by a tiny increment, and over thousands of cycles those increments progressively unwind the fastener. The key factors are vibration amplitude, frequency, bolt preload and the friction coefficient at the threads and under the head. As a rough threshold, sustained vibration amplitudes above roughly 0.5–1.0 g can loosen fasteners over time.
Worse, the process is self-reinforcing — a self-loosening spiral:
- Initial vibration causes a small amount of loosening.
- The new looseness raises vibration through non-linear effects.
- Higher vibration accelerates further loosening.
- This positive feedback can tip a slow drift into rapid deterioration.
Thermal Relaxation
Temperature swings quietly bleed off clamping force in two ways. Differential expansion occurs because the bolt and the clamped parts have different thermal expansion coefficients or run at different temperatures; heating can relieve bolt tension, and repeated heating–cooling cycles cause alternating stress known as thermal ratcheting. At elevated temperatures, creep can leave the bolt permanently elongated and slack. Separately, gasket and seal compression set matters in bolted flanges: gasket materials compress permanently under load and heat, the clamped height shrinks, the joint settles, and bolt tension falls — which is why gasketed joints need periodic retightening.
Material Embedment and Settling
- Surface-roughness crushing: microscopic peaks on the mating faces flatten under load.
- Initial settling: components bed together during the first hours or days of running.
- Permanent deformation: slight plastic yielding at the highest-stress points.
- Net effect: the joint stack-up gets thinner, and bolt preload drops with it.
Fretting and Wear
Where two clamped surfaces undergo microscopic relative motion, fretting wear removes material from the contact faces, clearances grow, and the joint loosens further. Press fits and keyed connections are especially vulnerable because they depend on a tight interference that fretting steadily erodes.
Corrosion and Chemical Attack
Corrosion reduces a fastener’s cross-section and strength. Rust jacking can initially increase tension before driving the joint to failure, thread corrosion can make retightening impossible, and galvanic action between dissimilar metals attacks the connection from within.
Fatigue
The alternating stresses that accompany vibration also cause bolt fatigue. Cracks initiate and grow until the fastener fractures — and critically, this can happen even when the bolt never visibly backs off. High-vibration environments make fatigue failure of fasteners a constant risk.
3. Detecting Progressive Loosening
Vibration Trending
The earliest warning usually comes from vibration trending as part of a condition monitoring programme. Watch for:
- A gradual rise in overall vibration levels over months or years.
- The emergence and growth of harmonic components (loosening is notorious for generating a string of running-speed harmonics).
- Increasing phase scatter from measurement to measurement.
- A shift from a clean, linear vibration response toward a non-linear one.
Periodic Bolt-Torque Checks
- Verify torque annually or semi-annually on important joints.
- Document and trend the values rather than just pass/fail.
- Torque relaxation greater than about 20% signals significant loosening.
- Note patterns — which bolts loosen first, and most.
Physical Inspection
- Look for witness marks that betray movement between parts.
- Check for worn or cracked paint at joint lines.
- Watch for rust streaks, the signature of movement combined with moisture.
- Look for fretting debris — a fine black or reddish powder at the interfaces.
4. Prevention Strategies
Design Measures
- Adequate fastener size: larger bolts resist vibration loosening better.
- Multiple fasteners: spread the load and provide redundancy.
- Proper thread engagement: at least one bolt diameter of engaged thread.
- Stiffness optimisation: the best defence is to reduce the vibration at source.
Assembly Practices
Correct torque application is the foundation: use calibrated torque wrenches, follow the specified tightening sequence (a star pattern on circular flanges), apply multi-pass tightening on critical joints, and verify the final torque on every fastener. Because the target is actually a clamping force rather than a torque reading, it helps to work from a proper specification — our Bolt Tightening Torque Calculator converts a desired preload into a torque value, while the Bolt Preload Force Calculator shows how much clamping force a given bolt and grade can actually deliver.
On top of correct torque, positive locking methods stop the fastener from backing off:
- Thread-locking compounds: anaerobic adhesives (Loctite and similar) that prevent rotation.
- Lock washers: split, star and serrated washers — though their effectiveness is debated.
- Lock nuts: nylon inserts, deformed threads, or staking.
- Safety wire: positive mechanical locking for critical fasteners.
- Locking plates and tabs: dedicated mechanical locking features.
Material Selection
- Use appropriate fastener grades — 8.8 or 10.9 for high loads.
- Choose corrosion-resistant materials in harsh environments.
- Consider coatings to control and stabilise the friction characteristics.
Operational Practices
- Retorque after run-in: retighten after the first 24–48 hours of operation, once embedment and settling have done their work.
- Periodic verification: recheck torque on a schedule — annually at minimum, quarterly for critical equipment.
- Vibration control: maintain good balance and alignment to keep the loosening forces low in the first place.
- Documentation: record torque values and trend the data over time.
5. Confirming and Diagnosing Loosening in the Field
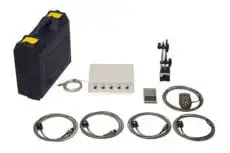
Because loosening shows up as a rising overall level and a growing harmonic family, you confirm it with a portable instrument that captures both amplitude and phase. A two-channel analyser such as the Balanset-1A lets you record the spectrum at a suspect bearing housing or baseplate, see the characteristic series of running-speed harmonics, and watch how the phase wanders from run to run — the non-repeating phase that distinguishes a loose joint from a clean unbalance. Measuring at operating speed, in the machine’s own mounts, also reveals whether the structure stiffens up when retorqued, confirming that loosening — not a rotor problem — was the source. This same instrument then verifies that correcting the rotor’s balance has removed the excitation that was driving the joint apart.
6. When Loosening Signals a Deeper Problem
Recurring loosening is rarely the disease — it is usually a symptom. If a joint will not stay tight, look upstream:
- Excessive vibration: unbalance, misalignment or resonance producing levels high enough to defeat normal fastening.
- Inadequate design: fasteners undersized or too few for the loads.
- Thermal issues: extreme temperature cycles or steep gradients.
- Corrosion: an aggressive environment steadily attacking the fasteners.
- Fatigue: alternating loads that exceed the fastener’s endurance limit.
In every one of these cases, retightening alone buys only temporary relief. The root cause must be found and corrected for a permanent solution.
Mechanical loosening is an insidious process that quietly turns properly assembled machinery into vibrating, unreliable equipment. Proactive monitoring through vibration trending and physical inspection, combined with disciplined assembly practices and effective locking methods, keeps loosening from compromising equipment reliability and safety.
