ISO 21940-13: Mechanical vibration – Rotor balancing – Part 13: Criteria and safeguards for the in-situ balancing of medium and large rotors


Summary
ISO 21940-13 is a specialized standard focused on the practical aspects of balancing rotors in their own bearings and support structure, directly in the machine’s operational location (in-situ or field balancing). It addresses the unique challenges and safety considerations that arise when balancing cannot be performed on a dedicated balancing machine. The standard provides criteria for when in-situ balancing is appropriate and outlines the necessary safeguards to perform the procedure safely and effectively, particularly for medium and large rotors where the risks are higher.
Table of Contents (Conceptual Structure)
The standard is structured to guide the decision-making and execution process for field balancing:
-
1. Scope and Applicability:
This initial chapter defines the standard’s specific focus, making it clear that it provides guidelines and safeguards for the process of in-situ (or field) balancing of medium and large rotors. It establishes that this procedure is performed while the rotor is in its own bearings and support structure, often in its final operational location. A key point made in this section is that the principles are applicable to rotors that may behave as either rigid or flexible in their final installed state, acknowledging that the system’s dynamics as a whole determine the balancing approach. The standard is intended for technicians, engineers, and managers who need to decide upon, plan, and safely execute a field balancing procedure.
-
2. Criteria for In-Situ Balancing:
This chapter provides a crucial decision-making framework to help determine if field balancing is the most appropriate course of action. It is not always the default solution for high vibration. The standard outlines several scenarios where in-situ balancing is justified: 1) When it is logistically impractical or prohibitively expensive to remove the rotor for a shop balance (e.g., a large turbine or generator rotor). 2) When the unbalance is caused by factors that only manifest under normal operating conditions, such as thermal distortions, aerodynamic forces, or process-related buildup (e.g., debris on a fan blade). 3) For final trim balancing after a rotor has been reinstalled following a shop balance. The standard advises a thorough analysis to confirm that the high vibration is indeed caused by unbalance and not by other issues like misalignment, resonance, or looseness before proceeding.
-
3. Balancing Procedures and Methodology:
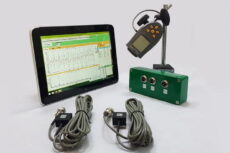
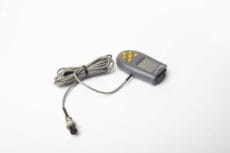
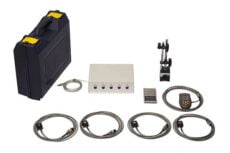
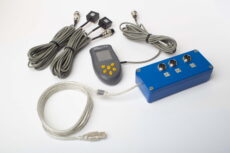
This section provides a detailed, step-by-step guide to the practical execution of the field balancing process. It begins by specifying the requirements for the portable instrumentation, which must include a multi-channel vibration analyzer capable of measuring amplitude and phase, one or more vibration sensors (accelerometers are most common), and a phase reference sensor (e.g., a photo-tach or laser tach) to provide a timing mark on the rotating shaft. The core of the chapter is a detailed description of the universally used influence coefficient method. This involves recording the initial vibration vector (amplitude and phase), attaching a known trial weight at a known angular position, measuring the new “response” vector, and then using vector mathematics to calculate the location and mass of the required correction weight. The standard provides guidance for both single-plane and multi-plane balancing using this method.
-
4. Balance Quality Evaluation:
This chapter makes a critical distinction between shop balancing and field balancing. While shop balancing aims to meet a specific residual unbalance tolerance based on a G-Grade, the primary objective of field balancing is more pragmatic: to reduce the operational vibration of the machine to an acceptable level. Therefore, the evaluation criteria are not based on residual unbalance but on the final vibration amplitudes. The standard specifies that the assessment of the final balance quality should be based on the in-service vibration limits defined in other relevant standards, primarily the ISO 20816 series. The ultimate goal is to reduce the 1X running speed vibration so that the machine’s overall vibration level falls into an acceptable zone for long-term operation (e.g., Zone A or B).
-
5. Safeguards and Safety Precautions:
This chapter is arguably the most important part of the standard, as field balancing carries significant risks not present in a controlled workshop environment. It mandates a rigorous and documented approach to safety. Key requirements include: 1) A thorough mechanical inspection before starting, ensuring all fasteners are tight and guards are in place. 2) A strict protocol for the attachment of weights, requiring them to be positively secured (e.g., welded, bolted, or placed in dedicated holders) to prevent them from becoming dangerous projectiles. 3) The establishment of a controlled access zone around the machine during test runs. 4) Clear, unambiguous communication protocols between the balancing analyst and the machine operator. 5) A pre-defined emergency stop procedure. This focus on safety is paramount to prevent injury and catastrophic equipment failure.
Key Concepts
- Field Balancing vs. Shop Balancing: The standard is entirely focused on balancing a rotor *in the machine* as opposed to on a dedicated balancing machine in a workshop. Field balancing corrects for the entire rotor assembly in its operational state.
- Vibration Reduction as the Goal: While shop balancing aims to reduce residual unbalance to a specific tolerance (Uper), the primary goal of field balancing is to reduce the operational vibration of the machine to an acceptable level as defined by standards like ISO 20816.
- Safety First: Due to the risks of running a machine with deliberately added trial weights, the standard places a very strong emphasis on safety procedures and safeguards.
- Influence Coefficient Method: This is the universal method for in-situ balancing. It involves measuring an initial vibration vector, adding a known trial weight, measuring the new “response” vector, and using vector math to calculate the required correction weight and its placement angle.
Official ISO Standard
For the complete official standard, visit: ISO 21940-13 on ISO Store
