Understanding Troubleshooting in Vibration Analysis


ਸਮੱਸਿਆ ਨਿਵਾਰਨ is the systematic process of investigating and resolving machinery problems through data collection, analysis, hypothesis testing and root-cause determination. In a ਵਾਈਬ੍ਰੇਸ਼ਨ context it combines ਵਾਈਬ੍ਰੇਸ਼ਨ ਮਾਪ, ਡਾਇਗਨੌਸਟਿਕ ਵਿਸ਼ਲੇਸ਼ਣ, physical inspection and testing to answer three questions: why does the excessive vibration exist, which component is defective, and what corrective action will resolve the problem permanently rather than merely treating its symptoms. Done well, it is the discipline that turns a vague complaint of “too much vibration” into a confirmed cause and a lasting fix.
1. Definition: What is Troubleshooting?
Effective troubleshooting rests on three pillars: a structured methodology, broad technical knowledge — of machinery design, failure modes and characteristic vibration signatures — and a systematic approach that progresses from simple checks to detailed investigation. The opposite is random part replacement or trial-and-error, which wastes time, money and credibility. The single most important habit is to diagnose before acting: every step that follows exists to build evidence before a spanner is ever lifted.
2. The Systematic Troubleshooting Process
A reliable investigation follows a repeatable sequence of six steps, each one narrowing the field before the next begins.
Step 1 — Problem Definition
- ਲੱਛਣ: what exactly is wrong — high vibration, noise, temperature?
- When it started: recent or long-standing?
- ਬਦਲਾਅ: what changed just before the problem appeared — maintenance, a process change, operating conditions?
- ਸੰਚਾਲਨ ਸਥਿਤੀਆਂ: when does it occur — at all times, or only at specific speeds or loads?
- ਇਤਿਹਾਸ: have there been similar problems or past repairs?
Step 2 — Data Collection
- Comprehensive vibration measurements at all bearings and in all directions.
- FFT ਸਪੈਕਟਰਾ, ਸਮਾਂ ਵੇਵਫਾਰਮ ਅਤੇ ਫੇਜ਼ readings.
- ਐਨਵੈਲਪ ਵਿਸ਼ਲੇਸ਼ਣ when a bearing is suspected.
- Temperature and performance data.
- Comparison against ਬੇਸਲਾਈਨ data where it exists.
Step 3 — Analysis and Hypothesis
- Identify the vibration signature — 1×, 2×, bearing frequencies and so on.
- Match it to known fault types.
- Form a primary hypothesis (the most likely cause) and list the alternatives.
- Prioritise the candidates by likelihood.
Step 4 — Hypothesis Testing
- Run tests that confirm or eliminate each hypothesis.
- Take additional measurements, or measure under different operating conditions.
- Inspect physically wherever access allows, and work by process of elimination.
Step 5 — Root-Cause Determination
- Ask why the fault occurred: operating abuse, a maintenance error, a design flaw, or simple age?
- Identify contributing factors, using a 5-Whys analysis or similar technique to get past the obvious.
Step 6 — Solution and Verification
- Implement the corrective action, then measure again to verify the problem is genuinely resolved.
- Address the root cause to prevent recurrence, and document the findings and the solution.
3. Common Troubleshooting Scenarios
Most investigations fall into a few familiar patterns, and recognising the pattern speeds the diagnosis.
- New high vibration after maintenance: check what was actually done — alignment, a bearing change, ਬੈਲੇਂਸਿੰਗ? Verify the work quality (is ਅਲਾਈਨਮੈਂਟ within tolerance, were the correct parts fitted?) and look for installation errors such as ਸਾਫਟ ਫੁੱਟ, loose bolts or a wrong reassembly.
- New high vibration with no maintenance: check for changes in speed, load or process; let the vibration signature point to the fault type; and decide whether it is a new fault or the progression of an existing one.
- Gradual vibration increase: review the trend history with ਰੁਝਾਨ ਵਿਸ਼ਲੇਸ਼ਣ — is it linear or exponential? Use spectral analysis to identify the developing fault, which is typically ਬੀਅਰਿੰਗ ਘਿਸਾਵਟ or growing ਅਸੰਤੁਲਨ from product build-up or erosion, then plan the intervention around the progression rate.
- Problem not fixed by the repair: the wrong fault may have been diagnosed, the root cause may not have been addressed, or there may be multiple simultaneous faults. Reassess with a fresh perspective rather than repeating the same repair.
4. Troubleshooting Tools and Techniques
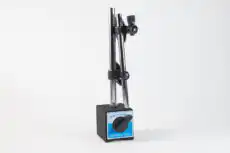
The investigation draws on three complementary lines of evidence. ਵਾਈਬ੍ਰੇਸ਼ਨ ਵਿਸ਼ਲੇਸ਼ਣ supplies the core data — multi-point measurements taken with a ਪੋਰਟੇਬਲ ਵਿਸ਼ਲੇਸ਼ਕ, testing under different speeds and loads, and before/after comparisons. ਭੌਤਿਕ ਨਿਰੀਖਣ grounds the data in reality: visual examination where accessible, checks for obvious issues such as loose bolts, damage or leaks, borescope viewing of internal parts, and alignment and ਰਨਆਊਟ measurements. And the process of elimination ties them together — testing hypotheses systematically, ruling out the impossible causes, narrowing to the most probable, and confirming it with a specific test.
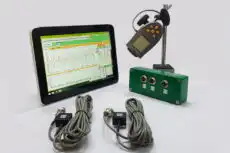
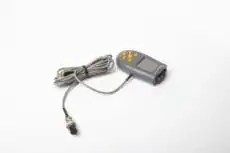
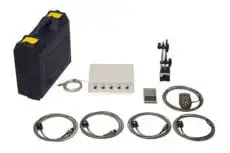
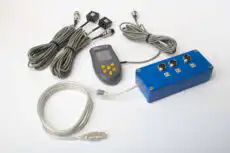
A portable two-channel instrument such as the Balanset-1A is the natural workhorse for this stage: it captures spectra, waveforms and amplitude-and-phase at every measurement point on the running machine, and when the diagnosis turns out to be unbalance it lets the engineer move straight from troubleshooting into ਸਾਈਟ ਬੈਲੇਂਸਿੰਗ (ਫੀਲਡ ਬੈਲੇਂਸਿੰਗ) and verify the result — all in the same visit, without disassembly. One subtlety to keep in mind is ਰੈਜ਼ੋਨੈਂਸ (ਅਨੁਨਾਦ): a structural resonance can amplify a modest force into alarming vibration, so confirming whether a frequency coincides with a natural frequency is often the test that separates a forcing problem from an amplification problem.
5. Common Troubleshooting Mistakes
The same errors recur across industries, and each has a simple antidote:
- Jumping to conclusions: assuming a cause without proper analysis, or pattern-matching to a previous job without verification. Antidote: follow the systematic process and verify before acting.
- Incomplete investigation: stopping at the surface finding and never establishing the root cause, so the problem recurs. Antidote: always ask “why did this happen?”
- Random part replacement: swapping components without diagnosis — expensive, slow and frequently ineffective. Antidote: diagnose first, then repair.
6. Documentation and the Knowledge Base
Good troubleshooting does not end when the machine runs smoothly; it ends when the case is recorded. A complete troubleshooting record captures the problem description and history, the data collected and analysis performed, the hypotheses considered, the tests conducted and their results, the root cause identified, the solution implemented, and the verification measurements that prove it worked. Over time these records compound into a knowledge base — a library of common problems and solutions, equipment-specific quirks and a training resource for new personnel — that complements ongoing ਸਥਿਤੀ ਨਿਗਰਾਨੀ.
Troubleshooting, then, is the problem-solving discipline that converts vibration symptoms into identified causes and effective solutions. Through systematic investigation — combining measurement data, analytical techniques, physical inspection and logical reasoning — it resolves vibration problems permanently while building the institutional knowledge that makes every future diagnosis faster and every machine more reliable.
