How to Balance a Centrifuge: Stop the Shake and Avoid Downtime
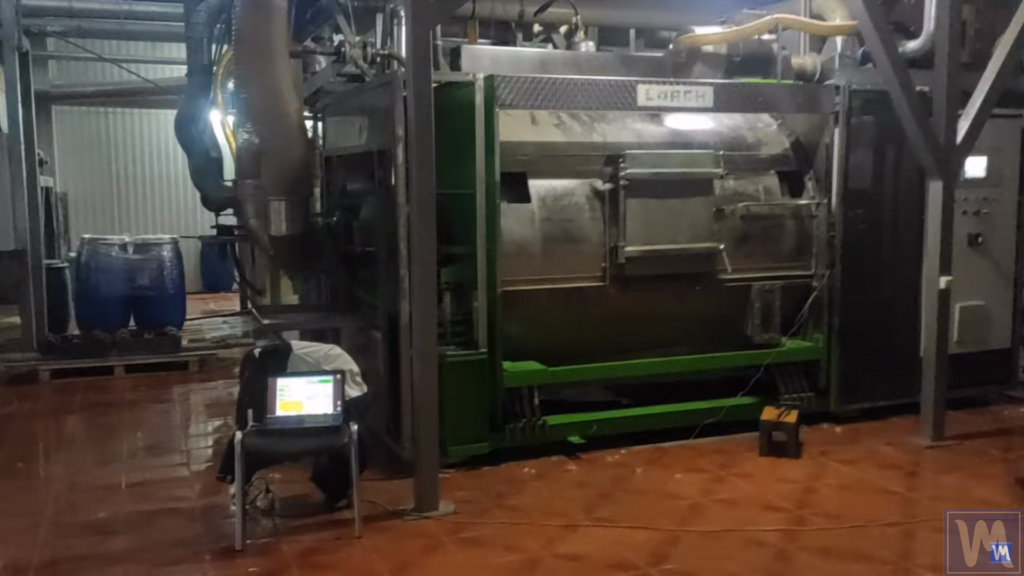
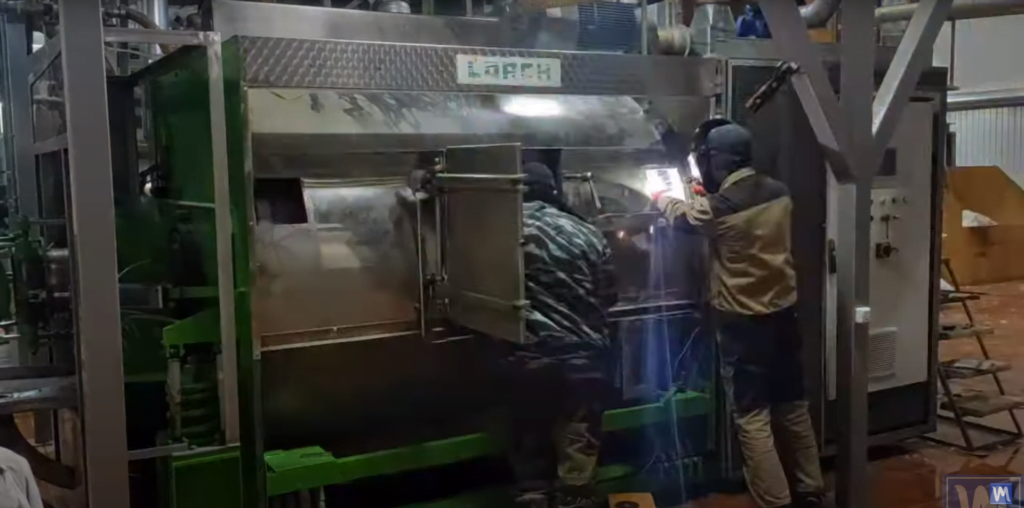
Problem: An industrial centrifuge in a home textile factory (used for washing and drying pillows) was shaking violently, rattling the entire floor. Not only did the noise alarm the staff, but the vibration was putting extra stress on the machine’s bearings and structure. This scenario is common in many plants: an out-of-balance centrifuge can quietly drain maintenance budgets and lead to unexpected failures.
Even a small imbalance can have a huge impact. At around 3000 RPM, a tiny 10 gram off-center mass can exert roughly 30 kg of force on the rotor’s bearings. Double the speed, and that force quadruples—potentially over 100 kg of force from that same little weight. Solution: The good news is that by properly balancing the centrifuge’s rotor, you can eliminate these destructive vibrations. In this article, we’ll explain why centrifuges vibrate, how to recognize the warning signs of imbalance, and most importantly, how to perform a dynamic balance of the rotor step-by-step. The process can be done on-site with a portable analyzer, restoring smooth operation and saving you money (from reduced damage and downtime), time (by avoiding unplanned shutdowns), and ensuring reliability and safety in your operations.
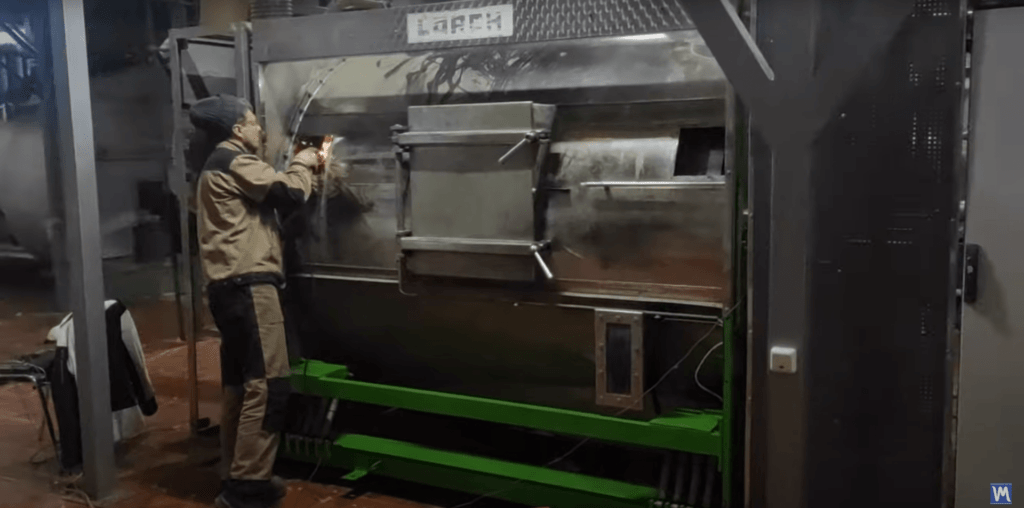
In the video below, you can see an example of this issue and its resolution at the pillow factory. The industrial washing machine (centrifuge) had severe vibration before balancing, and after performing the balancing procedure with the Balanset-1A device, it ran smoothly:
Understanding Vibration and Imbalance in Centrifuges
What is vibration? In a centrifuge, vibration is the oscillatory motion or shaking that occurs when the rotor is spinning. A perfectly balanced rotor would spin quietly and smoothly. However, if any part of the mass is unevenly distributed, the rotor will start to vibrate as it rotates. Think of how an unbalanced washing machine load causes the machine to shake during the spin cycle – the same principle applies to industrial centrifuges and other high-speed rotors.
Common causes of centrifuge vibration: Several factors can lead to excessive vibration in a centrifuge. The most common include:
- Rotor imbalance: Uneven distribution of mass in the rotor (a “heavy spot”). This is the primary cause of vibration and the focus of balancing.
- Rotor deformation: Bent or warped rotor components that throw off balance.
- Bearing issues: Worn-out or damaged bearings, or improper bearing installation, which can allow excess play and misalignment.
- Assembly asymmetry: Parts of the rotor or attached components (like baskets, mounts, or even loads inside the centrifuge) are not symmetrically arranged or have manufacturing inconsistencies.
- External factors: The centrifuge not being firmly mounted (uneven or loose foundation), or resonance with other machinery, can exacerbate vibrations.
While issues like bearings or installation can cause vibrations, it’s important to note that if a centrifuge is fundamentally out of balance, no amount of tightening or new bearings will completely stop the shaking. You must address the root cause: the imbalance of the rotor itself.
Static Imbalance vs. Dynamic Imbalance
There are two main types of rotor imbalance that can cause vibration:
- Static imbalance: This occurs when the rotor’s center of mass is offset from its axis of rotation. If you were to place the rotor on knife-edge rails, a statically imbalanced rotor would consistently roll so that the heavy spot hangs downward. Static imbalance typically causes the centrifuge to vibrate in a single plane (it’s like a wheel that isn’t balanced – it will bounce up and down).
- Dynamic (moment) imbalance: This happens when the rotor’s mass is distributed unevenly along different planes, causing a wobble or seesaw effect as it spins. A rotor might be balanced on a single plane but still wobble because one end is heavier on one side and the other end is heavier on the opposite side. Dynamic imbalance (also called couple imbalance) makes the rotor want to twist or “wag” as it spins. Most large industrial centrifuges suffer from some dynamic imbalance and require balancing in two planes to correct this.
In practice, dynamic balancing is the process used to address both static and dynamic imbalances for high-speed centrifuges. It involves spinning the rotor and measuring vibrations to determine where to add or remove weight. By contrast, static balancing might be sufficient for small rotors or when only a single-plane issue exists (for example, balancing a simple grinding wheel might only need static balancing). For an industrial centrifuge, however, dynamic balancing in two planes is usually necessary to achieve a truly smooth operation.
Why an Unbalanced Centrifuge Is a Big Problem
An out-of-balance centrifuge isn’t just a minor inconvenience; it’s a threat to your equipment’s health and your operation’s efficiency. Here are the key issues caused by excessive vibration:
- Accelerated wear and tear: Vibration subjects components like bearings, shafts, seals, and mounts to repetitive stress. This leads to faster wear, frequent breakdowns, and a shorter service life for the centrifuge. In financial terms, you’ll spend more on spare parts and repairs, and suffer more downtime.
- Reduced product quality: Many centrifuges (especially in industries like chemical, pharmaceutical, or food processing) are used to separate or process materials. Vibration can disrupt the smooth separation of components. For example, an unbalanced centrifuge might not separate liquids and solids as cleanly, resulting in lower-quality output or inconsistent results. In extreme cases (like in pharmaceutical production), this can ruin entire batches of product.
- Increased noise and operator fatigue: A vibrating centrifuge often produces loud, droning or rattling noises. This not only violates workplace noise standards, making the environment uncomfortable or even hazardous for staff, but also contributes to operator fatigue and stress. Over time, excessive noise and vibration can erode worker concentration and morale.
- Structural damage and safety risks: Severe vibrations can cause bolts to loosen and machine foundations to crack or degrade. The entire structure of the centrifuge and even the platform it’s mounted on can be compromised. In worst-case scenarios, a part of the centrifuge could break apart due to stress, leading to catastrophic failure. The safety risk here cannot be overstated – a disintegrating high-speed rotor can cause extensive damage to the facility and pose life-threatening danger to personnel.
Bottom line: ignoring the vibration in a centrifuge will cost you. It can result in expensive downtime (imagine having to halt production for emergency repairs), higher maintenance bills, and potentially liability or health and safety incidents. That’s why proactive balancing and maintenance are essential.
As rotation speed increases, the impact of even a small imbalance becomes more severe exponentially. If you double the speed of a centrifuge, the imbalance forces quadruple. This is why high-speed industrial centrifuges absolutely require precise balancing — what might be a mild vibration at a low speed becomes a violent shake at full operating speed.
Balanset-1A: Your Reliable Assistant in Centrifuge Balancing
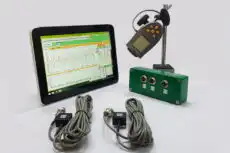
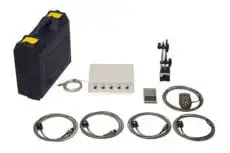
So, how do we solve the vibration problem effectively? The answer is to balance the centrifuge’s rotor, and modern technology makes this process easier than ever. The Balanset-1A is a portable vibration analyzer and dynamic balancing device specifically designed for rotors like those in centrifuges (as well as fans, crushers, turbines, and other industrial machines). It’s essentially a toolkit that lets you perform professional-grade balancing at your site, without needing to disassemble the machine and ship the rotor to a specialized facility.
Key features of Balanset-1A: This device comes with dual accelerometer sensors to measure vibrations in two planes, a laser tachometer to detect rotational speed and phase, and user-friendly balancing software. In vibrometer mode, Balanset-1A can act as a vibration meter to give you overall vibration levels and even an FFT spectrum to diagnose issues. In balancing mode, it guides you through adding a trial weight and then calculates the exact correction weights needed to counteract the imbalance. The device supports both single-plane (static) and two-plane (dynamic) balancing, which covers the needs of virtually all centrifuge types. By using Balanset-1A, you can achieve precise balance in a short time, reducing vibration down to safe levels as per ISO standards.
Importantly, on-site balancing with a portable device like this means minimal downtime — you don’t have to uninstall the rotor or wait days for an external service. This saves your operation time and money. Many maintenance teams and service engineers keep such a balancer on hand because it turns a potentially complicated repair (sending out a rotor) into a routine maintenance task that can be done in-house.


How to Balance a Centrifuge: Start With Load Symmetry
Before reaching for instruments, most centrifuge vibration is solved by balancing the load itself. The goal is simple: keep mass symmetric about the rotor’s pivotal axis so the centrifugal force generated at full revolutions per minute (RPM) is equal on every side.
- Use an even number of tubes. Load opposing positions in pairs so the number of tubes is balanced across the rotor — never spin a single tube alone.
- Match weights, not just counts. Fill opposing buckets to the same mass (to ~0.1 g). For an odd sample, add a water-filled balance tube of equal weight in the opposite position.
- Respect the rotor type. In a swinging bucket rotor, place loaded buckets directly opposite each other; in a fixed-angle rotor, distribute tubes symmetrically around the axis.
- Keep the centre of mass on the pivotal axis. Any offset becomes centrifugal force that grows with the square of the RPM — the faster you spin, the worse a small imbalance gets.
If smooth, symmetric loading still leaves noticeable vibration, the rotor itself has residual imbalance — and that is where dynamic balancing with the Balanset-1A comes in, as shown next.
How to Balance an Industrial Centrifuge Rotor (Step-by-Step)
Let’s walk through the balancing process. We’ll outline the steps to diagnose and balance a centrifuge using the Balanset-1A device. Even if you have a different balancer or just want to understand the procedure, these steps will give you a clear picture of how rotor balancing is done. The procedure consists of two parts: pre-balancing inspection (to ensure nothing else is wrong with the machine) and the dynamic balancing process itself. Always remember to follow safety protocols: work with the machine stopped whenever attaching weights or sensors, and wear appropriate protective equipment (such as eye protection and ensure the centrifuge’s protective lid or enclosure is in place during test runs).
Pre-Balancing Inspection and Preparation
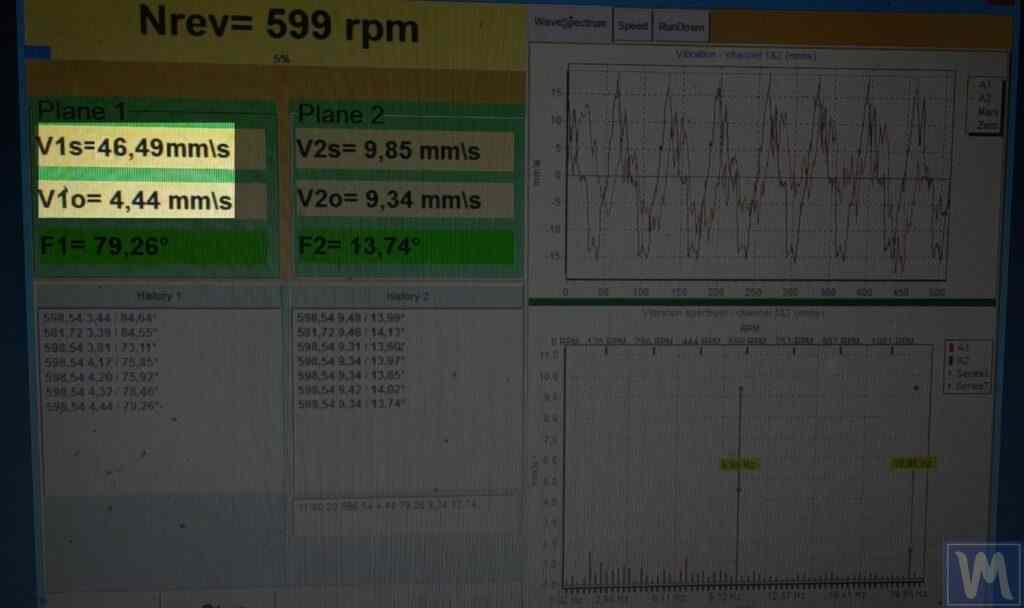
- Measure the current vibration (Baseline): Start by measuring the centrifuge’s vibration levels in its normal running state. Using Balanset-1A in vibrometer mode (or any vibration meter), record the overall vibration amplitude. Also note the vibration at the running speed (the 1× rotational component, which Balanset-1A can isolate). This will tell you how severe the imbalance is. For example, if your overall vibration is, say, 6 mm/s RMS and mostly coming from the 1× component, that’s a clear sign of imbalance.
- Compare overall vs. rotational vibration: Check the ratio of the total overall vibration to the vibration at the rotation frequency. If these values are almost the same, it means most of the vibration is due to rotor imbalance (which is good news—you can fix that by balancing). If the overall vibration is much higher than the rotational component, there might be other vibration sources (like a misaligned motor, resonance, or something loose). In our example, if 6 mm/s overall equals ~5.5 mm/s at 1×, imbalance is the primary issue. But if overall was 10 mm/s while 1× is 3 mm/s, something else might be adding vibration.
- Inspect the centrifuge mechanism: Before adding weights and doing the balance, examine the machine for any mechanical issues:
- Bearings condition: Check for bearing wear or play. A bad bearing can cause extra vibration and must be replaced; balancing the rotor won’t fix a ruined bearing.
- Mounting and supports: Ensure the centrifuge is firmly bolted down and that dampers or mounts are intact. Any looseness here can mimic imbalance vibrations.
- Rotor clearance: Spin the rotor by hand (with power off) to verify it doesn’t rub against any stationary parts. Sometimes a slight contact or scraping can cause high vibration when running.
- Consistency of readings: When measuring vibration in step 1, did the readings remain stable (within 10-15%) each time? Large fluctuations could indicate intermittent issues like an electrical fault or a component shifting. Stability of vibration readings means you can proceed confidently with balancing.
- Preparation for balancing: If no significant non-balance problems are found above, prepare for the balancing job. This includes cleaning the rotor (remove any dirt, dried product, or grease that could affect balance), and making sure you have access to the rotor to attach weights. Mark reference points on the rotor (many use a piece of reflective tape or chalk mark as the 0° reference for phase measurements). Set up the Balanset-1A device, laptop, and ensure you can safely run the centrifuge at speed for testing. At this stage, you’re ready to start the actual balancing procedure.
Important: Thoroughly clean the rotor and interior of the centrifuge before balancing. Even small residues can create slight imbalances or fall off during the process, skewing your results. Also, always double-check that all components (like the bowl, lid, or any filter insert) are properly installed and secured according to the manufacturer’s guidelines before you begin.
By taking these preparatory steps, you ensure that:
- You’re addressing the right problem (true imbalance versus another fault).
- The centrifuge is mechanically sound enough to be balanced (balancing a damaged machine is ineffective).
- Your balancing measurements will be accurate (no dirt clumps or loose parts to throw them off).
Dynamic Balancing Procedure with Balanset-1A
- Install the vibration sensors: Attach the Balanset-1A accelerometer sensors to the centrifuge. Typically, you mount one sensor on or near the front bearing housing and one on the rear bearing housing (for two-plane balancing). The sensors should be firmly fixed (usually magnetically or with studs) perpendicular to the rotor’s axis. This placement allows them to pick up vibrations effectively. Ensure the sensor cables are secured out of the way of any moving parts.
- Attach a reflective reference mark: Place a strip of reflective tape or paint a small mark on the rotor (or the rotating basket/drum) to serve as a reference point for the tachometer. This mark will let the Balanset-1A’s optical sensor detect the rotational speed and phase angle of the imbalance.
- Set up the tachometer (optical sensor): Position the Balanset-1A’s laser tachometer so that it has a clear view of the reflective mark on the rotor each time it spins around. A magnetic stand can help hold the sensor steady. Make sure the distance and angle are per the sensor’s specifications (usually a few inches away, directly facing the mark). When properly set, you should get a consistent RPM reading when the rotor spins.
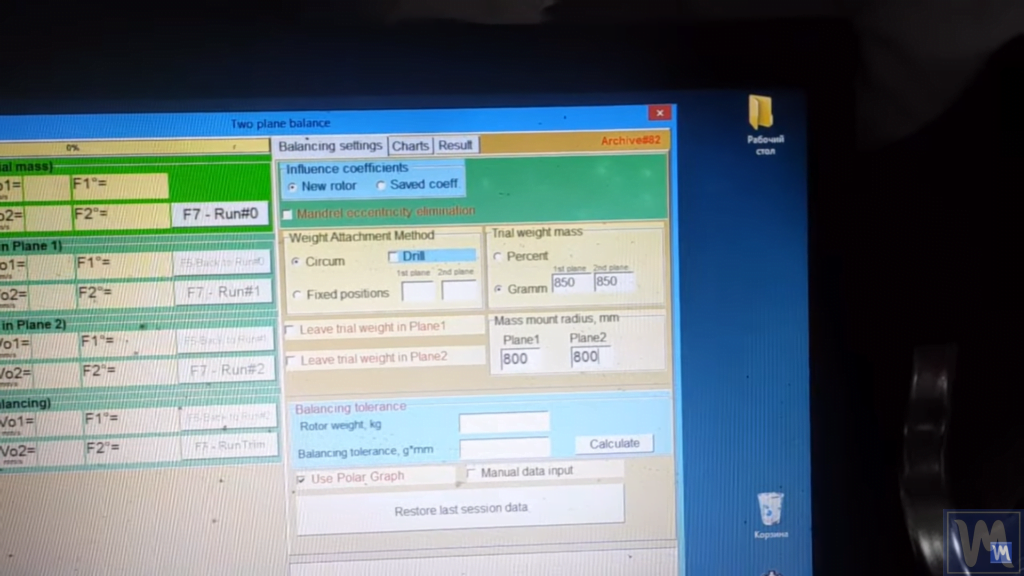
- Connect and configure the equipment: Plug the vibration sensors and tachometer into the Balanset-1A interface (which in turn connects to your laptop via USB). Launch the Balanset software and input initial data: select a two-plane balancing mode (since centrifuges usually need it), and enter the rotor details like the radius where you can add weights, and the weight of the “trial” mass you plan to use. Also, set the machine’s running speed if needed and ensure the device is reading vibrations and RPM correctly in the software.
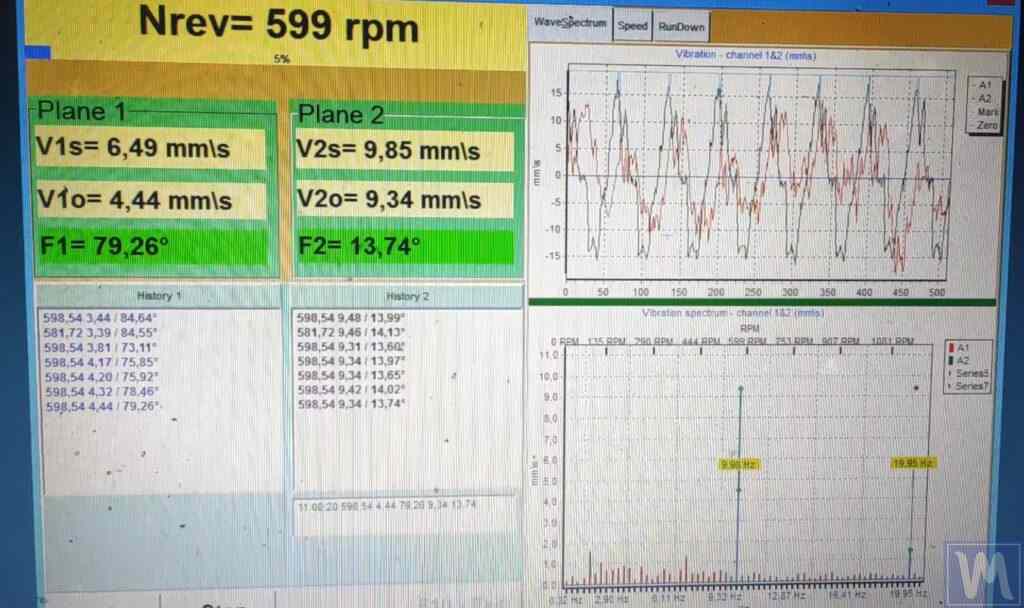
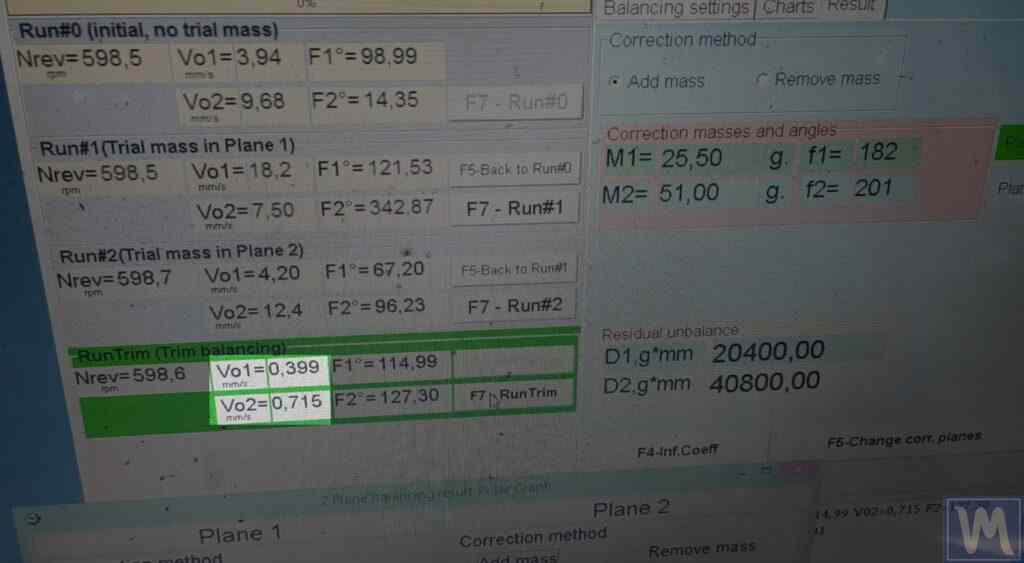
- Start the balancing program: With everything connected, you’re ready to begin measurements. In the software, proceed to take an initial measurement (often called the trim or baseline run). You will run the centrifuge up to its normal operating speed. The Balanset-1A will record the initial vibration amplitude and phase angle on each sensor (each plane). This is our “before” snapshot of imbalance.
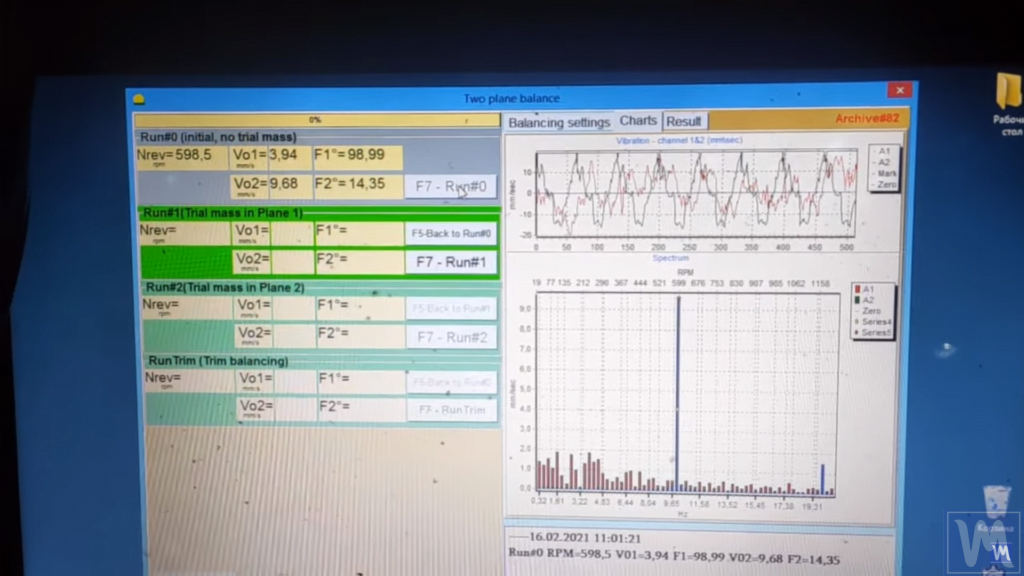
- Select the balancing mode: Ensure the software knows you’ll be doing a dynamic (two-plane) balance. This might have been set in step 4, but double-check. In two-plane mode, the device will expect you to do two test runs with a trial weight (one for each correction plane). It will also typically prompt you for any alignment or calibration needed (for example, confirming the sensor orientation or phase reference).
- Enter data for the trial weight: Choose a suitable trial weight (for example, a small bolt or weight of known mass, perhaps a few hundred grams, depending on rotor size). The software will ask for this weight’s value. Enter the exact weight (and sometimes the radius at which it will be attached, if the software requires that). This information is crucial because the balancing program uses it to calculate how big of an effect that weight has on vibration.
- Attach the trial weight on the first plane: With the centrifuge stopped and power isolated, attach your trial weight to the rotor at the location designated as plane 1 (for example, the front end of the rotor). Secure it at a known angle – many balancers suggest starting at 0° (aligned with your reflective mark) for consistency. Make sure the weight is fastened firmly so it won’t fly off when spinning.
- Restart the centrifuge and measure vibration with the trial weight: Power up the machine again and let it reach the same speed as before. Now the imbalance of the rotor has changed due to the added weight. The Balanset-1A will measure the new vibration amplitudes and phase angles. Typically, you will observe a change in one or both sensors’ readings. Once the data is collected, stop the centrifuge. Input or verify in the software what angle you placed the trial weight at (if the system requires manual input—some systems track phase automatically).
- Move the trial weight to the second plane: Remove the trial weight from plane 1 and now attach it to plane 2 (for example, the opposite end of the rotor). Again, put it at the same angle position (0° reference) on that end if possible. This consistency makes calculations easier. Ensure it’s secure.
- Run the centrifuge with trial weight on plane 2: Start the machine once more and let it stabilize at operating speed. The Balanset-1A will take another set of readings, now reflecting how the trial weight influences the second plane. After obtaining this data, stop the centrifuge. At this point, the device has information on how a known weight affects vibration in both correction planes.
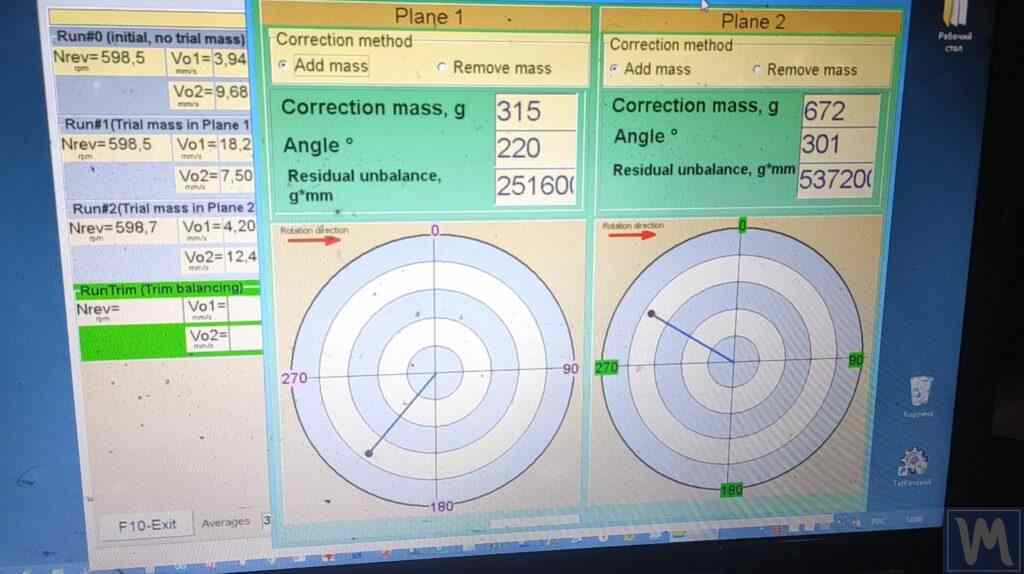
- Calculating the correction weights: The Balanset software will now compute the required correction weights and their angular positions for each plane. Essentially, it’s solving for how much counter-mass is needed to neutralize the heavy spots. The output might say, for example, “Plane 1: 50 grams at 135°, Plane 2: 60 grams at 270°” (just as an illustration). These are the weights you will need to add to balance the rotor. Remove the trial weight (don’t forget this step — leaving it on will mess up the balance!).
- Prepare and install the compensating weights: Now take the actual correction weights as calculated (you might use bolts, washers, or dedicated balancing weights) and attach them to the rotor. If the rotor has pre-drilled holes or a balancing ring, use those. Otherwise, you may have to secure weights by clamping or welding (depending on the rotor design and permanent balance correction method). The key is to place the specified mass at the exact angular location indicated. Use a protractor or the device’s built-in angle guide to get the positions right relative to your reference mark.
- Test run (verification): Once the new weights are in place, it’s time for the moment of truth. Run the centrifuge up to speed again and measure the vibration with the Balanset-1A. If everything was done correctly, you should see a dramatic reduction in vibration amplitude on both planes. Ideally, the residual imbalance is very low (the machine might even “purr”). Check that the vibration level now falls within acceptable standards (for instance, below your company’s specified mm/s threshold or within ISO balance quality grade for that rotor type). If the vibration is still a bit above target, the software may allow a fine-tuning run — but usually one round is enough for a significant improvement. Also, listen and feel: the centrifuge should sound and feel much smoother. Finally, make sure all added weights are firmly secured for continuous operation.
Conclusion: Smooth Operation and Lasting Benefits
Balancing a centrifuge rotor is not just an academic exercise – it directly translates into tangible benefits for your operation. By eliminating the excessive vibrations, you:
- Ensure reliability: A balanced centrifuge runs smoothly without shaking itself apart, leading to far fewer unexpected breakdowns. This means more uptime and a stable production process.
- Extend equipment life: With reduced vibration, critical components like bearings and seals last longer. The machine as a whole experiences less stress, which can add years to its service life.
- Improve quality and accuracy: When the centrifuge isn’t fighting imbalance, it does its job – separating or processing materials – more precisely. You get better product consistency, whether that’s drier output from a dewatering centrifuge or more uniform separation in a chemical process.
- Reduce noise levels: A well-balanced centrifuge purrs instead of rattling. The working environment becomes quieter and safer for everyone around. Operators will appreciate the difference in sound and vibration exposure.
- Enhance safety: You eliminate the risk of catastrophic failures due to imbalance. There’s much less chance of a vibration-related accident, protecting both personnel and surrounding equipment.
- Save money and time: Fewer repairs, less downtime, and more efficient operation all contribute to cost savings. Balancing is a preventive measure that costs far less than the emergencies it averts. On-site balancing with a device like Balanset-1A means you can address issues quickly, without long halts in production.
Call to action: Don’t let an unbalanced centrifuge undermine your work. If you’ve noticed vibration issues, take action by scheduling a balancing check. With tools like the Balanset-1A, the solution can be quick and effective, keeping your facility running at its best. Whether you choose to balance in-house or call in a specialist, the key is not to ignore the warning signs of vibration.
The Balanset-1A device makes the whole process accessible, even to those without a deep background in vibration analysis. It’s like having an expert by your side, guiding you through each step to achieve a smooth rotor. For engineers and maintenance teams in the field, this means problems get solved faster and production keeps moving.
Remember: Balanced machinery is the backbone of efficient and safe industrial operations. By applying the principles and steps outlined in this guide, you can ensure your centrifuges (and other rotating equipment) stay in peak condition.
The Balanset-1A: your reliable assistant in ensuring uninterrupted operation and longevity of your centrifuge. Embrace proactive maintenance and enjoy the peace of mind that comes with equipment that runs smoothly and efficiently.

0 Comments