How to Balance an Industrial Centrifuge: Step-by-Step Guide and Common Mistakes to Avoid
Have you ever seen a centrifuge shake like it’s about to launch into orbit? In industrial settings, an unbalanced centrifuge can cause intense vibration, leading to costly downtime, safety hazards, and product losses. We recently witnessed this at a home textile factory producing down pillows and blankets: one high-speed centrifuge was vibrating violently, threatening to halt production. The solution was clear – once the rotor was properly balanced, the vibration levels dropped more than tenfold, and the machine ran smoothly again.
In this comprehensive guide, we’ll walk you through how to perform field balancing on an industrial centrifuge to eliminate excessive vibrations. You’ll learn how to diagnose the cause of the vibration, execute a step-by-step balancing procedure, and avoid the common pitfalls that engineers often encounter. By the end, you should be able to confidently balance a centrifuge rotor, ensuring it operates reliably, saves maintenance time, and prevents costly breakdowns.
- Diagnosing vibration issues: How to tell if rotor imbalance is the main cause of vibration or if other mechanical issues are at play.
- Step-by-step balancing process: A detailed procedure for balancing the centrifuge rotor in the field using test weights and vibration measurements.
- Common mistakes to avoid: Six frequent errors in centrifuge balancing (like balancing a dirty machine) and how to prevent them.
- Pro tips for reliability: Important advice on cleaning, weight selection, safety precautions, and using advanced diagnostic tools to keep your centrifuge running smoothly.


Why Proper Balancing of a Centrifuge Matters
An out-of-balance centrifuge isn’t just a minor inconvenience – it’s a serious problem that can impact your operation’s time, money, reliability, and quality. When a rotor is unbalanced at thousands of RPM, even a tiny weight discrepancy can generate huge forces. (For example, a 2 gram imbalance at about 4,600 RPM can exert a force equivalent to roughly 9 kg!) These forces shake the machine, which can lead to:
- Excessive wear and damage: Bearings, seals, and other components wear out faster. In extreme cases, parts can break, leading to expensive repairs or even total machine failure.
- Unplanned downtime: Vibrations can trigger safety sensors or force shutdowns. Every hour of unexpected downtime means lost production and increased costs.
- Safety risks: Severe vibration increases the risk of a catastrophic failure. A loose part or weight could turn into a dangerous projectile, endangering personnel and equipment.
- Poor performance: The centrifuge may not achieve optimal separation or throughput if it can’t run at full speed due to vibration. Product quality could suffer, or processes take longer.
By balancing the centrifuge properly, you ensure smoother operation. This extends the machine’s lifespan (improving reliability), minimizes breakdowns and maintenance costs, and keeps the work environment safe. In short, balancing is critical for keeping your production efficient and trouble-free.
Diagnosing the Vibration: Pre-Balancing Checks
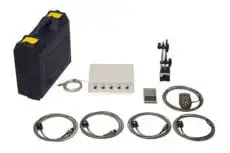
Before jumping straight into adding weights, it’s important to verify that imbalance is indeed the main cause of the vibration. Modern vibration analyzers (or balancing instruments like the Balanset-1A) often have a vibrometer mode or spectrum analysis mode to help with this diagnosis.
Check Vibration Components
Run the centrifuge (empty) at operating speed and observe the vibration readings. Pay attention to the overall vibration level and the component at the rotational speed (often called the 1× or reverse component).
- If the vibration at 1× is nearly equal to the total vibration level, it strongly indicates that rotor unbalance is the primary cause of the vibration. In this case, proceeding with balancing is the right approach.
- If the total vibration is much higher than the 1× component (for example, if there are significant vibrations at other frequencies), then something else may be wrong besides just imbalance.
Inspect for Other Mechanical Issues
If the vibration isn’t mostly coming from unbalance, you should inspect the centrifuge for mechanical problems before attempting to balance the rotor. Look for common issues such as:
- Worn or damaged bearings: Bad bearings can cause excess vibration and must be replaced or repaired first.
- Loose foundation or mounts: Ensure the centrifuge is firmly secured to its foundation or base. Loose hold-down bolts or a weak support structure can amplify vibrations.
- Rotor contact or rubbing: Check that no part of the rotor is scraping or hitting stationary parts (like the housing) during rotation.
Stability of Vibration Readings
Also, observe the stability of the vibration measurements. In vibrometer mode, the amplitude and phase angle readings should be relatively steady (fluctuating by no more than about 10–15%). If the readings are jumping around more than that, it could indicate intermittent issues like loose components or even structural resonance. You’ll want to address those issues or choose a stable measurement speed before proceeding.
Bottom line: Only once you’re confident that the centrifuge is mechanically sound (aside from imbalance) and that the vibration is primarily due to rotor unbalance, should you move on to the balancing process.
How to Balance an Industrial Centrifuge (Step-by-Step)
Now we’ll get into the core of the matter: performing a field balance of the centrifuge rotor. Make sure the centrifuge is clean and empty before you start. The basic idea is to measure the current vibration, add a known test weight to figure out the imbalance, and then add correction weights to counteract the imbalance. Follow these steps:
- Start the balancing program: Using your balancing instrument or the centrifuge’s control panel, initiate the balancing mode or program. (On some devices, this might be a special "Balance" menu or software mode.) Ensure that the centrifuge is running at the proper speed for balancing – typically its normal operating speed or a specified test speed. This will be the speed at which you take all measurements.
- Measure initial vibration (baseline): Let the centrifuge run without any test weights and observe the vibration readings in the balancing software (or vibrometer). Record the initial vibration amplitude and phase for each sensor/plane. For example, during our test, the baseline vibration levels were about 4.44 mm/s on Plane 1 and 9.34 mm/s on Plane 2. These baseline values give you a starting point and will later be used to gauge improvement.
- Enter rotor information (if applicable): Many balancing systems allow you to input details like the rotor’s name or ID, the machine location, and parameters for test weights. If your system asks for the test weight mass and the radius at which it will be mounted, enter those values (if you plan to use the software’s help in calculating the imbalance in units like gram-millimeters). This step helps generate a report and do unit conversions but isn’t strictly necessary for balancing – you can skip it if not needed.
- Perform a test run with a trial weight on Plane 1: Stop the machine and attach a small trial weight to the rotor on the first correction plane (the plane where sensor 1 is monitoring). Mark the position where you add this weight (many balancers use an angle reference, often zero degrees at that mark). The trial weight should be modest – enough to visibly change the vibration, but not so heavy that it could damage the machine at speed. Resume running the centrifuge and let it reach speed. Measure the vibration amplitude and phase again. Ideally, the vibration should change by at least 20% (either in magnitude or the phase shifting) upon adding this weight. A noticeable change confirms that the weight is influencing the vibration, which is necessary for the calculations.
- Move the trial weight to Plane 2 and test again: Power down and safely relocate the same trial weight (or a weight of equal mass) to the second correction plane (where sensor 2 is located). Make sure to place it at the reference angle position on that plane (e.g., align it with the same zero-degree mark if possible). Run the centrifuge up to speed once more and record the vibration data for this configuration. Now you have two sets of data: one from the trial weight on Plane 1 and one from Plane 2.
- Calculate the required correction: With the baseline data and the two trial-run measurements, the balancing instrument or software can now compute the amount of imbalance and suggest correction weights. Essentially, the system is solving for how much weight and at what angle on each plane will counteract the measured imbalance. It will output recommendations, for example: “Add X grams at Y° on Plane 1, and Z grams at W° on Plane 2.” If you performed the earlier step of entering the trial weight mass and radius, the program will use that to give the correction mass directly. Otherwise, it might give the result in terms of imbalance (gram-millimeters) that you need to translate into a weight placement.
- Attach the correction weights: Once you have the recommended corrections, turn off and lock out the centrifuge (you must never add weights while the machine is running). Affix the specified correction weights on each rotor plane at the angles given by the balancer. Use a secure method – typically, weights are welded or bolted onto the rotor. (In our case at the factory, we welded the weights to ensure they stay in place at high speed.) Remember that the angle is usually measured from the reference point (where you put the trial weight initially) in the direction of rotation (the instrument should clarify how it defines 0° and the angle direction).
- Verify the results (final run): Remove any trial weights still on the rotor, double-check that all tools or loose items are cleared away, and run the centrifuge one more time at the balancing speed. Check the vibration readings now. They should be much lower than the initial baseline. In our example, after adding the calculated correction weights, the vibrations dropped to about 0.399 mm/s on Plane 1 and 0.715 mm/s on Plane 2 – more than a tenfold reduction from the start. This confirmed that the balancing was successful. If your vibration levels are now within acceptable limits (often set by machine standards or your company’s criteria), you’re done! If not, the process might need to be repeated or fine-tuned, but usually one iteration is sufficient if done correctly.
At this point, the centrifuge rotor should be well-balanced. You’ll notice the difference immediately: smoother operation, less noise, and no excessive shaking. Always document the final vibration levels and any weights added, as this information is useful for maintenance records and future monitoring.
6 Common Mistakes in Balancing Industrial Centrifuges (and How to Avoid Them)
Even with a solid understanding of the balancing procedure, there are pitfalls that technicians and engineers can fall into. Balancing industrial centrifuges poses unique challenges – these machines often run at very high speeds and deal with heavy process materials, which means mistakes can be costly or dangerous. Here are six common errors people make when balancing centrifuge rotors, and how you can avoid each of them:
-
Attempting to balance a centrifuge that’s dirty or faulty. This is the number one mistake with centrifuges. Unlike a simple fan or motor rotor, an industrial centrifuge’s vibration is usually dominated by process-related imbalance – meaning the uneven distribution of product (like slurry, solids, etc.) inside the machine. If the rotor is dirty or caked with material, that buildup is likely causing most of the vibration. In such a case, trying to “balance” the rotor by adding weights is just fighting the symptom, not the cause. Furthermore, if the machine has a serious mechanical fault (bad bearings, etc.), balancing won’t help.
Advice: Always thoroughly clean the centrifuge before attempting any balancing. Remove all product residue, deposits, and dirt from the rotor bowl or basket. Once it’s clean (and any mechanical fixes are done), take fresh vibration readings – you might find the vibration is already much lower. Only then, if there is still significant vibration, proceed with balancing the empty rotor. Also, double-check the health of the bearings and the sturdiness of the foundation. High vibration can quickly reveal and worsen any pre-existing issues in those areas, so it’s best to have the machine in good shape before balancing.
-
Assuming balancing will permanently eliminate all vibration. Many beginners expect that once you’ve balanced the centrifuge, it will run vibration-free forever. The reality is that there are two types of unbalance in a centrifuge: (1) the inherent mechanical (residual) unbalance of the rotor itself, and (2) the ongoing process unbalance caused by the product. Balancing in the field corrects only the mechanical unbalance of the empty rotor. It does not prevent vibration caused by uneven loading or buildup during operation.
Advice: Understand the difference between mechanical vs. process unbalance. Your goal in field balancing is to make the rotor as mechanically balanced as possible when it’s clean and empty. This will improve reliability and reduce baseline vibration. However, when the centrifuge is in use, material will inevitably get slightly uneven (for example, cake sticking to the bowl), causing some vibration again. Regular cleaning schedules and operating procedures are still needed. In short, balancing the rotor improves performance and extends the machine’s life (because it can handle the process-induced forces better), but it isn’t a one-time cure for all vibration forever.
-
Using an inappropriate trial weight (too heavy or too light). Choosing the right trial weight is critical. If the test weight is too small, it might not produce a measurable change in vibration, and you’ll struggle to get useful data. If it’s too large, especially on a high-speed centrifuge, it could overstress the machine or even cause damage (imagine slapping a big weight on a rotor spinning thousands of RPM – the centrifugal force is enormous). It’s a delicate balance to get a weight that’s effective but safe.
Advice: Err on the side of caution and start with a small trial weight. You can always run multiple trial runs, gradually increasing the weight until you see a clear 20–30% change in vibration. This incremental approach is much safer than risking an oversized weight from the outset. Use available resources to guide your choice: for example, you can use an online trial weight calculator to get a rough estimate of a suitable weight based on rotor mass and speed. Keep in mind how high the centrifugal forces are – better to take a few extra runs than to throw a huge weight and cause a catastrophe.
-
Balancing under changing or improper conditions. A common mistake is trying to balance the centrifuge under unstable conditions – for instance, while it’s processing material, or at varying speeds. If product is moving or being fed in and out, the vibration will keep changing and make your balancing data invalid. Another aspect is temperature and operating conditions: if the machine’s behavior changes when it’s hot versus cold, that can affect balancing too.
Advice: Always perform balancing in a controlled, consistent state. The centrifuge should be empty (as mentioned earlier) and run at a steady speed for all measurements – typically its normal operating RPM or a specified balance speed that avoids any critical resonances. Do not attempt balancing during production cycles; pause the process or isolate the machine. If the centrifuge’s characteristics change with temperature (for example, clearances might be tighter when cold), you might want to warm it up to operating temperature before taking measurements, so that you’re balancing it in the true operating state. Consistency is key for accurate balancing results.
-
Not securing correction weights properly. Imagine going through the whole balancing procedure, only to have a correction weight fly off when the centrifuge is back in operation. On a typical fan, a thrown weight might just drop inside the casing; but on an industrial centrifuge, a loose weight becomes a high-speed projectile. It can severely damage the machine’s casing or, worse, injure someone nearby. Using flimsy methods to attach weights (like tape, glue, or inadequate clamps) or not following the proper mounting procedure is extremely dangerous.
Advice: Safety first! Use only approved methods to attach weights, and ensure they are very secure. The best practice is to weld or bolt weights onto the rotor at designated balance correction spots (many industrial centrifuges have specific areas on the rotor where you can add weight). Never use temporary attachments such as wax, clay, or tape for test weights at full operating speed – if you need to use those for a low-speed trial, that’s one thing, but remove them before spinning up. Always double-check that all weights (and fasteners) are tight and won’t come loose. It’s also wise to stand clear of the "plane of rotation" (equatorial plane of the rotor) when running the machine at speed during tests, just as an extra precaution.
-
Ignoring the diagnostic tools beyond basic balancing. Modern balancing equipment can do more than just tell you where to put weights. If you don’t take advantage of features like spectral analysis or coast-down testing, you might miss important clues. For example, a high 1× vibration suggests imbalance, but if there are also peaks at other frequencies (like 2×, 3×, or non-synchronous frequencies), those could indicate misalignment, looseness, or resonance issues. If you focus only on balancing without diagnosing these, you might leave a deeper problem unaddressed.
Advice: Leverage the full capability of your vibration analysis tools. After balancing, or even during the diagnostic phase, check the vibration spectrum. A properly balanced rotor will have the dominant vibration at 1× (running speed) and very low levels at other frequencies. If you see significant peaks elsewhere, investigate those – you might have a bearing defect (often a higher-frequency vibration), a structural resonance (vibration spikes at certain speeds), or other mechanical issues. Perform a coast-down (run-down) test if your device allows: as the centrifuge decelerates, watch for any spikes in vibration at specific speeds – those indicate critical speeds or resonant frequencies of the system. Knowing these can help you avoid taking measurements exactly at those speeds (where the data would be skewed) and also inform you about operating speeds to avoid or reinforce. In summary, use spectral and run-down analysis to ensure you really are dealing with a simple imbalance and to confirm that your balancing work has resolved the issue.
In conclusion: successfully balancing an industrial centrifuge requires a methodical approach and attention to detail. Always start with a clean, mechanically sound machine; then diagnose to confirm the issue is imbalance; and only then perform the balancing procedure carefully, with all safety measures in place. The payoff is worth it – your centrifuge will run with minimal vibration, which means less downtime, fewer repairs, and a safer environment. By avoiding the common mistakes above, you’ll save time and money while extending the life of your equipment.
Don’t wait until a vibration problem causes a crisis. Apply these practices during your regular maintenance, and monitor your centrifuge’s condition proactively. With proper balancing and maintenance, your centrifuge will keep spinning smoothly, delivering reliable performance for years to come. If you’re ever unsure, consult with vibration analysis experts or reach out to the equipment manufacturer – it’s always better to get professional guidance than to guess when it comes to high-speed machinery. Happy balancing!
Frequently Asked Questions
Why must a centrifuge be thoroughly cleaned before balancing?
An unclean centrifuge often has product residue stuck to the rotor, which causes most of the vibration. If you try to balance the rotor without cleaning, you’re only compensating for that temporary buildup. The moment the process changes or you clean the machine later, the balance will be off again. Therefore, you should always clean the rotor completely and fix any mechanical issues before balancing so that you’re addressing the true underlying imbalance of the rotor itself.
Does balancing an industrial centrifuge eliminate all vibration?
Balancing greatly reduces the vibration caused by the rotor’s inherent imbalance, so the centrifuge will run much smoother when empty. However, it doesn’t prevent vibration that comes from the process (for example, if material sticks to the bowl or isn’t evenly distributed). You will likely still see some vibration over time as the machine operates and gets dirty – which is why routine cleaning is important. In short, balancing fixes the rotor’s imbalance but can’t stop all vibration under operating conditions, especially if the process introduces new imbalance.
How do I choose a proper trial weight for balancing an industrial centrifuge?
You should start with a small trial weight and see how it affects the vibration. The rule of thumb is to aim for about a 20% change in vibration amplitude when the test weight is added. If you add a tiny weight and nothing changes, you can try a slightly larger one. The key is to increase gradually – don’t jump to a very heavy weight at once. Because centrifuges spin so fast, even a small weight creates a large force. Overshooting with a big weight can be dangerous. Using a calculation or a tool to estimate a reasonable weight (based on rotor size and speed) can be helpful, but always err on the side of caution.
Can a centrifuge be balanced while it contains product?
No – you should balance a centrifuge only when it’s empty (and preferably clean). If there’s product inside (like liquid or sludge), it will likely not be evenly distributed and will slosh or shift around, which means your vibration readings will keep changing. Any balance correction you do under those conditions will be unreliable. Always balance under stable conditions: empty rotor, constant speed, and no active processes going on.
How should corrective weights be attached to a centrifuge rotor safely?
Always attach correction weights very securely, using methods like welding or bolting as recommended by the centrifuge manufacturer. The weights should go in designated balance correction areas if the rotor has them. Temporary methods (glue, tape, putty) are not safe for full-speed operation – they can come off and cause serious damage or injury. After installing weights, do a slow test spin if possible to ensure everything holds, and never stand in line with the rotor’s plane while it’s spinning, just in case.
How can spectral analysis and coast-down tests help in centrifuge balancing?
Spectral analysis (looking at the vibration frequency spectrum) helps you confirm that the main issue is at the running speed (1×). If the spectrum shows a big peak at 1× RPM and not much else, that’s a good sign you’re mainly dealing with imbalance. If there are other peaks (like at 2× or random frequencies), it alerts you to potential other problems (like misalignment, looseness, or bearing issues) which balancing alone won’t fix. Coast-down tests (recording vibration as the machine slows down) can reveal resonant frequencies – if the centrifuge passes through a speed where it shakes a lot and then smooths out at the operating speed, that spike is a resonance. Knowing that, you might avoid doing measurements exactly at that troublesome speed, or you’ll be aware that the machine may always vibrate when passing through that range. Both tools essentially give you a deeper understanding of the machine’s behavior, so you can ensure you’re applying the right solution (and only balancing what truly needs balancing).