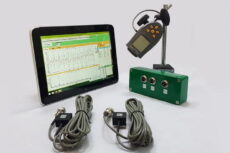
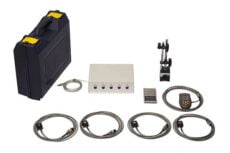
ISO 1940-1: Balance Quality Requirements for Rigid Rotors • Portable balancer, vibration analyzer "Balanset" for dynamic balancing crushers, fans, mulchers, augers on combines, shafts, centrifuges, turbines, and many others rotors ISO 1940-1: Balance Quality Requirements for Rigid Rotors • Portable balancer, vibration analyzer "Balanset" for dynamic balancing crushers, fans, mulchers, augers on combines, shafts, centrifuges, turbines, and many others rotors


ISO 1940-1: Balance Quality Requirements for Rigid Rotors


Analytical Report: In-depth Analysis of ISO 1940-1 “Balance Quality Requirements of Rigid Rotors” and Integration of Balanset-1A Measuring Systems into Vibration Diagnostics

Introduction

In modern engineering practice and industrial production, dynamic balancing of rotating equipment is a fundamental process that ensures reliability, service life, and safe operation of machinery. Unbalance of rotating masses is the most common source of harmful vibration, leading to accelerated wear of bearing assemblies, fatigue failure of foundations and casings, and increased noise. On a global scale, the standardization of balancing requirements plays a key role in unifying manufacturing processes and acceptance criteria for equipment.

The central document regulating these requirements for decades has been the international standard ISO 1940-1. Even though in recent years the industry has been gradually transitioning to the newer ISO 21940 series, the principles, physical models, and methodology embedded in ISO 1940-1 remain the foundation of engineering practice in balancing. Understanding the internal logic of this standard is essential not only for designers of rotors, but also for maintenance specialists who use modern portable balancing instruments such as Balanset-1A.

This report aims to provide an exhaustive, detailed analysis of each chapter of ISO 1940-1, to uncover the physical meaning of its formulas and tolerances, and to show how modern hardware–software systems (using Balanset-1A as an example) automate the application of the standard’s requirements, reducing human error and improving the accuracy of balancing procedures.

Chapter 1. Scope and Fundamental Concepts

The first chapter of the standard defines its scope and introduces a critically important distinction between types of rotors. ISO 1940-1 applies only to rotors in a constant (rigid) state. This definition is the cornerstone of the entire methodology, because the behavior of rigid and flexible rotors is fundamentally different.

Phenomenology of the Rigid Rotor

A rotor is classified as rigid if its elastic deformations under centrifugal forces in the entire range of operating speeds are negligibly small compared to the specified unbalance tolerances. In practical terms this means that the mass distribution of the rotor does not change significantly as the speed varies from zero to the maximum operating speed.

An important consequence of this definition is the invariance of balancing: a rotor balanced at a low speed (for example, on a balancing machine in a workshop) remains balanced at its operating speed in service. This allows balancing to be performed at speeds significantly lower than operating speed, which simplifies and reduces the cost of the process.

If a rotor operates in the supercritical region (at speeds above the first bending critical speed) or near resonance, it is subject to significant deflections. In this case the effective mass distribution depends on speed, and balancing performed at one speed may be ineffective or even harmful at another. Such rotors are referred to as flexible, and the requirements for them are set out in another standard — ISO 11342. ISO 1940-1 deliberately excludes flexible rotors and focuses only on rigid ones.

Exclusions and Limitations

The standard also clearly specifies what is outside its scope:

  • Rotors with changing geometry (for example, articulated shafts, helicopter blades).
  • Resonance phenomena in the rotor–support–foundation system, if they do not affect the classification of the rotor as rigid.
  • Aerodynamic and hydrodynamic forces that can cause vibration not directly related to mass distribution.

Thus, ISO 1940-1 focuses on inertial forces caused by the mismatch between the mass axis and the axis of rotation.

Chapter 2. Normative References

To ensure unambiguous interpretation of its requirements, ISO 1940-1 refers to a number of related standards. The key one is ISO 1925 “Mechanical vibration — Balancing — Vocabulary”. This document plays the role of a dictionary that fixes the semantics of the technical language. Without a common understanding of terms such as “principal inertia axis” or “couple unbalance”, effective communication between an equipment buyer and a balancing service provider is impossible.

Another important reference is ISO 21940-2 (formerly ISO 1940-2), which deals with balance errors. It analyzes methodological and instrumental errors arising during unbalance measurement and shows how to account for them when verifying that tolerances are met.

Chapter 3. Terms and Definitions

Understanding the terminology is a necessary condition for a deep analysis of the standard. This chapter gives strict physical definitions on which the later calculation logic is based.

3.1 Balancing

Balancing is the process of improving the mass distribution of a rotor so that it rotates in its bearings without generating unbalanced centrifugal forces that exceed permissible limits. It is an iterative procedure that includes measuring the initial state, calculating correction actions, and verifying the result.

3.2 Unbalance

Unbalance is the physical state of a rotor in which its principal central inertia axis does not coincide with the axis of rotation. This leads to centrifugal forces and moments that cause vibration in the supports. In vector form the unbalance U is defined as the product of the unbalanced mass m and its radial distance r from the axis of rotation (the eccentricity):

U = m · r

The SI unit is kilogram-meter (kg·m), but in balancing practice a more convenient unit is gram-millimeter (g·mm).

3.3 Specific Unbalance

Specific unbalance is a critically important concept for comparing balance quality of rotors with different masses. It is defined as the ratio of the principal unbalance vector U to the total mass of the rotor M:

e = U / M

This quantity has the dimension of length (usually expressed in micrometers, µm, or g·mm/kg) and physically represents the eccentricity of the rotor’s center of mass relative to the axis of rotation. Specific unbalance is the basis for classifying rotors into balance quality grades.

3.4 Types of Unbalance

The standard distinguishes several types of unbalance, each requiring its own correction strategy:

  • Static unbalance. The principal inertia axis is parallel to the axis of rotation but shifted from it. It can be corrected by a single weight in a single plane (through the center of mass). Typical for narrow, disc-like rotors.
  • Couple unbalance. The principal inertia axis passes through the center of mass but is inclined relative to the axis of rotation. The resultant unbalance vector is zero, but a couple (a pair of forces) tends to “tilt” the rotor. It can only be eliminated by two weights in different planes that create a compensating couple.
  • Dynamic unbalance. The most general case, representing a combination of static and couple unbalance. The principal inertia axis is neither parallel to nor intersecting the axis of rotation. Correction requires balancing in at least two planes.

Chapter 4. Pertinent Aspects of Balancing

This chapter elaborates on the geometric and vector representation of unbalance, and sets rules for selecting measurement and correction planes.

4.1 Vector Representation

Any unbalance of a rigid rotor can be mathematically reduced to two vectors located in two arbitrarily chosen planes perpendicular to the axis of rotation. This is the theoretical justification for two-plane balancing. The Balanset-1A instrument uses exactly this approach, solving a system of vector equations to calculate correction weights in planes 1 and 2.

4.2 Reference Planes and Correction Planes

The standard makes an important distinction between planes in which tolerances are specified and planes in which correction is performed.

Tolerance planes. These are usually the bearing planes (A and B). Here vibration and dynamic loads are most critical for machine reliability. Permissible unbalance Uper is normally specified relative to these planes.

Correction planes. These are the physically accessible locations on the rotor where material can be added or removed (by drilling, attaching weights, etc.). They may not coincide with the bearing planes.

The engineer’s (or balancing software’s) job is to convert permissible unbalance from the bearing planes into equivalent tolerances in the correction planes, taking rotor geometry into account. Errors at this stage can result in a rotor that is formally balanced in the correction planes, but produces unacceptable loads on the bearings.

4.3 Rotors Requiring One or Two Correction Planes

The standard offers recommendations on the number of planes required for balancing:

  • One plane. Sufficient for short rotors whose length is much smaller than the diameter (L/D < 0.5) and with negligible axial runout. In this case couple unbalance can be neglected. Examples: pulleys, narrow gears, fan wheels.
  • Two planes. Necessary for elongated rotors where couple unbalance can be significant. Examples: motor armatures, paper machine rolls, cardan shafts.

Chapter 5. Similarity Considerations

Chapter 5 explains the physical logic behind the G balance quality grades. Why are different unbalance limits required for a turbine versus a car wheel? The answer lies in analyzing stresses and loads.

Mass Similarity Law

For geometrically similar rotors operating under similar conditions, the permissible residual unbalance Uper is directly proportional to the rotor mass M:

Uper ∝ M

This means that the specific unbalance eper = Uper / M should be the same for such rotors. This allows unified requirements to be applied across machines of different sizes.

Speed Similarity Law

The centrifugal force F generated by unbalance is defined as:

F = M · e · Ω²

where Ω is the angular velocity.

To achieve the same bearing life and similar mechanical stress levels in rotors operating at different speeds, the centrifugal forces must remain within permissible limits. If we want the specific load to be constant, then when Ω increases the permissible eccentricity eper must decrease.

Theoretical and empirical studies have led to the relationship:

eper · Ω = const

The product of specific unbalance and angular speed has the dimension of linear velocity (mm/s). It characterizes the linear speed of the rotor’s center of mass around the axis of rotation. This value became the basis for the definition of G balance quality grades.

Chapter 6. Specification of Balance Tolerances

This is the most practically important chapter, describing methods for quantitatively determining balance tolerances. The standard suggests five methods, but the dominant one is based on the G quality grades system.

6.1 G Balance Quality Grades

ISO 1940-1 introduces a logarithmic scale of balance quality grades, designated by the letter G and a number. The number represents the maximum permissible velocity of the rotor’s center of mass in mm/s. The step between adjacent grades is a factor of 2.5.

The following table gives a detailed overview of the G grades with typical rotor types. This table is the main tool for selecting balance requirements in practice.

Table 1. ISO 1940-1 Balance Quality Grades (detailed)

G grade eper · Ω (mm/s) Typical rotor types Expert comment
G 4000 4000 Crankshafts of low-speed marine diesel engines on rigid foundations. Equipment with very loose requirements where vibration is absorbed by massive foundations.
G 1600 1600 Crankshafts of large two-stroke engines.
G 630 630 Crankshafts of large four-stroke engines; marine diesels on elastic mounts.
G 250 250 Crankshafts of high-speed diesel engines.
G 100 100 Complete engines of cars, trucks, locomotives. Typical grade for internal combustion engines.
G 40 40 Car wheels and rims, cardan shafts. Wheels are balanced relatively coarsely because the tire itself introduces significant variation.
G 16 16 Cardan shafts (special requirements); agricultural machinery; crusher components. Machines operating under heavy conditions but requiring reliability.
G 6.3 6.3 General industrial standard: fans, pumps, flywheels, ordinary electric motors, machine tools, paper machine rolls. The most common grade. If there are no special requirements, G 6.3 is typically used.
G 2.5 2.5 High-precision: gas and steam turbines, turbogenerators, compressors, electric motors (>80 mm center height, >950 rpm). Required for high-speed machines to prevent premature bearing damage.
G 1 1 Precision equipment: grinding spindle drives, tape recorders, small high-speed armatures. Requires especially accurate machines and conditions (cleanliness, low external vibration).
G 0.4 0.4 Ultra-precision equipment: gyroscopes, precision spindles, optical disk drives. Near the limit of conventional balancing; often requires balancing in the machine’s own bearings.

6.2 Method for Calculating Uper

The permissible residual unbalance Uper (in g·mm) is calculated from the G grade by the formula:

Uper = (9549 · G · M) / n

where:

  • G is the balance quality grade (mm/s), for example 6.3,
  • M is the rotor mass (kg),
  • n is the maximum operating speed (rpm),
  • 9549 is a unit conversion factor (derived from 1000 · 60 / 2π).

Example. Consider a fan rotor with mass M = 200 kg operating at n = 1500 rpm, with specified grade G 6.3.

Uper ≈ (9549 · 6.3 · 200) / 1500 ≈ 8021 g·mm

This is the total permissible residual unbalance for the rotor as a whole. It must then be allocated between the planes.

6.3 Graphical Method

The standard includes a logarithmic diagram (Figure 2 in ISO 1940-1) that relates rotational speed to permissible specific unbalance for each G grade. Using it, an engineer can quickly estimate requirements without calculations, by locating the intersection of rotor speed with the desired G grade line.

Chapter 7. Allocation of Permissible Residual Unbalance to Correction Planes

The Uper calculated in Chapter 6 applies to the rotor’s center of mass. In practice, however, balancing is performed in two planes (typically near the bearings). Chapter 7 regulates how to split this overall tolerance between correction planes — a critically important stage where mistakes are common.

7.1 Symmetrical Rotors

For the simplest case of a symmetric rotor (center of mass exactly midway between the bearings and correction planes symmetric relative to it), the tolerance is split evenly:

Uper,L = Uper / 2
Uper,R = Uper / 2

7.2 Asymmetrical Rotors (Between-Bearing Rotors)

If the center of mass is shifted toward one bearing, the tolerance is allocated in proportion to the static reactions at the bearings (inversely proportional to distances).

Let L be the distance between the tolerance planes (bearings), a the distance from the center of mass to the left bearing, b to the right bearing.

Uper,left = Uper · (b / L)
Uper,right = Uper · (a / L)

Thus, the bearing that carries the greater static load is assigned a larger share of the unbalance tolerance.

7.3 Overhung and Narrow Rotors

This is the most complex case considered in the standard. For rotors with a significant overhung mass (for example, a pump impeller on a long shaft) or when the correction planes are close together (b < L/3), simple allocation is no longer adequate.

An unbalanced mass on an overhung portion creates a bending moment that loads both the near and far bearings. The standard introduces correction factors that tighten the tolerances.

For overhung rotors, tolerances should be recalculated through equivalent bearing reactions. Often this leads to a significantly lower permissible unbalance in the overhung plane compared to a between-bearing rotor of the same mass, to prevent excessive bearing loads.

Table 2. Comparative Analysis of Tolerance Allocation Methods

Rotor type Allocation method Features
Symmetrical 50% / 50% Simple, but rare in its pure form.
Asymmetrical Proportional to distances Accounts for center-of-mass shift. Main method for between-bearing shafts.
Overhung Moment-based reallocation Requires solving statics equations. Tolerances are often significantly reduced to protect the far bearing.
Narrow (b ≪ L) Separate static and couple limits Recommended to specify static unbalance and couple unbalance separately, as their effects on vibration differ.

Chapter 8. Balance Errors

This chapter moves from theory to reality. Even if the tolerance calculation is perfect, actual residual unbalance may exceed it due to errors in the process. ISO 1940-1 classifies these errors as:

  • Systematic errors: machine calibration inaccuracies, eccentric fixtures (mandrels, flanges), keyway effects (see ISO 8821).
  • Random errors: instrumentation noise, play in supports, variations in rotor seating and position during remounting.

The standard requires that the total measurement error not exceed a certain fraction of the tolerance (typically 10–15%). If errors are large, the working tolerance used in balancing must be tightened to ensure that the actual residual unbalance, including error, still satisfies the specified limit.

Chapters 9 and 10. Assembly and Verification

Chapter 9 warns that balancing individual components does not guarantee that the assembly will be balanced. Assembly errors, radial runout, and coupling eccentricity can negate careful component balancing. Final trim balancing of the fully assembled rotor is recommended.

Chapter 10 describes verification procedures. For legally valid confirmation of balance quality it is not enough to print a balancing machine ticket. There must be a check that excludes machine errors — for example, an index test (rotating the rotor in relation to the supports) or use of trial weights. The Balanset-1A instrument can be used to perform such checks in the field, measuring residual vibration and comparing it with calculated ISO limits.

Integration of Balanset-1A into the ISO 1940-1 Ecosystem

The portable Balanset-1A instrument (produced by Vibromera) is a modern solution that allows field implementation of ISO 1940-1 requirements, often without disassembling the equipment (in-situ balancing).

1. Automation of ISO 1940-1 Calculations

One of the main obstacles to applying the standard is the complexity of the calculations in Chapters 6 and 7. Engineers often skip rigorous calculation and rely on intuition. Balanset-1A solves this via its built-in ISO 1940 tolerance calculator.

Workflow: the user enters rotor mass, operating speed, and selects a G grade from a list.

Result: the software immediately calculates Uper and, most importantly, automatically distributes it between correction planes (Plane 1 and Plane 2), taking into account the rotor geometry (radii, distances). This eliminates human error in dealing with asymmetric and overhung rotors.

2. Compliance with Metrological Requirements

According to its specifications, Balanset-1A provides vibration velocity measurement accuracy of ±5% and phase accuracy of ±1°. For grades G16 to G2.5 (fans, pumps, standard motors) this is more than sufficient for confident balancing.

For grade G1 (precision drives) the instrument is also applicable, but requires careful preparation (minimizing external vibrations, securing mounts, etc.).

The laser tachometer provides precise phase synchronization, which is critical for separating unbalance components in two-plane balancing, as described in Chapter 4 of the standard.

3. Balancing Procedure and Reporting

The instrument’s algorithm (trial weight / influence coefficient method) fully corresponds to the physics of a rigid rotor described in ISO 1940-1.

Typical sequence: measure initial vibration → install trial weight → measure → calculate correction mass and angle.

Verification (Chapter 10): after installing correction weights, the instrument performs a control measurement. The software compares the resulting residual unbalance with the ISO tolerance. If the condition Ures ≤ Uper is satisfied, the screen shows a confirmation.

Reporting: the F6 “Reports” function generates a detailed report including initial data, unbalance vectors, correction weights, and a conclusion on the achieved G grade (for example, “Balance Quality Grade G 6.3 achieved”). This transforms the instrument from a maintenance tool into a proper quality control tool suitable for formal handover to the customer.

Table 3. Summary: Implementation of ISO 1940-1 Requirements in Balanset-1A

ISO 1940-1 requirement Implementation in Balanset-1A Practical benefit
Determining tolerance (Chap. 6) Built-in G-grade calculator Instant calculation without manual formulas or charts.
Tolerance allocation (Chap. 7) Automatic allocation by geometry Accounts for asymmetry and overhung geometry.
Vector decomposition (Chap. 4) Vector diagrams and polar plots Visualizes unbalance; simplifies placement of correction weights.
Residual unbalance check (Chap. 10) Real-time comparison of Ures vs Uper Objective “pass/fail” assessment.
Documentation Automatic report generation Ready-made protocol for formal documentation of balance quality.

Conclusion

ISO 1940-1 is an indispensable tool for ensuring the quality of rotating equipment. Its solid physical basis (similarity laws, vector analysis) allows common criteria to be applied to very different machines. At the same time, the complexity of its provisions — particularly the allocation of tolerances — has long limited its exact application in field conditions.

The emergence of instruments such as Balanset-1A eliminates the gap between ISO theory and maintenance practice. By embedding the logic of the standard into a user-friendly interface, the instrument enables maintenance personnel to perform balancing at a world-class quality level, extending equipment life and reducing failure rates. With such tools, balancing becomes a precise, repeatable, and fully documented process rather than an “art” practiced by a few experts.


Official ISO Standard

For the complete official standard, visit: ISO 1940-1 on ISO Store

Note: The information provided above is an overview of the standard. For the complete official text with all technical specifications, detailed tables, formulas, and annexes, the full version must be purchased from ISO.


← Back to Main Index


Categories: GlossaryISO Standards

WhatsApp