ISO 5348: Kumikiza kwa Kimakanika kwa Accelerometer

ISO 5348 — “Vibration ya kimakanika na mgomo — Kumikiza kwa kimakanika kwa accelerometer” — ni moja ya kiwango cha muhimu zaidi ambacho mchambuzi wa vibration atakutumia kila wakati. Inakamatia kigezo ambacho kufanya kuondoa kwa karama inatawala ubora wa data: jinsi accelerometer imeambatanishwa kwa kimakanika kwa mashine. Kiwango kinaweka njia za kumikiza za njia nzuri, inaeleza jinsi kila moja inashughulikia frequency jibu la kipimo, na kuonyesha kwa nini uchaguzi mbaya unaweza kuanguka habari ya kiwango cha juu ambayo ulikuwa unatafuta. Kufuata mwongozo wake ni muhimu kwa ajili ya kusoma sahihi, kurudia — kwa karama lote wakati wa kufa kwa ajili ya matatizo ya kiwango cha juu katika kumimina na gear.
1. Kwa Nini Kifulanya ni Sehemu ya Senseni
Hekima kuu inayoendana na ISO 5348 ni kwamba njia ya kufunga si jamali kwa kipimo — ni is sehemu ya mfumo wa kipimo. Accelerometer iliyoandaliwa kwa uso inaunda mfumo mdogo wa chemchemi-uzani na muundo unapo chini yake, na mfumo huo una resonance yake binafsi, frequency ya resonance iliyofunga frequency ya resonance iliyofunga. Juu ya resonance hiyo kusoma hakuna kuaminika tena. Kufunga kigumu, kirefu, kilichoandaliwa vizuri kunasambaza resonance juu, kubukabukatuza beni mahitimu; kufunga kinene au mizani kubwa kunakuzuia resonance chini na kufanya kazi kama chuja ya ond-ond ya mitambo, kunaingia au kukuguta frequency ya juu vibration kabla haijawahi kufikia kioo. Unaweza kupitia ambapo kuzuia hicho kitafautiana kwa muundo fulani na programu ya kumradi frequency ya resonance ya kufunga accelerometer, ambayo inaifanya muapango kuwa mimi kabla hata kukamatia nukta moja. Kiwango cha mjinga njia inayotathmini kwa undani — ujinga, ungo, na kufunga kwa sumaku, kwa pamoja na probes zinazoshikiliwa — na inaiweka kila kitu kulingana na usabuni, uzani, maandaliko ya uso, na frequency ya juu kabisa ambayo data inabaki kuaminika.
2. Kufunga kwa Stadi — Njia ya Kumbukumbu
Kufunga kwa stadi kunawasilishwa kama mbinu bora, ya diraja la kumbukumbu. Shimo linaborifu ndani ya muundo wa mashine, lina thread, na stadi ya kufunga ya accelerometer ina screw moja kwa moja ndani yake. Kiwango kinabainisha kwamba uso wa kufunga lazima uwe safi, laini, na laini — na uso wa nukta ulichoinskania mahali nilichohajibu — na kwamba membran nyembamba ya silikooni grisi au kioevu sawa cha kuunganisha kutumwe kwa msingi wa senseni. Membran hiyo inajesha furaha ndogo ndogo ndogo za uso, kuongeza eneo la mawasiliano halisi, na kuboresha uhamaji wa nishati ya frequency juu.
Matokeo ni kufunga kigumu zaidi kinachowezekana na kwa sababu hiyo frequency ya resonance iliyofunga inayokososha zaidi, ambayo kwa upande wake inatoa beni la kipimo kinachoadhani zaidi, kupiga biashara na resonance ya kufunga yenyewe. Kufunga kwa stadi ni kiwango cha kupitia njia nyingine zinazotathminika, na ni uchaguzi tu unaokubaliwa kwa ukamaafuni wa kuaweza kwa muda mrefu, inayokaziwa maaridha ya frequency juu kama vile bearing and gear uchambuzi, na kwa senseni calibration.
3. Kufunga kwa Ungo — Chaguo Lenye Nguvu Lenye Muda Mfupi
Mahali pa kufanya shimo ndani ya mashine sio kazi rahisi au kukatazwa, ungos inatoa mbadala ya muda mfupi. ISO 5348 inabainisha kati ya aina za ungo. Kwa matokeo bora inataka ungo kigumu, kigumu — cyanoacrylate (“ungo la super”) au epoxy ya sehemu mbili — inayotumwa kama kidogo, kidogo sana, kiungo kigumu kati ya msingi wa senseni na uso wa mashine. Kanuni inayotawala ni usabuni: ungo lenye unene au laini kama vile kauciu ya silikoni hutenda kama dampener na kukataza sana jibu la frequency juu.
Iliyofanywa vizuri kwenye uso ulioandikelwa vizuri, kufunga kwa ungo kigumu kufikia eneo la frequency linayoshinda karibu na kufunga kwa stadi, inayoifanya kuwa mbadala inayoadhimika kwa kazi nyingi za utambuzi. Kiwango pia kinachukua ungopamba bases — pamba ndogo za chuma zilizounganishwa kwa mashine zinazotoa mahali endelevu kwa kuunga senseni ya kufunga kwa stadi, inayoohonda rahisi ya urusi na ubora inayotakwa kwa tahlili ya mwelekeo.
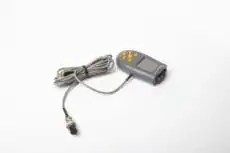
4. Kufunga kwa Sumaku — Rahisi ya Gharama
Misingi ya sumaku iko kila mahali katika njia nyingi, ukusanyaji wa taarifa wa njia kwa sababu ni haraka sana kutumia, lakini ISO 5348 ni wazi kwamba rahisi hii ina gharama halisi kwa ubora wa data. Kufunga kwa sumaku ni ndogo na ndogo kuliko kufunga kwa stadi au ungo, na sumaku yenyewe huongeza uzani mkubwa kwa muundo wa senseni. Usabuni mdogo unaounganishwa na uzani mkubwa unakuza frequency ya resonance iliyofunga kwa kasi, ambayo inakataza sana frequency ya juu inayowezekana ya kipimo.
Kiwango kinachukua wazi kwamba data ya frequency juu — kawaida juu ya kiasi cha 2,000 Hz — ilikusanywa kupitia sumaku mara kwa mara haiaminiki. Inatoa msaada wa vitendo kwa kupata kwa usahihi kwa sumaku: tumia sumaku nguvu, mbili-pole, hakikisha kuwa nyuso za mawasiliano safi kabisa na laini, na tumia shinikizo kali wakati wa kuandaa sumaku. Hata kwa hiyo, mtaalam lazima akubali beni ya juzuu; kwa kazi kuhusu majimaji au gins ya frequency juu, kufunga kwa stadi au ungo kinatarajiwa kwa bidii. Sumaku ni mbili inayohifadhiwa kwa usomi wa frequency ndogo kama vile unbalance and misalignment majaribio, ambapo masafa ya maslahi yanakaa salama chini ya resonanssi iliyopunguzwa.
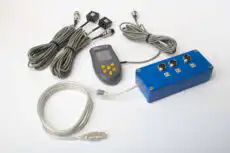
5. Probes za Mkono (“Stingers”)
Kiwango kinahusu probes za mkono — mara nyingi huitwa stingers — ambayo wakati mwingine hutumiwa kwa majaribio ya haraka au katika maeneo magumu, na kwa nguvu inakamatia kwa ajili ya kazi yoyote ya uchunguzi mkubwa. Mwili wa binadamu ni kichuja cha juu cha chini na damper yenye madhimira, na haiwezekani kubaki probe yenye shinikizo la thabiti au katika pembe kamili. Matokeo ni kurudia vibaya na majibu ya masafa mara nyingi sehemu ndogo kuliko 1,000 Hz. Probe inaweza kuthibitisha vibration kubwa na ya masafa chini kama vile hali mbaya ya kutokuwa na usawa, lakini hailingani kwa ajili ya kutegemeka trend analysis au kwa ajili ya kutambua vibrations vya masafa ya juu vya kumenyeka na kasoro za gia.
6. Mapango ya Uso na Kableski
Sehemu ya kumalizisha inatoa ushauri wa matendo unaotumika bila kugombana na njia. Uso wa kuweka lazima uandaliwe vizuri: sawa na laini iwezekanavyo, na rangi, kutu, na uchafu kuondolewa ili kuwe na uhusiano wa chuma kwa chuma (au chuma-kwa-muumba-kwa-chuma). Kwa kuweka kwa stud, mahali pa uso unapaswa kufanya chumvi haki ambapo uso hauko sawa kabisa.
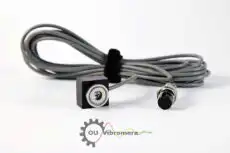
Kiwango pia ni imara sana kuhusu kableski. Kable lazima ifungwe vizuri kwenye muundo umbali mfupi kutoka kwa sensor. Hii inatoa mlangao wa mkazo kwa konekta na, muhimu zaidi, inapuuza mwendo wa kable: kable iliyoachwa kusimama wakati wa kipimo inaweza kutengeneza ishara ya umeme wa masafa chini yasiyo ya kawaida kupitia athari ya triboelectric, kunajisi ishara ya vibration halisi na kutengeneza data iliyokosa.
7. Dhana Nne Muhimu za Kuchukua
- Majibu ya masafa ni kila kitu: kuweka kinachofanya kazi kama kichuja cha mitambo. Kuweka kwa ubaya — sumaku, kwa mfano — kuongeza wingi na kuondoa kigumu, kutengeneza kichuja cha chini-pasi kinachogeuza vibrations ya masafa ya juu kabla ya kufikia sensor.
- Rigidity ni kuu: ili kuhamisha masafa ya juu kwa uaminifu, uhusiano kati ya sensor na mashine lazima uwe na kigumu na kakhafi iwezekanavyo — ambayo ni sababu sawa kwa nini kuweka kwa stud moja kwa moja kuzidi kila mbadala.
- Urahisishi unabadiliana na usahihi: kuweka sumaku ni haraka kwa kazi ya kupitia, lakini bendi linayotaka linakufa. Kwa uchanganuzi wa masafa ya juu ya kumenyeka au gia, chagua stud au muumba.
- Kurudia kulinda tabia: kutumia badii za kuweka zisizozaa kwa nafasi ya sensor inayorudia inahakikisha kwamba mabadiliko katika data yanaonyesha hali ya mashine, sio tofauti katika mbinu ya kipimo.
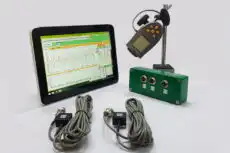
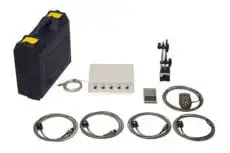
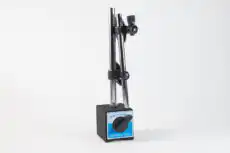
8. ISO 5348 katika Mazoezi yenye Kichumba Kikubwa
Kanuni hizi sio za akademia — zinaamua ikiwa kipimo cha uwanja kina maana. Kichumba kikubwa kwa chani mbili kama vile Balancet-1A kinatumiwa kwa ajili ya uchunguzi na kwa field balancing, na kanuni sawa ya kuweka sensor inatumika kwa kila kazi. Kwa ruteni kusawazisha ishara kuu ni mzunguko mmoja kwa kila mapinduzi running-speed sehemu — frequency ya chini ambayo hata kipaji cha sumaku cha safi kinakamata kwa uaminifu, ambayo ndio sababu magneti bado inakubali kabisa kwa uchunguzi wa kulipua. Lakini mara ishara inageuka kwenye bearing inayosadikiwa au kasusumali cha gear — ambapo nishati ya utambuzi iko kwa frequency ya juu — ISO 5348 inaagiza kupiga pua au kuweka adhesive kwa ngazi kwenye uso uliotayarishwa vizuri, na kebo iliyofungwa, ili maudhui ya frequency ya juu hayapotezi kwenye interface laini. Kuchagua kuweka sensor ili kulingana na frequencies unazotafuta ndiyo moyo wa vitendo wa kiwango, na inapanga asili na fahamu kutengeneza sensor kwa usahihi mbinu na sawa baseline takwimu kwa mwelekeo mrefu wa kuaminika.
9. Mahali ISO 5348 Panamo Kati ya Viwango Vinavyohusiana
ISO 5348 inataka jinsi unavyo attach sensor; viwango vya rafiki inataka jinsi unavyo judge kile kinachosomwa. Tathmini ya kiwango cha vibration ambayo hapo awali ilikuwa imegawanyika katikati ya ISO 10816 na ISO 2372 ya zamani sasa iko katika ISO 20816-1 mfululizo, na mipaka ya mashine ya viwanda katika ISO 20816-3. Takwimu ambazo tathmini hizo zinategemea zina uaminifuzi tu kwa njia ya kuweka sensor iliyokusanya — ambayo ndiyo sababu ISO 5348, isivyo na upinde kama inavyoonekana, inakaa katika msingi wa ufuatiliaji wa hali ya mashine.
