వైబ్రేషన్ మానిటరింగ్లో షాఫ్ట్ సెంటర్లైన్ను అర్థం చేసుకోవడం


యంత్ర పర్యవేక్షణలో ప్రాక్సిమిటీ ప్రోబ్లు, the షాఫ్ట్ సెంటర్లైన్ స్థానం అనేది ద్రవ-ఫిల్మ్ బేరింగ్ క్లియరెన్స్ లోపల షాఫ్ట్ యొక్క జ్యామితీయ కేంద్రం యొక్క సగటు, లేదా స్థిర-స్థితి (steady-state), స్థానం. ఒక vibration కొలత — సిగ్నల్ యొక్క AC కాంపోనెంట్ — షాఫ్ట్ యొక్క వేగవంతమైన డైనమిక్ చలనాన్ని వివరిస్తుంది around ఆ సగటు స్థానాన్ని, సెంటర్లైన్ కొలత — DC కాంపోనెంట్ — వివరిస్తుంది where బేరింగ్ లోపల సగటు స్థానం వాస్తవంగా ఎక్కడ ఉంటుందో అది చూపిస్తుంది. ఆ DC స్థానం కాలక్రమేణా ఎలా మారుతుందో ట్రాక్ చేయడం వల్ల బేరింగ్ లోడ్, అలైన్మెంట్ మరియు దీర్ఘకాలిక అరుగుదల గురించి అత్యంత విలువైన అవగాహన లభిస్తుంది, ఇవన్నీ ఒక orbit plot మాత్రమే మిస్సవుతుంది.
1. సెంటర్లైన్ స్థానం ఎందుకు ముఖ్యమైనది
ఒక రోటర్ ఒక జర్నల్ బేరింగ్ దాని బోర్ మధ్యలో ఉండదు. విశ్రాంతి స్థితిలో అది క్లియరెన్స్ దిగువన ఉంటుంది; ఒకసారి నడుస్తే, అది హైడ్రోడైనమిక్ ఆయిల్ వెడ్జ్పై పైకి ఎక్కి వేగం, లోడ్, ఆయిల్ విస్కాసిటీ మరియు కపుల్లింగ్ ద్వారా వచ్చే శక్తులచే నిర్ణయించబడిన ఒక ఆఫ్సెట్, ఎక్సెంట్రిక్ స్థానంలో స్థిరపడుతుంది. ఆ సమతుల్య స్థానం రోటర్పై పని చేసే స్థిర శక్తుల ప్రత్యక్ష, భౌతిక సూచిక. వైబ్రేషన్ షాఫ్ట్ ఎంత హింసాత్మకంగా కంపిస్తుందో చెప్తుంది; సెంటర్లైన్ అది ఎక్కడ నెట్టబడుతుందో చెప్తుంది. ఈ రెండూ మూలభూతంగా వేర్వేరు ప్రశ్నలకు సమాధానమిస్తాయి, మరియు ద్రవ-ఫిల్మ్ యంత్రం యొక్క పూర్తి డయాగ్నసిస్కు రెండూ అవసరం.
2. షాఫ్ట్ సెంటర్లైన్ స్థానం ఎలా కొలుస్తారు
స్థానం X–Y ప్రాక్సిమిటీ ప్రోబ్ల జంట యొక్క DC వోల్టేజ్ అవుట్పుట్ నుండి నిర్ధారించబడుతుంది — అదే యాక్షియల్ ప్లేన్లో 90 డిగ్రీల దూరంలో అమర్చిన రెండు ప్రోబ్లు. ప్రక్రియ ఈ విధంగా నడుస్తుంది:
- ప్రోబ్ గ్యాప్ వోల్టేజ్: ప్రతి ప్రాక్సిమిటీ ప్రోబ్’స్ డ్రైవర్ ప్రోబ్ టిప్ మరియు షాఫ్ట్ ఉపరితలం మధ్య అంతరానికి నేరుగా అనుపాత అయిన ఋణాత్మక DC వోల్టేజ్ను అవుట్పుట్ చేస్తుంది. సాధారణ కాలిబ్రేషన్ −200 mV/mil, కాబట్టి షాఫ్ట్ ప్రోబ్ నుండి దూరంగా వెళ్ళే కొద్దీ వోల్టేజ్ మరింత ఋణాత్మకంగా మారుతుంది. ఆ బయాస్ గ్యాప్ను సరిగ్గా సెట్ చేయడం మరియు తనిఖీ చేయడం ఒక సాధారణ కమిషనింగ్ దశ, మరియు మా Proximity Probe గ్యాప్ వోల్టేజ్ కాలిక్యులేటర్ మార్పిడిని సరళంగా చేస్తుంది.
- స్థానాన్ని సున్నాకు సెట్ చేయడం: రెఫరెన్స్ ఏర్పాటు చేయడానికి, DC గ్యాప్ వోల్టేజ్లు సాధారణంగా షాఫ్ట్ దాని బేరింగ్ దిగువన విశ్రాంతి స్థితిలో ఉన్నప్పుడు సున్నాకు సెట్ చేయబడతాయి లేదా నమోదు చేయబడతాయి.
- సగటు స్థానాన్ని ట్రాక్ చేయడం: యంత్రం మొదలవుతూ నిర్వహణ వేగం మరియు ఉష్ణోగ్రతకు చేరుకున్న కొద్దీ, షాఫ్ట్ దాని హైడ్రోడైనమిక్ ఆయిల్ ఫిల్మ్పై పైకి లేస్తుంది. సిస్టమ్ X మరియు Y ప్రోబ్ల నుండి సగటు DC గ్యాప్ వోల్టేజ్లను నిరంతరం పర్యవేక్షిస్తుంది.
- స్థానాన్ని ప్లాట్ చేయడం: X మరియు Y DC వోల్టేజీలను ఒకదానికొకటి వ్యతిరేకంగా ప్లాట్ చేయడం ద్వారా, మానిటరింగ్ వ్యవస్థ సంపూర్ణ bearing క్లియరెన్స్ను సూచించే 2D గ్రాఫ్పై షాఫ్ట్ యొక్క సగటు స్థానాన్ని ప్రదర్శిస్తుంది.
కొలత ఒక eddy-current సిగ్నల్ యొక్క DC కంటెంట్పై ఆధారపడటం వల్ల, ఇది శాశ్వతంగా అమర్చిన ప్రోబ్ జతను మరియు నెమ్మదిగా మారే DC ట్రెండ్ను విశ్లేషించగల మానిటర్ను అవసరం చేస్తుంది — పోర్టబుల్, AC-కపుల్డ్ కాదు displacement రీడింగ్. సెంటర్లైన్ మానిటరింగ్ అనేది వాక్-అరౌండ్ రూట్ల కంటే అమర్చిన టర్బోమెషినరీ రక్షణ వ్యవస్థల లక్షణంగా ఉండటానికి ఇదే కారణం.
3. షాఫ్ట్ సెంటర్లైన్ ప్లాట్ యొక్క నిదానాత్మక విలువ
ఎ షాఫ్ట్ సెంటర్లైన్ ప్లాట్ యంత్రం యొక్క వేగం లేదా లోడ్ మారినప్పుడు సగటు షాఫ్ట్ స్థానం యొక్క మార్గాన్ని చూపిస్తుంది. టర్బోమెషినరీలో ఇది శక్తివంతమైన నిదానాత్మక సాధనం, మరియు vibration డేటా మాత్రమే చూపించలేని అనేక పరిస్థితులను బహిర్గతం చేస్తుంది.
1. సాధారణ bearing పని నిర్ధారించడం
స్టార్టప్లో, fluid-film bearing లో ఆరోగ్యకరమైన రోటర్ హైడ్రోడైనమిక్ ఆయిల్ వెడ్జ్ అభివృద్ధి చెందుతుండగా పైకి లేచి పక్కకు కదులుతుంది — ఇది bearing జ్యామితి మరియు భ్రమణ దిశ ఫలితం. సెంటర్లైన్ ప్లాట్పై అది గుర్తించే మార్గం ప్రతిసారి యంత్రం స్టార్ట్ అయినప్పుడు నిష్కళంకంగా మరియు పునరావృతంగా ఉండాలి. స్థిరమైన మార్గం bearings సరైన లిఫ్ట్ ఉత్పత్తి చేస్తున్నాయని మరియు రోటర్ దాని clearance.
2. బేరింగ్ అరుగుదలను నిర్ధారించడం
bearing అరిగిపోతుండగా, షాఫ్ట్ క్రమంగా దాని క్లియరెన్స్ లోపల మరింత మరింత కిందకు స్థిరపడుతుంది. నేటి సెంటర్లైన్ స్థానాన్ని ఒక సంవత్సరం క్రితం నమోదు చేసిన స్థానంపై అతివ్యాపింపజేయడం ద్వారా, ఒక విశ్లేషకుడు ట్రెండ్ను స్పష్టంగా చూసి, bearing ను ఎప్పుడు భర్తీ చేయాల్సి వస్తుందో అంచనా వేయవచ్చు — చాలా ముందుగానే bearing wear అధిక vibration ఉత్పత్తి చేయడం మొదలుపెట్టే ముందు. సెంటర్లైన్ అనేది, వాస్తవంగా, vibration ట్రెండ్కు ముందు హెచ్చరించే ముందస్తు హెచ్చరిక ఛానల్.
3. అమరిక లేదా లోడ్లో మార్పులు గుర్తించడం
షాఫ్ట్ స్థానం దానిపై పనిచేసే శక్తుల ద్వారా నిర్ణయించబడుతుంది. యంత్రం యొక్క అమరిక మారినప్పుడు — ఉష్ణ వ్యాప్తి, పైప్ స్ట్రెయిన్ లేదా స్థిరపడే పునాది ద్వారా — bearing శక్తులు మారతాయి, మరియు సెంటర్లైన్ స్థానం దానికి ప్రతిస్పందనగా మారుతుంది. అన్యథా స్థిర-స్థితి ఆపరేషన్లో సెంటర్లైన్ స్థానంలో హఠాత్తు మార్పు రోటర్పై శక్తులలో గణనీయమైన మార్పుకు బలమైన సంకేతం మరియు వెంటనే దర్యాప్తు అవసరం. ఇది అభివృద్ధి చెందుతున్న misalignment or a thermal bow, మరియు దానిపై ఉపయోగకరమైన క్రాస్-చెక్ foundation condition.
4. బేరింగ్ అస్థిరతలను గుర్తించడం
కొన్ని పరిస్థితులలో షాఫ్ట్ ఎప్పటికీ స్థిరమైన స్థానంలో స్థిరపడదు, బదులుగా bearing లోపల ప్రెసెస్ చేయడం లేదా విప్ చేయడం మొదలుపెడుతుంది. ఈ పరిస్థితి — oil whirl లేదా ఆయిల్ విప్, ఒక రకమైన రోటర్ అస్థిరత — సెంటర్లైన్ ప్లాట్పై పెద్ద, అస్థిర విచలనంగా కనిపిస్తుంది, ఆరోగ్యకరమైన యంత్రం యొక్క చక్కని, పునరావృత మార్గం నుండి విభిన్నంగా. స్పెక్ట్రమ్లో whirl సంతకంతో పాటు చదివితే, ఇది బలవంతపు సమస్య కాకుండా స్వీయ-ఉత్తేజిత సమస్యను నిర్ధారిస్తుంది.
4. కక్ష్యతో పోలిస్తే సెంటర్లైన్ స్థానం
రెండు ప్లాట్లను వేరు చేయడం చాలా అవసరం, ఎందుకంటే ఒకే జత ప్రాక్సిమిటీ ప్రోబ్లు ఉత్పత్తి చేయగల రెండు ప్లాట్లు పూర్తిగా వేర్వేరు విధానాలలో చదవబడతాయి:
- The షాఫ్ట్ సెంటర్లైన్ ప్లాట్ uses the DC voltage to show the average షాఫ్ట్ యొక్క స్థానం. ఇది కాలక్రమేణా నెమ్మదిగా జరిగే మార్పులకు — ట్రెండ్లకు — మరియు startup and shutdown.
- The షాఫ్ట్ ఆర్బిట్ ప్లాట్ uses the AC voltage to show the dynamic motion షాఫ్ట్ యొక్క దాని సగటు సెంటర్లైన్ స్థానం చుట్టూ కదలిక. ఇది unbalance వంటి నిర్దిష్ట డైనమిక్ లోపాలను నిర్ధారించడానికి సరైన సాధనం unbalance మరియు మిస్అలైన్మెంట్.
ఒకటి సమతుల్య బిందువు యొక్క నెమ్మది చలనాన్ని సంగ్రహిస్తుంది; మరొకటి దాని చుట్టూ వేగంగా డోలనమవడాన్ని సంగ్రహిస్తుంది. కలిసి ఉపయోగించినప్పుడు, అవి బేరింగులలో రోటర్’స్ ఆరోగ్యం మరియు ప్రవర్తన యొక్క పూర్తి మరియు వివరణాత్మక చిత్రాన్ని అందిస్తాయి.
5. ఆచరణాత్మక గమనికలు మరియు పరిమితులు
కొన్ని వాస్తవాలు క్షేత్రంలో సెంటర్లైన్ డేటా ఎలా ఉపయోగించబడుతుందో నిర్ణయిస్తాయి:
- యాంత్రిక మరియు విద్యుత్ రన్అవుట్: DC రీడింగ్ ఏదైనా చేర్చుతుంది runout ప్రోబ్ లక్ష్య ప్రాంతంలో, నిజమైన స్థాన మార్పుగా పొరపాటు పడకుండా ఉండేందుకు నెమ్మది రోల్ వద్ద దీన్ని వర్గీకరించాలి.
- ఇది ద్రవ-పొర బేరింగులకు వర్తిస్తుంది: ఈ భావన జర్నల్ చమురు పొరపై పైకి లేవడంపై ఆధారపడుతుంది, కాబట్టి రోలింగ్-ఎలిమెంట్ బేరింగులకు ఇది పెద్దగా అర్థం కాదు, ఎందుకంటే వాటిలో కదలడానికి అదే క్లియరెన్స్ స్థలం ఉండదు.
- థర్మల్ సందర్భం ముఖ్యమైనది: యంత్రం వేడెక్కే కొద్దీ స్థాన మార్పులు సాధారణమే; రోగనిర్ధారణ సంకేతం అనేది సంభవించే మార్పు after థర్మల్ స్థిరత సాధించబడింది.
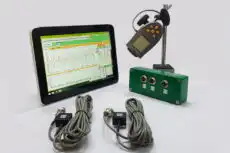
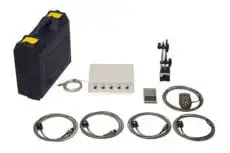
స్థాపించబడిన క్లిష్టమైన యంత్రాలపై, సెంటర్లైన్ పర్యవేక్షణ శాశ్వత రక్షణ వ్యవస్థలో భాగంగా ఉంటుంది. ప్రాక్సిమిటీ ప్రోబులు లేని అనేక చిన్న యంత్రాలపై, సమానమైన విశ్వసనీయత పని పోర్టబుల్ రెండు-చానెల్ విశ్లేషకుడితో చేయబడుతుంది, ఉదాహరణకు Balanset-1A, ఇది కేసింగ్ కంపనాన్ని మరియు బేరింగుల వద్ద 1× వ్యాప్తి మరియు దశ బేరింగుల వద్ద మరియు — లోపం అసమతుల్యత అయిన చోట — దీన్ని సరిదిద్దుతుంది field balancing రోటర్ను స్థానంలో ఉంచి. రెండు విధానాలు పరస్పర పూరకమైనవి: సెంటర్లైన్ ప్లాట్ పెద్ద రోటర్ ఎక్కడ కూర్చుందో గమనిస్తుంది, పోర్టబుల్ విశ్లేషకుడు దాన్ని కదిలించే డైనమిక్ శక్తులను నిర్ధారించి సరిదిద్దుతాడు.
