
PORTABLE BALANCER „BALANSET-1A“
Dvokanalni sustav dinamičkog balansiranja temeljen na računalu
OPERATION MANUAL
rev. 1.56 May 2023
2023
Estonia, Narva
SIGURNOSNA OBAVIJEST: Ovaj uređaj je u skladu sa sigurnosnim standardima EU. Laserski proizvod klase 2. Slijedite sigurnosne postupke za rotirajuću opremu. Pogledajte sve sigurnosne informacije u nastavku →
1. PREGLED SUSTAVA URAVNOTEŽAVANJA
Balanset-1A balancer pruža usluge dinamičkog balansiranja u jednoj i dvije ravnine za ventilatore, brusne kotače, vretena, drobilice, pumpe i ostale rotirajuće strojeve.
Balanset-1A balanser uključuje dva vibrosenzora (akcelerometra), laserski fazni senzor (tahometar), 2-kanalnu USB sučeljnu jedinicu s predpojačalima, integratorima i ADC modulom za akviziciju te Windows softver za balansiranje. Balanset-1A zahtijeva prijenosno računalo ili drugo Windows (WinXP…Win11, 32 ili 64bit) kompatibilno računalo.
Balancing software provides the correct balancing solution for single-plane and two-plane balancing automatically. Balanset-1A is simple to use for non-vibration experts.
All balancing results saved in archive and can be used to create the reports.
Značajke:
- Easy to use
- Storage of unlimited balancing data
- User selectable trial mass
- Split weight calculation, drill calculation
- Trial mass validity automatically popup message
- Measuring RPM, amplitude and phase of vibrovelocity overall and 1x vibration
- FFT spectrum
- Dual-channel simultaneous data collection
- Waveform and spectrum display
- Storage of vibration values and vibration waveform and spectra
- Balancing using saved influence coefficients
- Trim balancing
- Balancing mandrel eccentricity calculations
- Remove or leave trial weights
- Balancing tolerance calculation (ISO 1940 G-classes)
- Changing correction planes calculations
- Polar graph
- Manual data input
- RunDown charts (experimental option)
2. SPECIFICATION
| Parametar | Specifikacija |
|---|---|
| Measurement range of the root-mean-square value (RMS) of the vibration velocity, mm/sec (for 1x vibration) | from 0.02 to 100 |
| The frequency range of the RMS measurement of the vibration velocity, Hz | od 5 do 550 |
| Number of the correction planes | 1 or 2 |
| Range of the frequency of rotation measurement, rpm | 100 – 100000 |
| Range of the vibration phase measurement, angular degrees | from 0 to 360 |
| Error of the vibration phase measurement, angular degrees | ± 1 |
| Točnost mjerenja efektivne vrijednosti brzine vibracija | ±(0,1 + 0,1×Vizmjereno) mm/s |
| Točnost mjerenja frekvencije vrtnje | ±(1 + 0,005 × Nizmjereno) okretaja u minuti |
| Srednje vrijeme između kvarova (MTBF), sati, min | 1000 |
| Prosječni vijek trajanja, godine, min | 6 |
| Dimenzije (u tvrdoj kutiji), cm | 39*33*13 |
| Masa, kg | <5 |
| Ukupne dimenzije vibracionog senzora, mm, maks. | 25*25*20 |
| Masa vibracionog senzora, kg, maks. | 0.04 |
|
Radni uvjeti: – Temperature range: from 5°C to 50°C – Relative humidity: < 85%, unsaturated – Without strong electric-magnetic field & strong impact |
|
3. PACKAGE
Balanset-1A balanser uključuje dva jednoosna akcelerometra, laserski fazni referentni marker (digitalni tahometar), 2-kanalnu USB sučeljnu jedinicu s predpojačalima, integratorima i ADC akvizicijskim modulom te Windows softver za balansiranje.
Delivery set
| Opis | Number | Note |
|---|---|---|
| USB interface unit | 1 | |
| Laser phase reference marker (tachometer) | 1 | |
| Jednoosni akcelerometri | 2 | |
| Magnetic stand | 1 | |
| Digital scales | 1 | |
| Hard case for transportation | 1 | |
| „Balanset-1A“. Korisnički priručnik. | 1 | |
| Flash disk with balancing software | 1 |
4. BALANCE PRINCIPLES
4.1. „Balanset-1A“ uključuje (slika 4.1) USB sučelje (1), dva akcelerometra (2) and (3), referentni marker faze (4) i prijenosno računalo (nije uključeno) (5).
U kompletu se nalazi i magnetski stalak (6) koristi se za montažu faznog referentnog markera i digitalnih skala 7.
X1 and X2 connectors intended for connection of the vibration sensors respectively to 1 and 2 measuring channels, and the X3 connector used for connection of the phase reference marker.
The USB cable provides power supply and connection of the USB interface unit to the computer.

Sl. 4.1. Komplet isporuke uređaja „Balanset-1A“
Mehaničke vibracije uzrokuju električni signal proporcionalan ubrzanju vibracija na izlazu senzora vibracija. Digitalizirani signali iz ADC modula prenose se putem USB-a na prijenosno računalo. (5). Fazni referentni marker generira impulsni signal koji se koristi za izračun frekvencije rotacije i faznog kuta vibracije. Windows softver pruža rješenje za balansiranje u jednoj i dvije ravnine, analizu spektra, grafikone, izvješća, pohranu koeficijenata utjecaja.
5. SAFETY PRECAUTIONS
PAŽNJA
5.1. When operating on 220V electrical safety regulations must be observed. It is not allowed to repair the device when connected to 220 V.
5.2. Ako uređaj koristite u okruženju s niskom kvalitetom izmjenične struje ili u prisutnosti mrežnih smetnji, preporučuje se korištenje samostalnog napajanja iz baterije računala.
Dodatni sigurnosni zahtjevi za rotirajuću opremu
- Zaključavanje stroja: Uvijek primijenite odgovarajuće postupke zaključavanja/označavanja prije instaliranja senzora
- Osobna zaštitna oprema: Nosite zaštitne naočale, zaštitu za sluh i izbjegavajte široku odjeću u blizini rotirajućih strojeva
- Sigurna instalacija: Provjerite jesu li svi senzori i kabeli sigurno pričvršćeni i ne mogu ih uhvatiti rotirajući dijelovi
- Postupci u hitnim slučajevima: Znati mjesta zaustavljanja u nuždi i postupke isključivanja
- Trening: Samo obučeno osoblje smije upravljati opremom za balansiranje na rotirajućim strojevima
6. POSTAVKE SOFTVERA I HARDVERA
6.1. USB drivers and balancing software installation
Before working install drivers and balancing software.
Popis mapa i datoteka
Installation disk (flash drive) contains the following files and folders:
- Bs1Av###Setup – mapa sa softverom za balansiranje „Balanset-1A“ (### – broj verzije)
- ArdDrv – USB upravljački programi
- EBalancer_priručnik.pdf – ovaj priručnik
- Bal1Av###Setup.exe – instalacijska datoteka. Ova datoteka sadrži sve gore navedene arhivirane datoteke i mape. ### – verzija softvera „Balanset-1A“.
- Ebalance.cfg – vrijednost osjetljivosti
- Bal.ini – neki podaci za inicijalizaciju
Postupak instalacije softvera
For installing drivers and specialized software run file Bal1Av###Setup.exe and follow setup instructions by pressing buttons «Next», «ОК» etc.
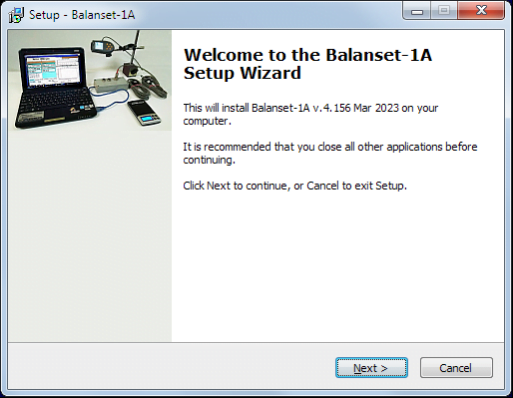
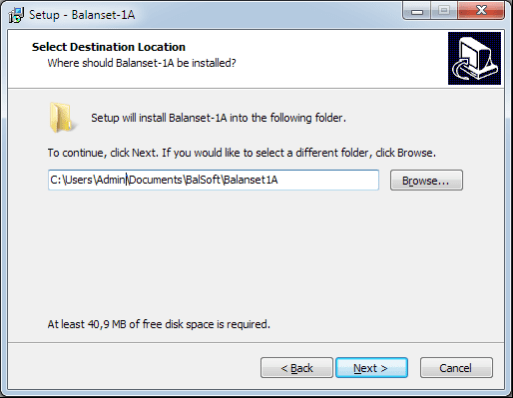
Choose setup folder. Usually the given folder should not be changed.
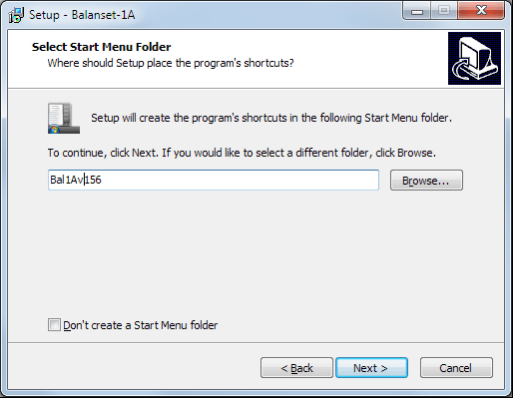
Then the program requires specifying Program group and desktop folders. Press button Next.
Završna instalacija
- Install sensors on the inspected or balanced mechanism (Detailed information about how to install the sensors is given in Annex 1)
- Connect vibration sensors 2 and 3 to the inputs X1 and X2, and phase angle sensor to the input X3 of USB interface unit.
- Connect USB interface unit to the USB-port of the computer.
- Kada koristite AC napajanje, spojite računalo na električnu mrežu. Spojite napajanje na 220 V, 50 Hz.
- Kliknite prečac "Balanset-1A" na radnoj površini.
7. SOFTVER ZA BALANSIRANJE
7.1. Općenito
Initial window
Prilikom pokretanja programa „Balanset-1A“ pojavljuje se početni prozor, prikazan na slici 7.1.

Sl. 7.1. Početni prozor “Balanset-1A”
U početnom prozoru nalazi se 9 gumba s nazivima funkcija koje se ostvaruju klikom na njih.
F1-«About»
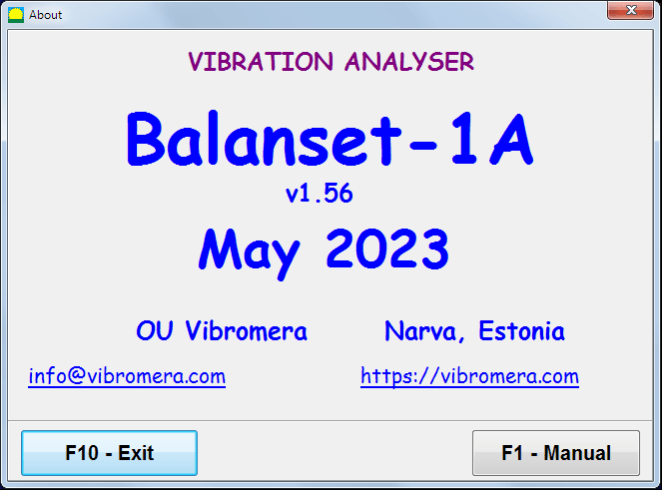
Sl. 7.2. F1-prozor «O nama»
F2-«Single plane», F3-«Two plane»
Pritiskom na "F2– Jednoravninski" (ili F2 funkcijska tipka na tipkovnici računala) odabire vibraciju mjerenja na kanalu X1.
After clicking this button, the computer display diagram shown in Fig. 7.1 illustrating a process of measuring the vibration only on the first measuring channel (or the balancing process in a single plane).
Pritiskom na tipku "F3–Dvoravninski" (ili F3 function key on the computer keyboard) selects the mode of vibration measurements on two channels X1 and X2 simultaneously. (Fig. 7.3.)
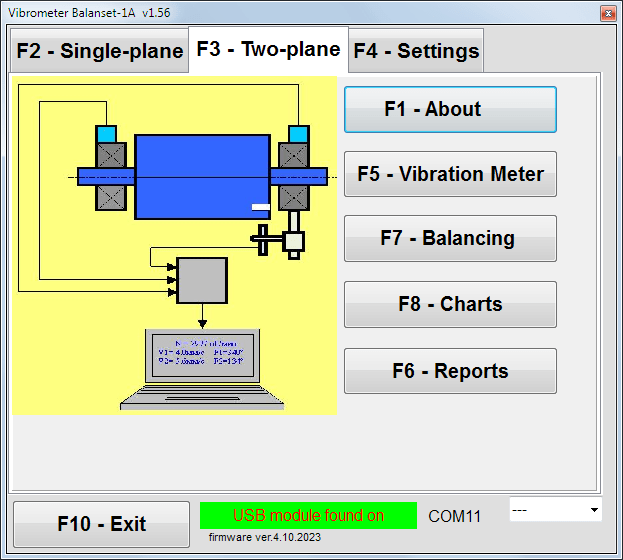
Sl. 7.3. Početni prozor “Balanset-1A”. Balansiranje u dvije ravnine.
F4 – «Postavke»
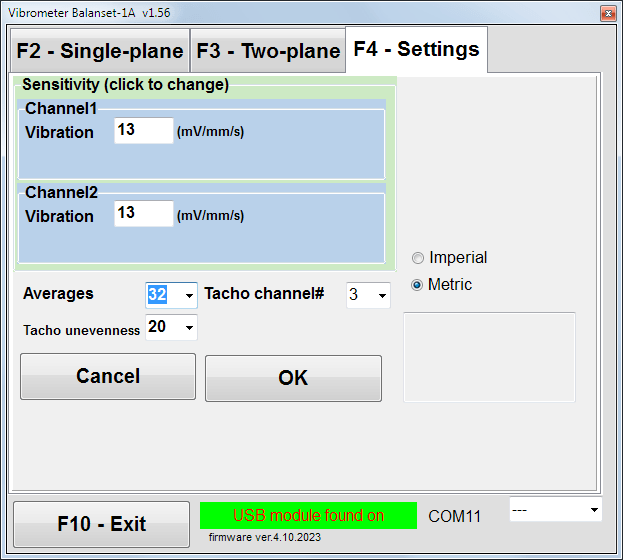
Sl. 7.4. Prozor „Postavke“
In this window you can change some Balanset-1A settings.
- Sensitivity. The nominal value is 13 mV / mm/s.
Changing the sensitivity coefficients of sensors is required only when replacing sensors!
Attention!
When you enter a sensitivity coefficient its fractional part is separated from the integer part with the decimal point (the sign “,”).
- Averaging – number of averaging (number of revolutions of the rotor over which data is averaged to more accuracy)
- Tacho channel# – channel# the Tacho is connected. By default – 3rd channel.
- Unevenness – the difference in duration between adjacent tacho pulses, which above gives the warning “Failure of the tachometer“
- Imperial/Metric – Select the system of units.
Com port number is assigned automatically.
F5 – «Mjerač vibracija»
Pressing this button (or a function key of F5 on the computer keyboard) activates the mode of vibration measurement on one or two measuring channels of virtual Vibration meter depending on the buttons condition “F2-single-plane”, “F3-two-plane”.
F6 – «Izvješća»
Pressing this button (or F6 function key on the computer keyboard) switches on the balancing Archive, from which you can print the report with the results of balancing for a specific mechanism (rotor).
F7 – «Balancing»
Pressing this button (or function key F7 on your keyboard) activates balancing mode in one or two correction planes depending on which measurement mode is selected by pressing the buttons “F2-single-plane”, “F3-two-plane”.
F8 – «Charts»
Pressing this button (or F8 function key on the computer’s keyboard) enables graphic Vibration meter, the implementation of which displays on a display simultaneously with the digital values of the amplitude and phase of the vibration graphics of its time function.
F10 – «Izlaz»
Pressing this button (or F10 funkcijska tipka na tipkovnici računala) dovršava program „Balanset-1A“.
7.2. „Mjerač vibracija“
Before working in the “Vibration meter"u načinu rada", instalirajte senzore vibracija na stroj i spojite ih na konektore X1 i X2 USB sučelja. Senzor tahometra treba spojiti na ulaz X3 USB sučelja.

Fig. 7.5 USB interface unit
Za rad tahometara postavite reflektirajuću traku na površinu rotora.

Sl. 7.6. Reflektirajuća traka.
Recommendations for the installation and configuration of sensors are given in Annex 1.
Za početak mjerenja u načinu rada mjerača vibracija kliknite na gumb "F5 – Vibration Meter” u početnom prozoru programa (vidi sliku 7.1).
Vibration Meter window appears (see. Fig.7.7)

Fig. 7.7. Vibration meter mode. Wave and Spectrum.
Za početak mjerenja vibracija kliknite gumb "F9 – Trči” (ili pritisnite funkcijsku tipku F9 on the keyboard).
If Način okidanja Automatski is checked – the results of vibration measurements will be periodically displayed on the screen.
U slučaju istovremenog mjerenja vibracija na prvom i drugom kanalu, prozori koji se nalaze ispod riječi „Plane 1" i "Plane 2" bit će popunjeno.
Vibration measuring in the “Vibration” mode also may be carried out with disconnected phase angle sensor. In the Initial window of the program the value of the total RMS vibration (V1s, V2s) will only be displayed.
U načinu rada mjerača vibracija postoje sljedeće postavke
- RMS niska vrijednost, Hz – najniža frekvencija za izračun RMS ukupne vibracije
- Propusnost – širina pojasa frekvencije vibracija u grafikonu
- Averages – number of average for more measure accuracy
Za dovršetak rada u načinu rada "Mjerač vibracija" kliknite gumb "F10 – Exit" i vratite se na početni prozor.

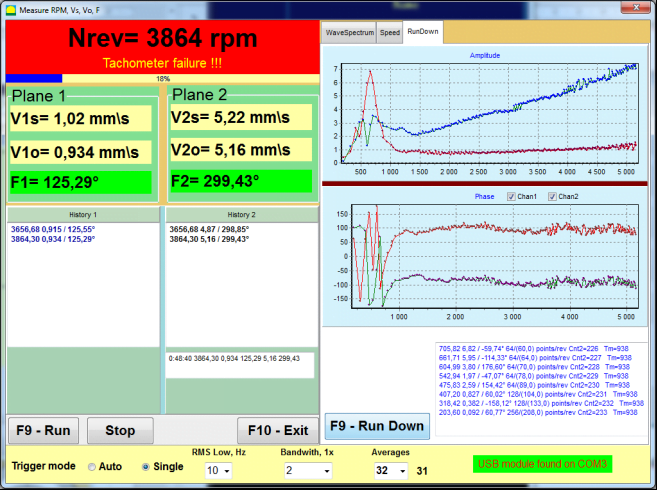
Fig. 7.8. Vibration meter mode. Rotation speed Unevenness, 1x vibration wave form.
Fig. 7.9. Vibration meter mode. Rundown (beta version, no warranty!).
7.3 Postupak uravnoteženja
Balansiranje se vrši za mehanizme u tehničkom stanju i ispravno montirane. Inače, prije balansiranja mehanizam se mora popraviti, ugraditi u odgovarajuće ležajeve i popraviti. Rotor treba očistiti od onečišćenja koja mogu spriječiti postupak balansiranja.
Prije balansiranja izmjerite vibracije u načinu rada Mjerač vibracija (gumb F5) kako biste bili sigurni da je uglavnom vibracija 1x vibracija.
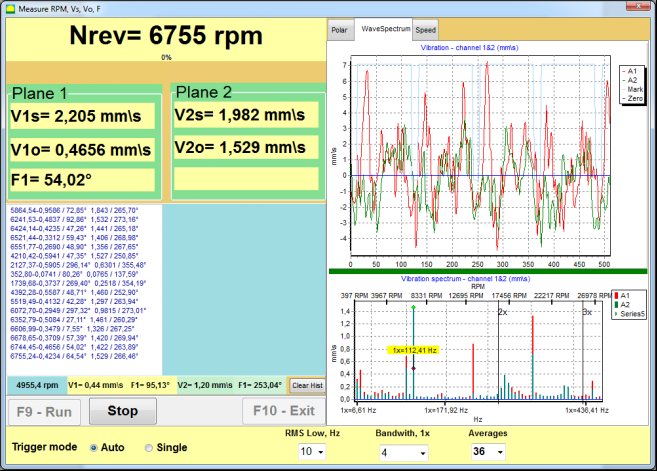
Slika 7.10. Način mjerenja vibracija. Provjera ukupne (V1s,V2s) i 1x (V1o,V2o) vibracije.
Ako je vrijednost ukupne vibracije V1s (V2s) približno jednaka magnitudi vibracije pri frekvenciji rotacije (1x vibracija) V1o (V2o), može se pretpostaviti da glavni doprinos mehanizmu vibracija dolazi od neravnoteže rotora. Ako je vrijednost ukupne vibracije V1s (V2s) znatno veća od 1x komponente vibracija V1o (V2o), preporučuje se provjeriti stanje mehanizma - stanje ležajeva, njihov položaj na podnožju, osigurati da nema kontakta između fiksnih dijelova i rotora tijekom rotacije itd.
Također treba obratiti pozornost na stabilnost izmjerenih vrijednosti u načinu rada mjerača vibracija – amplituda i faza vibracije ne smiju varirati za više od 10-15% tijekom procesa mjerenja. U suprotnom, može se pretpostaviti da mehanizam radi u području bliskom rezonanci. U tom slučaju promijenite brzinu vrtnje rotora, a ako to nije moguće – promijenite uvjete postavljanja stroja na temelj (na primjer, privremeno ga montirajte na opružne nosače).
Za balansiranje rotora metoda koeficijenta utjecaja treba koristiti balansiranje (metoda u 3 prolaza).
Probne vožnje se rade kako bi se utvrdio utjecaj probne mase na promjenu vibracija, mase i mjesta (kuta) ugradnje korekcijskih utega.
Najprije se odredi izvorna vibracija mehanizma (prvi start bez utega), a zatim se postavi probni uteg na prvu ravninu i izvrši se drugi start. Zatim uklonite probni uteg iz prve ravnine, postavite je u drugu ravninu i počnite drugi put.
Program zatim izračunava i na ekranu prikazuje težinu i mjesto (kut) ugradnje korekcijskih utega.
Kod balansiranja u jednoj ravnini (statično), drugi start nije potreban.
Probna težina se postavlja na proizvoljno mjesto na rotoru gdje je to zgodno, a zatim se stvarni radijus unosi u program za podešavanje.
(Polumjer položaja koristi se samo za izračun količine neuravnoteženosti u gramima * mm)
Važno!
- Mjerenja treba provoditi uz konstantnu brzinu vrtnje mehanizma!
- Korekcijski utezi moraju biti postavljeni na istom radijusu kao i probni utezi!
Masa probnog utega odabrana je tako da se nakon faze instalacije (> 20-30°) i (20-30%) amplituda vibracija značajno promijeni. Ako su promjene premale, pogreška se uvelike povećava u sljedećim izračunima. Pogodno je postaviti probni uteg na isto mjesto (isti kut) kao i fazna oznaka.
Formula za izračun mase probne težine
Mt = Mr × Kpodrška × Kvibracija / (Rt × (N/100)²)
Gdje:
- Planina – masa probnog utega, g
- Gospodin – masa rotora, g
- Kpodrška – koeficijent krutosti nosača (1-5)
- Kvibracija – koeficijent razine vibracija (0,5-2,5)
- Desno – radijus ugradnje probnog utega, cm
- N – brzina rotora, okretaji u minuti
Koeficijent krutosti oslonca (Ksupport):
- 1.0 – Vrlo mekani nosači (gumeni amortizeri)
- 2.0-3.0 – Srednja krutost (standardni ležajevi)
- 4.0-5.0 – Kruti nosači (masivni temelji)
Koeficijent razine vibracija (kvibracija):
- 0.5 – Niske vibracije (do 5 mm/s)
- 1.0 – Normalne vibracije (5-10 mm/s)
- 1.5 – Povišene vibracije (10-20 mm/s)
- 2.0 – Visoka vibracija (20-40 mm/s)
- 2.5 – Vrlo visoke vibracije (>40 mm/s)
🔗 Koristite naš online kalkulator:
Kalkulator probne težine →
https://vibromera.eu/content/trial-weight-calculator/
Važno!
Nakon svakog probnog rada probne mase se uklanjaju! Korekcijski utezi postavljeni pod kutom izračunatim od mjesta postavljanja probnog utega u smjeru vrtnje rotora!
Angle Calculation Explanation:
The correction weight installation angle is ALWAYS counted from the trial weight installation point in the direction of rotor rotation.
- Zero Point (0°): The exact location where you installed the trial weight becomes your reference point (0 degrees).
- Smjer: Measure the angle in the same direction the rotor spins.
Example: If the rotor spins clockwise, measure the angle clockwise from the trial weight position. - Tumačenje: If the program displays an angle of 120°, you must install the correction weight 120 degrees ahead of the trial weight position in the direction of rotation.
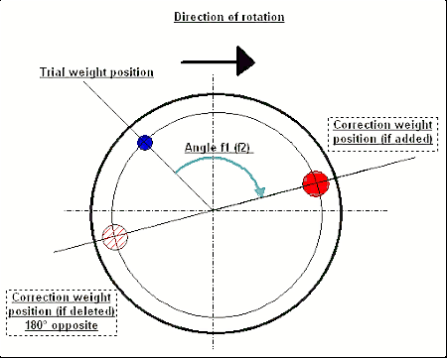
Fig. 7.11. Correction weight mounting.
Preporučuje se!
Prije izvođenja dinamičkog balansiranja preporučuje se provjeriti da statička neravnoteža nije prevelika. Kod rotora s horizontalnom osi, rotor se može ručno zakrenuti za kut od 90 stupnjeva od trenutnog položaja. Ako je rotor statički neuravnotežen, zakrenut će se u ravnotežni položaj. Nakon što rotor zauzme ravnotežni položaj, potrebno je postaviti uteg za balansiranje na gornju točku, približno u sredini duljine rotora. Uteg treba odabrati tako da se rotor ne pomiče ni u jednom položaju.
Takvo prethodno uravnoteženje smanjit će količinu vibracija pri prvom pokretanju jako neuravnoteženog rotora.
Ugradnja i montaža senzora
VSenzor vibracija mora biti instaliran na stroju u odabranoj mjernoj točki i spojen na ulaz X1 jedinice USB sučelja.
Postoje dvije konfiguracije montaže:
- Magneti
- Vijci s navojem M4
Optički taho senzor treba biti spojen na ulaz X3 jedinice USB sučelja. Nadalje, za korištenje ovog senzora treba staviti posebnu reflektirajuću oznaku na površinu rotora.
Zahtjevi za ugradnju optičkog senzora:
- Udaljenost od površine rotora: 50-500 mm (ovisno o modelu senzora)
- Širina reflektirajuće trake: Minimalno 1-1,5 cm (ovisi o brzini i radijusu)
- Orijentacija: Okomito na površinu rotora
- Montaža: Za stabilno pozicioniranje koristite magnetski stalak ili stezaljku
- Izbjegavajte izravnu sunčevu svjetlost ili jako umjetno osvjetljenje na senzoru/traci
💡 Izračun širine trake: Za optimalne performanse, izračunajte širinu trake pomoću:
L ≥ (N × R)/30000 ≥ 1,0-1,5 cm
Gdje je: L – širina trake (cm), N – brzina rotora (o/min), R – polumjer trake (cm)
Detaljni zahtjevi za odabir mjesta senzora i njihovo pričvršćivanje na objekt prilikom balansiranja navedeni su u Dodatku 1.
7.4 Balansiranje u jednoj ravnini
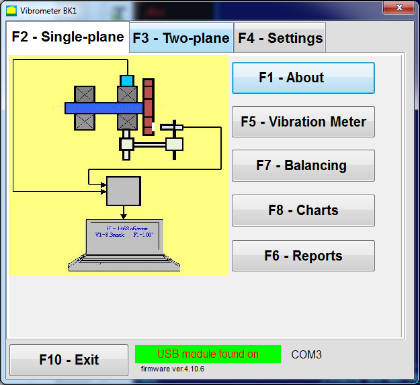
Slika 7.12. “Balansiranje u jednoj ravnini”
Arhiva uravnoteženja
Za početak rada na programu u "Balansiranje u jednoj ravnini" način rada, kliknite na "F2-Jedna ravnina” (ili pritisnite tipku F2 na tipkovnici računala).
Zatim kliknite na "F7 – Balansiranjegumb ", nakon čega Arhiva balansiranja u jednoj ravnini pojavit će se prozor u kojem će biti spremljeni podaci o balansiranju (vidi sl. 7.13).

Slika 7.13 Prozor za odabir arhive balansiranja u jednoj ravnini.
U ovom prozoru potrebno je unijeti podatke o nazivu rotora (Ime rotora), mjesto ugradnje rotora (Mjesto), tolerancije na vibracije i zaostalu neravnotežu (Tolerancija), datum mjerenja. Ovi se podaci pohranjuju u bazu podataka. Također, kreira se mapa Arc### u kojoj je ### broj arhive u koju će biti pohranjeni grafikoni, datoteka izvješća i sl. Nakon završetka balansiranja, generira se datoteka izvješća koja se može uređivati i ispisivati u ugrađenom editoru.
Nakon unosa potrebnih podataka, potrebno je kliknuti na "F10-OKgumb ", nakon čega "Balansiranje u jednoj ravnini” otvorit će se prozor (vidi sliku 7.13)
Postavke balansiranja (1 ravnina)
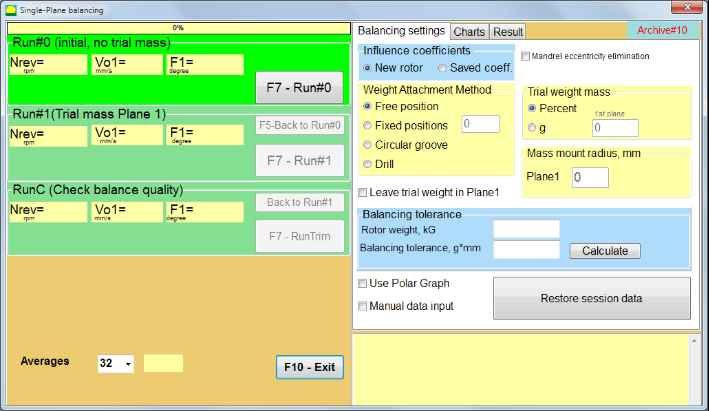
Slika 7.14. Jedan avion. Postavke balansiranja
Na lijevoj strani ovog prozora prikazuju se podaci mjerenja vibracija i tipke za upravljanje mjerenjem.Run # 0“, “Pokreni # 1“, “RunTrim“.
Na desnoj strani ovog prozora nalaze se tri kartice:
- Balancing settings
- Karte
- Result
The “Balancing settingsKartica ” koristi se za unos postavki balansiranja:
- "Koeficijent utjecaja" –
- “Novi rotor” – odabir balansiranja novog rotora, za koji ne postoje pohranjeni koeficijenti balansiranja i potrebna su dva pokušaja za određivanje mase i kuta ugradnje korekcijskog utega.
- “Saved coeff.” – odabir ponovnog balansiranja rotora, za koje postoje spremljeni koeficijenti balansiranja i potreban je samo jedan prolaz za određivanje težine i kuta ugradnje korektivne težine.
- "Masa probne težine" –
- “Percent” – korektivna težina izračunava se kao postotak probne težine.
- “Gram” – upisuje se poznata masa probnog utega i izračunava masa popravnog utega grams ili u oz za carski sustav.
Attention!
Ako je potrebno koristiti "Saved coeff.” Način rada za daljnji rad tijekom početnog balansiranja, masa probnog utega mora se unijeti u gramima ili uncama, a ne u %. Vage su uključene u paket isporuke.
- "Metoda pričvršćivanja težine"
- “Free position” – utezi se mogu postaviti u proizvoljne kutne položaje na obodu rotora.
- “Fixed position” – uteg se može postaviti u fiksne kutne položaje na rotoru, na primjer, na lopatice ili rupe (na primjer 12 rupa – 30 stupnjeva) itd. Broj fiksnih položaja mora se unijeti u odgovarajuće polje. Nakon uravnoteženja, program će automatski podijeliti uteg na dva dijela i naznačiti broj položaja na kojima je potrebno uspostaviti dobivene mase.
- “Circular groove” – koristi se za balansiranje brusnih ploča U ovom slučaju koriste se 3 protuutega za uklanjanje neravnoteže
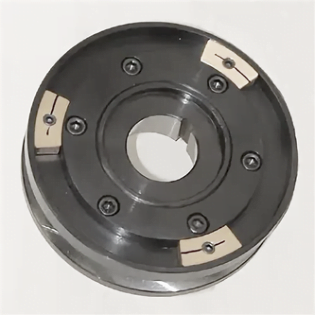
Slika 7.17 Balansiranje brusne ploče s 3 protuutega
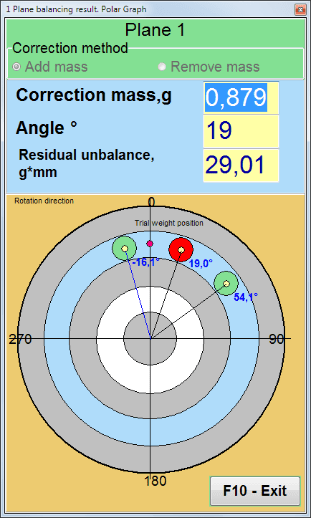
Slika 7.18 Balansiranje brusne ploče. Polarni graf.

Slika 7.15. Kartica rezultata. Fiksni položaj montaže korekcijskog utega.
Z1 i Z2 – položaji postavljenih korektivnih utega, izračunati iz položaja Z1 prema smjeru rotacije. Z1 je položaj na koji je postavljen probni uteg.
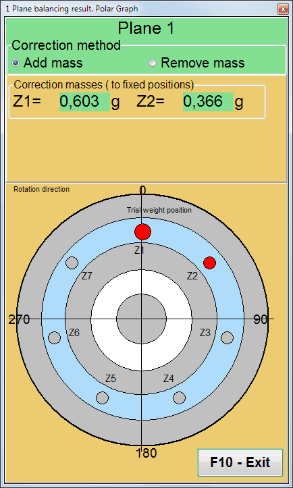
Slika 7.16 Fiksni položaji. Polarni dijagram.
- “Mass mount radius, mm” – “Ravnina1” – Polumjer probnog utega u ravnini 1. Potrebno je izračunati veličinu početne i preostale neravnoteže kako bi se utvrdilo usklađenost s tolerancijom za preostalu neravnotežu nakon balansiranja.
- “Ostavite probnu težinu u Plane1.” Obično se probni uteg uklanja tijekom procesa balansiranja. Ali u nekim slučajevima nemoguće ju je ukloniti, tada morate postaviti kvačicu na ovo da biste uzeli u obzir masu probne težine u izračunima.
- “Manual data input” – koristi se za ručni unos vrijednosti vibracije i faze u odgovarajuća polja na lijevoj strani prozora te izračun mase i kuta ugradnje korekcijskog utega pri prelasku na “Resultskartica "
- Dugme "Vrati podatke o sesiji“. Tijekom balansiranja, izmjereni podaci se spremaju u datoteku session1.ini. Ako je proces mjerenja prekinut zbog zamrzavanja računala ili iz drugih razloga, tada klikom na ovaj gumb možete vratiti mjerne podatke i nastaviti balansiranje od trenutka prekida.
- Mandrel eccentricity elimination (Index balancing) Balansiranje s dodatnim startom kako bi se eliminirao utjecaj ekscentriciteta trna (balansirajuća trna). Montirajte rotor naizmjenično na 0° i 180° u odnosu na. Izmjerite neravnoteže u oba položaja.
- Balancing tolerance Unos ili izračun rezidualnih tolerancija debalansa u gx mm (G-klase)
- Use Polar Graph Use polar graph to display balancing results
Balansiranje u 1 ravnini. Novi rotor
Kao što je gore navedeno, „Novi rotor„Balansiranje zahtijeva dva probna rada i barem jedan trim rad stroja za balansiranje.“
Izvođenje#0 (početno izvođenje)
Nakon postavljanja senzora na balansirajući rotor i unosa parametara postavki, potrebno je uključiti rotaciju rotora i, kada dostigne radnu brzinu, pritisnuti tipku "Run#0" za početak mjerenja. Gumb "Karte” otvorit će se u desnom panelu, gdje će biti prikazani valni oblik i spektar vibracije. U donjem dijelu kartice čuva se datoteka povijesti u kojoj su spremljeni rezultati svih pokretanja s vremenskom referencom. Na disku se ova datoteka sprema u arhivsku mapu pod nazivom memo.txt
Attention!
Prije početka mjerenja potrebno je uključiti rotaciju rotora stroja za balansiranje (Run#0) i provjerite je li brzina rotora stabilna.
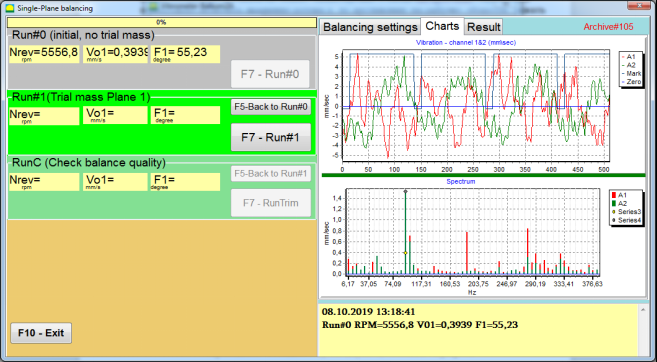
Slika 7.19. Balansiranje u jednoj ravnini. Početno izvođenje (Run#0). Kartica grafikona
Nakon završetka procesa mjerenja, u Run#0 dijelu na lijevoj ploči pojavljuju se rezultati mjerenja – brzina rotora (RPM), RMS (Vo1) i faza (F1) 1x vibracije.
The “F5-Natrag na Run#0Tipka ” (ili funkcijska tipka F5) koristi se za povratak na odjeljak Run#0 i, ako je potrebno, za ponavljanje mjerenja parametara vibracija.
Run#1 (probna masa aviona 1)
Prije početka mjerenja parametara vibracija u odjeljku „Run#1 (probna masa aviona 1), probni uteg treba postaviti prema "Trial weight mass"polje".
Cilj ugradnje probnog utega je procijeniti kako se mijenja vibracija rotora kada se poznati uteg ugradi na poznato mjesto (kut). Probni uteg mora promijeniti amplitudu vibracije za 30% nižu ili veću od početne amplitude ili promijeniti fazu za 30 stupnjeva ili više od početne faze.
Ako je potrebno koristiti "Saved coeff.” balansiranje za daljnji rad, mjesto (kut) ugradnje probnog utega mora biti isto kao i mjesto (kut) reflektirajuće oznake.
Ponovno uključite rotaciju rotora balansirajućeg stroja i provjerite je li frekvencija rotacije stabilna. Zatim kliknite na "F7-Run#1” button (or press the F7 key on the computer keyboard).
Nakon mjerenja u odgovarajućim prozorima "Run#1 (probna masa aviona 1)U odjeljku ” pojavljuju se rezultati mjerenja brzine rotora (RPM), kao i vrijednost RMS komponente (Vо1) i faze (F1) 1x vibracije.
U isto vrijeme, “Result"kartica ” otvara se na desnoj strani prozora.
Ova kartica prikazuje rezultate izračuna mase i kuta korektivne težine, koja se mora postaviti na rotor radi kompenzacije neravnoteže.
Štoviše, u slučaju korištenja polarnog koordinatnog sustava, zaslon prikazuje vrijednost mase (M1) i kut ugradnje (f1) korekcijskog utega.
U slučaju "Fixed positions"Prikazat će se brojevi pozicija (Zi, Zj) i podijeljena masa probne težine."
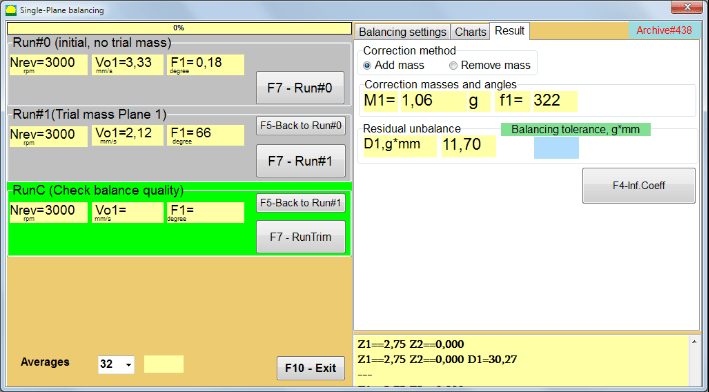
Slika 7.20. Balansiranje u jednoj ravnini. Run#1 i rezultat balansiranja.
If Polar graph je označeno, prikazat će se polarni dijagram.
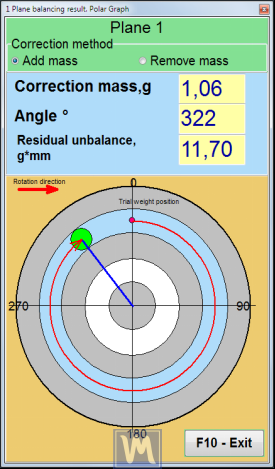
Fig. 7.21. The result of balancing. Polar graph.
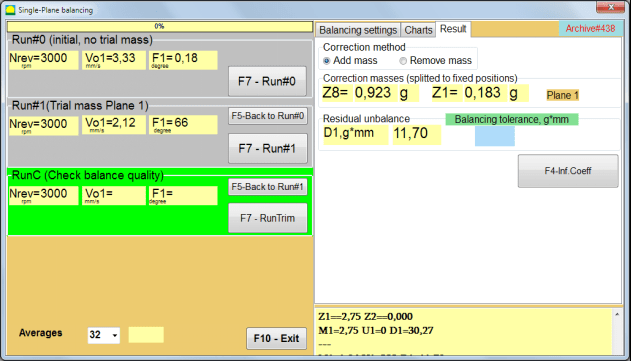
Slika 7.22. Rezultat balansiranja. Podijeljena težina (fiksni položaji)
Također, ako "Polar graph" je označeno, prikazat će se polarni graf.
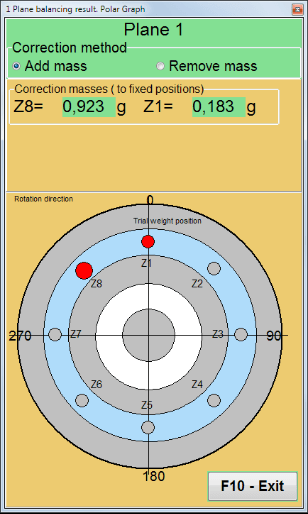
Fig. 7.23. Weight splitted on fixed positions. Polar graph
Attention!:
- Nakon završetka postupka mjerenja u drugom pokušaju („Run#1 (probna masa aviona 1)„) balansirajućeg stroja, potrebno je zaustaviti rotaciju i ukloniti ugrađeni probni uteg. Zatim ugraditi (ili ukloniti) korektivni uteg na rotor prema podacima s kartice rezultata.
Ako probni uteg nije uklonjen, morate prijeći na "Balancing settings" i označite potvrdni okvir u "Ostavite probnu težinu u Plane1". Zatim se vratite na "Result” kartica. Težina i kut ugradnje korekcijskog utega automatski se ponovno izračunavaju.
- Kutni položaj korektivnog utega izvodi se s mjesta ugradnje probnog utega. Smjer referencije kuta podudara se sa smjerom vrtnje rotora.
- U slučaju "Fixed position” – 1st position (Z1), coincides with the place of installation of the trial weight. The counting direction of the position number is in the direction of rotation of the rotor.
- Prema zadanim postavkama, korektivna težina bit će dodana rotoru. To je naznačeno oznakom postavljenom u "Add” field. If removing the weight (for example, by drilling), you must set a mark in the “Delete” field, after which the angular position of the correction weight will automatically change by 180º.
Nakon postavljanja korekcijskog utega na balansirajući rotor u radnom prozoru, potrebno je provesti RunC (trim) i procijeniti učinkovitost provedenog balansiranja.
RunC (Provjeri kvalitetu ravnoteže)
Attention!
Prije početka mjerenja na RunC, potrebno je uključiti rotaciju rotora stroja i uvjeriti se da je ušao u način rada (stabilna frekvencija rotacije).
Za izvođenje mjerenja vibracija u "RunC (Provjeri kvalitetu ravnoteže)" kliknite na odjeljak "F7 – RunTrim” (ili pritisnite tipku F7 na tipkovnici).
Nakon uspješnog završetka postupka mjerenja, u "RunC (Provjeri kvalitetu ravnoteže)U odjeljku "" na lijevoj ploči" prikazuju se rezultati mjerenja brzine rotora (RPM), kao i vrijednost RMS komponente (Vo1) i faze (F1) 1x vibracije.
In the “Result” prikazani su rezultati izračuna mase i kuta ugradnje dodatnog korektivnog utega.
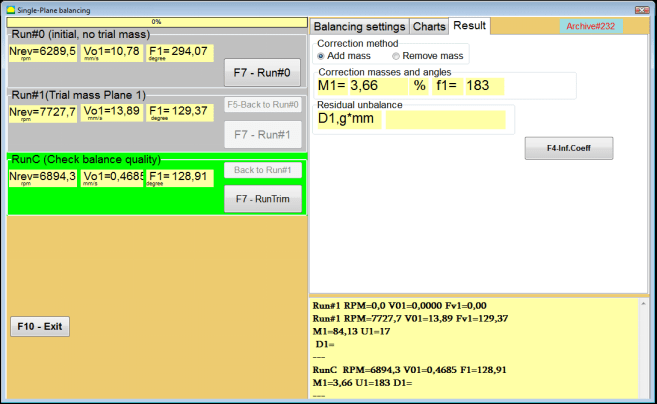
Slika 7.24. Balansiranje u jednoj ravnini. Izvođenje RunTrim. Kartica rezultata
Ova težina se može dodati korekcijskoj težini koja je već montirana na rotoru kako bi se kompenzirala zaostala neravnoteža. Osim toga, zaostala neuravnoteženost rotora postignuta nakon balansiranja prikazana je u donjem dijelu ovog prozora.
U slučaju kada količina zaostale vibracije i/ili zaostale neuravnoteženosti balansiranog rotora zadovoljava zahtjeve tolerancije utvrđene u tehničkoj dokumentaciji, proces balansiranja se može dovršiti.
Otherwise, the balancing process may continue. This allows the method of successive approximations to correct possible errors that may occur during the installation (removal) of the corrective weight on a balanced rotor.
Prilikom nastavka procesa balansiranja na balansirajućem rotoru potrebno je ugraditi (ukloniti) dodatnu korektivnu masu, čiji su parametri navedeni u odjeljku „Korekcija masa i kutova“.
Koeficijenti utjecaja (1-ravnina)
The “F4-Inf.Coeff" gumb u "ResultKartica ” koristi se za pregled i pohranjivanje u memoriju računala koeficijenata uravnoteženja rotora (koeficijenata utjecaja) izračunatih iz rezultata kalibracijskih probnih vožnji.
Kada se pritisne, "Koeficijenti utjecaja (jedna ravnina)Na zaslonu računala pojavljuje se prozor "" u kojem su prikazani koeficijenti uravnoteženja izračunati iz rezultata kalibracijskih (testnih) vožnji. Ako se tijekom naknadnog uravnoteženja ovog stroja pretpostavlja korištenje ""Saved coeff."U ovom načinu rada, ovi koeficijenti moraju biti pohranjeni u memoriji računala."
Da biste to učinili, kliknite na "F9 – Spremigumb " i idite na drugu stranicu "Arhiva koeficijenata utjecaja. Jedna ravnina.“

Slika 7.25. Koeficijenti ravnoteže u 1. ravnini
Zatim morate unijeti naziv ovog stroja u "Rotor" i kliknite na "F2-Spremi” gumb za spremanje navedenih podataka na računalo.
Zatim se možete vratiti na prethodni prozor pritiskom na tipku "F10-Izlaz” (ili funkcijsku tipku F10 na tipkovnici računala).
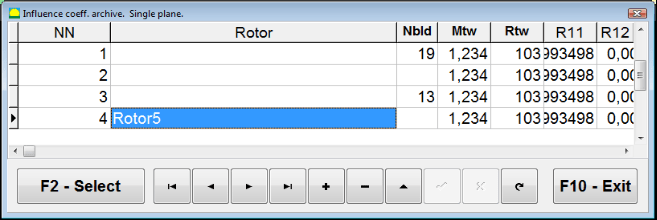
Sl. 7.26. „Arhiva koeficijenata utjecaja. Jedna ravnina.“
Izvješće o bilanci
Nakon uravnoteženja, svi podaci su spremljeni i izvješće o uravnoteženju je kreirano. Izvješće možete pregledati i urediti u ugrađenom uređivaču. U prozoru „Uravnoteženje arhive u jednoj ravnini“ (Sl. 7.9) pritisnite gumb “F9 - Izvješće" za pristup uređivaču izvješća o uravnoteženju.
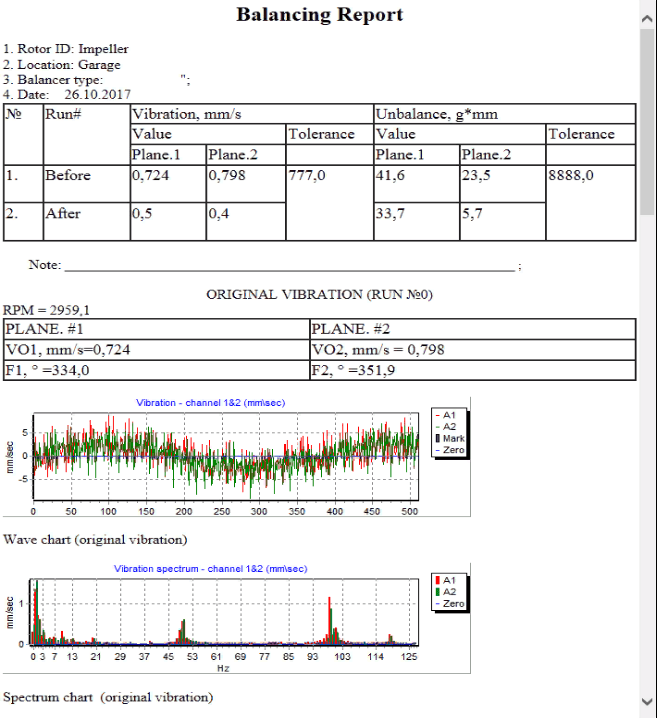
Sl. 7.27. Izvješće o uravnoteženju.
Spremljeni postupak uravnoteženja koeficijenata sa spremljenim koeficijentima utjecaja u 1 ravnini
Postavljanje mjernog sustava (unos početnih podataka)
Saved coeff. balancing može se izvesti na stroju za koji su koeficijenti uravnoteženja već određeni i uneseni u memoriju računala.
Attention!
Kod balansiranja sa spremljenim koeficijentima, senzor vibracija i senzor faznog kuta moraju biti instalirani na isti način kao i kod početnog balansiranja.
Unos početnih podataka za Saved coeff. balancing (kao u slučaju primarnog("New rotor") balansiranje) počinje u "Balansiranje u jednoj ravnini. Postavke balansiranja.“.
In this case, in the “Influence coefficients” section, select the “Spremljeni koef" stavka. U ovom slučaju, druga stranica stavke "koef. arhiva. Jedan avion.”, koja pohranjuje arhivu spremljenih koeficijenata uravnoteženja.
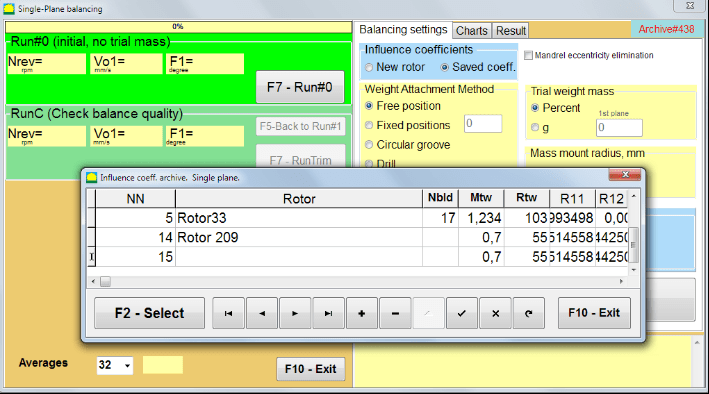
Slika 7.28. Balansiranje sa spremljenim utjecajnim koeficijentima u 1 ravnini
Kretanjem kroz tablicu ove arhive pomoću tipki „►“ ili „◄“ možete odabrati željeni zapis s koeficijentima uravnoteženja stroja koji nas zanima. Zatim, da biste ove podatke koristili u trenutnim mjerenjima, pritisnite tipku „F2 – Odaberite" dugme.
Nakon toga, sadržaj svih ostalih prozora "Balansiranje u jednoj ravnini. Postavke balansiranja." se popunjavaju automatski.
Nakon završetka unosa početnih podataka, možete započeti s mjerenjem.
Mjerenja tijekom balansiranja sa spremljenim koeficijentima utjecaja
Balansiranje sa spremljenim koeficijentima utjecaja zahtijeva samo jedan početni i najmanje jedan probni rad stroja za balansiranje.
Attention!
Prije početka mjerenja potrebno je uključiti rotaciju rotora i uvjeriti se da je frekvencija rotacije stabilna.
Za provođenje mjerenja parametara vibracija u "Run#0 (početno, bez probne mase)", pritisnite "F7 – Run#0" (ili pritisnite tipku F7 na tipkovnici računala).
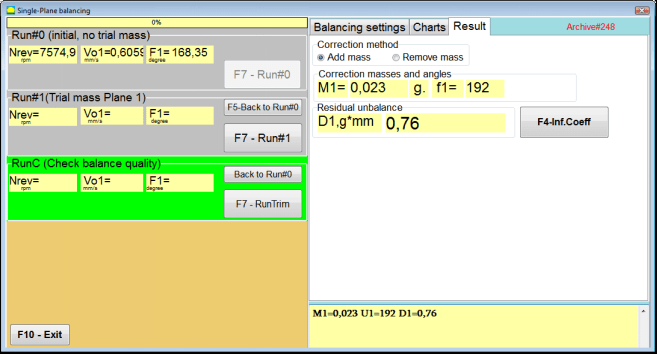
Slika 7.29. Balansiranje sa spremljenim utjecajnim koeficijentima u jednoj ravnini. Rezultati nakon jedne vožnje.
U odgovarajućim poljima od "Run#0U odjeljku ” pojavljuju se rezultati mjerenja brzine rotora (RPM), vrijednost RMS komponente (Vо1) i faze (F1) 1x vibracije.
U isto vrijeme, “Result” kartica prikazuje rezultate izračuna mase i kuta korektivnog utega, koji se mora postaviti na rotor radi kompenzacije neravnoteže.
Štoviše, u slučaju korištenja polarnog koordinatnog sustava, zaslon prikazuje vrijednosti mase i kutove ugradnje korekcijskih utega.
U slučaju cijepanja korektivnog utega na fiksne pozicije ispisuju se brojevi pozicija balansnog rotora i masa utega koje je potrebno na njih postaviti.
Nadalje, postupak balansiranja provodi se u skladu s preporukama navedenim u odjeljku 7.4.2. za primarno balansiranje.
Mandrel eccentricity elimination (Index balancing)
If during balancing the rotor is installed in a cylindrical mandrel, then the eccentricity of the mandrel may introduce an additional error. To eliminate this error, the rotor should be deployed in the mandrel 180 degrees and carry out an additional start. This is called index balancing.
To carry out index balancing, a special option is provided in the Balanset-1A program. When checked Mandrel eccentricity elimination an additional RunEcc section appears in the balancing window.

Slika 7.30. Radni prozor za balansiranje indeksa.
Nakon pokretanja Run # 1 (Probna ravnina mase 1), pojavit će se prozor
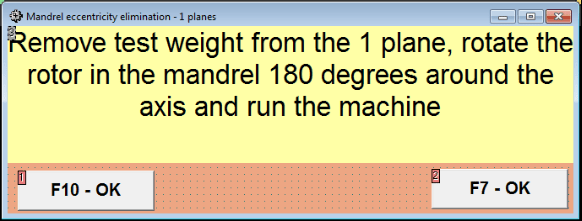
Slika 7.31 Prozor pozornosti za uravnoteženje indeksa.
Nakon ugradnje rotora s okretom od 180°, mora se dovršiti Run Ecc. Program će automatski izračunati stvarnu neravnotežu rotora bez utjecaja na ekscentricitet trna.
7.5 Balansiranje u dvije ravnine
Before starting work in the Two plane balancing mode, it is necessary to install vibration sensors on the machine body at the selected measurement points and connect them to the inputs X1 and X2 of the measuring unit, respectively.
An optical phase angle sensor must be connected to input X3 of the measuring unit. In addition, to use this sensor, a reflective tape must be glued onto the accessible rotor surface of the balancing machine.
Detailed requirements for choosing the installation location of sensors and their mounting at the facility during balancing are set out in Appendix 1.
Rad na programu u "Two plane balancing” mode starts from the Main window of the programs.
Click on the “F3-Two plane” button (or press the F3 key on the computer keyboard).
Nadalje, kliknite na gumb „F7 – Balansiranje“, nakon čega će se na zaslonu računala pojaviti radni prozor (vidi sliku 7.13), odabir arhive za spremanje podataka prilikom balansiranja u dvije ravnine.
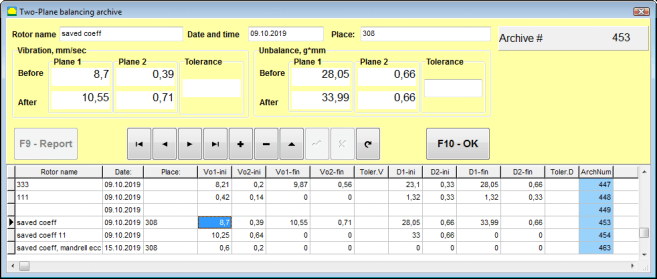
Fig. 7.32 Two plane balancing archive window.
U ovom prozoru trebate unijeti podatke o uravnoteženom rotoru. Nakon pritiska tipke "F10-OK", pojavit će se prozor za balansiranje.
Balancing settings (2-plane)
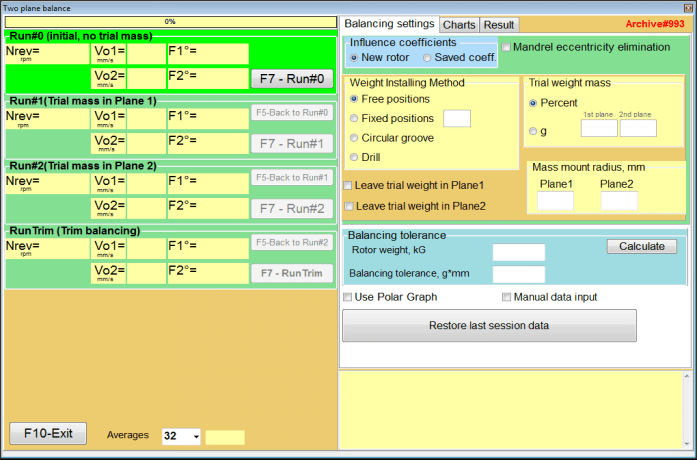
Fig. 7.33. Balancing in two planes window.
Na desnoj strani prozora nalazi se "Balancing settings” za unos postavki prije balansiranja.
- Influence coefficients – Balansiranje novog rotora ili balansiranje korištenjem pohranjenih koeficijenata utjecaja (koeficijenata balansiranja)
- Mandrel eccentricity elimination – Balansiranje s dodatnim startom kako bi se uklonio utjecaj ekscentričnosti trna
- Weight Attachment Method – Ugradnja korektivnih utega na proizvoljno mjesto na obodu rotora ili u fiksni položaj. Izračuni za bušenje pri uklanjanju mase.
- “Free position” – utezi se mogu postaviti u proizvoljne kutne položaje na obodu rotora.
- “Fixed position” – uteg se može postaviti u fiksne kutne položaje na rotoru, na primjer, na lopatice ili rupe (na primjer 12 rupa – 30 stupnjeva) itd. Broj fiksnih položaja mora se unijeti u odgovarajuće polje. Nakon uravnoteženja, program će automatski podijeliti uteg na dva dijela i naznačiti broj položaja na kojima je potrebno uspostaviti dobivene mase.
- Trial weight mass – Probna težina
- Leave trial weight in Plane1 / Plane2 – Uklonite ili ostavite probni uteg prilikom balansiranja.
- Mass mount radius, mm – Radijus montaže probnih i korektivnih utega
- Balancing tolerance – Unos ili izračunavanje tolerancija preostale neravnoteže u g-mm
- Use Polar Graph – Koristite polarni graf za prikaz rezultata balansiranja
- Manual data input – Ručni unos podataka za izračun utega za uravnoteženje
- Restore last session data – Oporavak podataka mjerenja posljednje sesije u slučaju neuspjeha u nastavku balansiranja.
2 planes balancing. New rotor
Postavljanje mjernog sustava (unos početnih podataka)
Input of the initial data for the New rotor balancing u "Balansiranje u dvije ravnine. Postavke“.
In this case, in the “Influence coefficients” section, select the “New rotor” item.
Further, in the section “Trial weight mass“, you must select the unit of measurement of the mass of the trial weight – “Gram” or “Percent“.
Prilikom odabira mjerne jedinice "Percent„, svi daljnji izračuni mase korektivnog utega provodit će se kao postotak u odnosu na masu probnog utega.“
Prilikom odabira "Gram” mjerna jedinica, svi daljnji izračuni mase korektivnog utega bit će u gramima. Zatim unesite u prozore koji se nalaze desno od natpisa „Gram” the mass of trial weights that will be installed on the rotor.
Attention!
Ako je potrebno koristiti "Saved coeff.” Način za daljnji rad tijekom početnog balansiranja, masa probnih utega mora se unijeti u grams.
Zatim odaberite "Weight Attachment Method” – “Circum” or “Fixed position“.
Ako odaberete "Fixed position„, morate unijeti broj pozicija.
Calculation of tolerance for residual imbalance (Balancing tolerance)
Tolerancija za preostalu neravnotežu (tolerancija uravnoteženja) može se izračunati u skladu s postupkom opisanim u normi ISO 1940 Vibracije. Zahtjevi za kvalitetu uravnoteženja rotora u konstantnom (krutom) stanju. Dio 1. Specifikacija i provjera tolerancija uravnoteženja.

Fig. 7.34. Balancing tolerance calculation window
Initial run (Run#0)
Prilikom balansiranja u dvije ravnine u "New rotor" način rada, balansiranje zahtijeva tri kalibracijska rada i barem jedan probni rad stroja za balansiranje.
Mjerenje vibracija pri prvom pokretanju stroja provodi se u "Two plane balance"radni prozor u "Run#0” section.
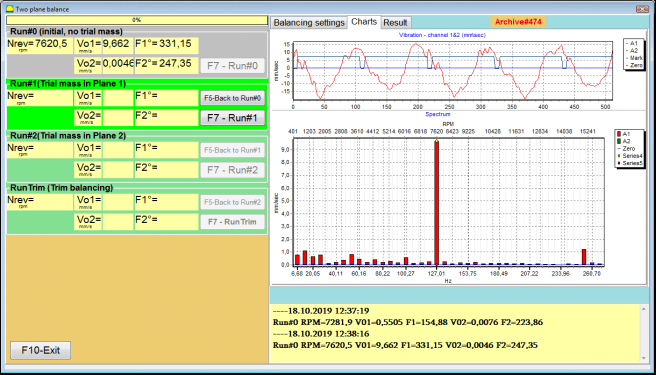
Slika 7.35. Rezultati mjerenja pri balansiranju u dvije ravnine nakon početne vožnje.
Attention!
Prije početka mjerenja potrebno je uključiti rotaciju rotora balansirajućeg stroja (prvi rad) i provjeriti je li ušao u radni način sa stabilnom brzinom.
To measure vibration parameters in the Run#0 u odjeljku kliknite na "F7 – Run#0gumb ” (ili pritisnite tipku F7 na tipkovnici računala)
Rezultati mjerenja brzine rotora (RPM), vrijednost RMS (VО1, VО2) i faze (F1, F2) 1x vibracije pojavljuju se u odgovarajućim prozorima Run#0 section.
Run#1.Trial mass in Plane1
Before starting to measure vibration parameters in the “Run#1.Trial mass in Plane1” section, you should stop the rotation of the rotor of the balancing machine and install a trial weight on it, the mass selected in the “Trial weight mass” section.
Attention!
- Pitanje odabira mase probnih utega i mjesta njihove ugradnje na rotoru balansirajućeg stroja detaljno je razmotreno u Dodatku 1.
- Ako je potrebno koristiti Saved coeff. Mode in future work, the place for installing the trial weight must necessarily coincide with the place for installing the mark used to read the phase angle.
After this, it is necessary to turn on the rotation of the rotor of the balancing machine again and make sure that it has entered the operating mode.
To measure vibration parameters in the “Run # 1.Trial mass in Plane1" kliknite na odjeljak "F7 – Run#1” button (or press the F7 key on the computer keyboard).
Nakon uspješnog završetka postupka mjerenja, vraćate se na karticu s rezultatima mjerenja.
In this case, in the corresponding windows of the “Run#1. Trial mass in Plane1” section, the results of measuring the rotor speed (RPM), as well as the value of the components of the RMS (Vо1, Vо2) and phases (F1, F2) of 1x vibration.
"Pokreni # 2. Probna masa u ravnini2"
Before starting to measure vibration parameters in the section “Run # 2.Trial mass in Plane2“, you must perform the following steps:
- zaustaviti rotaciju rotora balansirajućeg stroja;
- uklonite probni uteg postavljen u ravnini 1;
- U ravninu 2 postavite probni uteg, mase odabrane u odjeljku "Trial weight mass“.
After this, turn on the rotation of the rotor of the balancing machine and make sure that it has entered the operating speed.
Za početak mjerenja vibracija u "Run # 2.Trial mass in Plane2" kliknite na odjeljak "F7 – Run # 2" (ili pritisnite tipku F7 na tipkovnici računala). Zatim "Result"otvara se kartica ”.
In the case of using the Weight Attachment Method” – “Free positions, zaslon prikazuje vrijednosti mase (M1, M2) i kutove ugradnje (f1, f2) korektivnih utega.
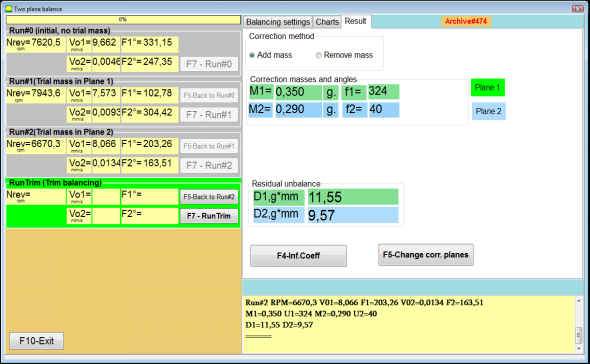
Fig. 7.36. Results of calculation of corrective weights – free position
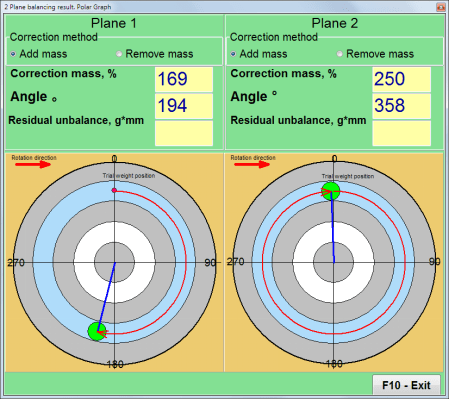
Slika 7.37. Rezultati izračuna korektivnih utega – slobodna pozicija. Polarni dijagram
In the case of using the Weight Attachment Method” – “Fixed positions

Sl. 7.38. Rezultati izračuna korektivnih utega – fiksni položaj.
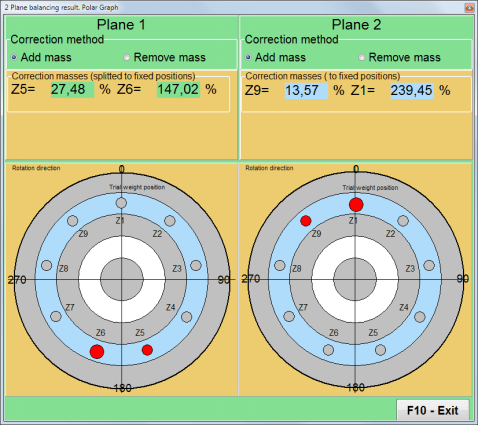
Slika 7.39. Rezultati izračuna korektivnih utega – fiksni položaj. Polarni dijagram.
U slučaju korištenja metode pričvršćivanja utega” – “Circular groove“
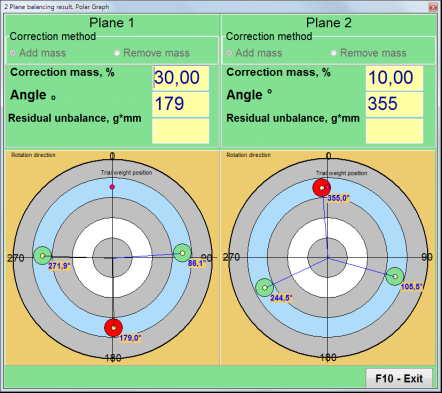
Sl. 7.40. Rezultati izračuna korektivnih utega – Kružni utor.
Attention!:
- Nakon završetka postupka mjerenja na RUN#2 of the balancing machine, stop the rotation of the rotor and remove the trial weight previously installed. Then you can to install (or remove) corrective weights.
- Kutni položaj korektivnih utega u polarnom koordinatnom sustavu računa se od mjesta ugradnje probnog utega u smjeru vrtnje rotora.
- U slučaju "Fixed position” – 1st position (Z1), coincides with the place of installation of the trial weight. The counting direction of the position number is in the direction of rotation of the rotor.
- Prema zadanim postavkama, korektivna težina bit će dodana rotoru. To je naznačeno oznakom postavljenom u "Add” field. If removing the weight (for example, by drilling), you must set a mark in the “Delete” field, after which the angular position of the correction weight will automatically change by 180º.
RunC (Trim run)
After installing the correction weight on the balancing rotor it is necessary to carry out a RunC (trim) and evaluate the effectiveness of the performed balancing.
Attention!
Prije početka mjerenja na probnom radu potrebno je uključiti rotaciju rotora stroja i provjeriti je li ušao u radnu brzinu.
Za mjerenje parametara vibracija u odjeljku RunTrim (Provjera kvalitete ravnoteže) kliknite na "F7 – RunTrim” button (or press the F7 key on the computer keyboard).
The results of measuring the rotor rotation frequency (RPM), as well as the value of the RMS component (Vо1) and phase (F1) of 1x vibration will be shown.
The “ResultNa desnoj strani radnog prozora pojavljuje se kartica ” s tablicom rezultata mjerenja koja prikazuje rezultate izračuna parametara dodatnih korektivnih utega.
These weights can be added to corrective weights that are already installed on the rotor to compensate for residual imbalance.
In addition, the residual rotor unbalance achieved after balancing is displayed in the lower part of this window.
U slučaju kada vrijednosti zaostale vibracije i/ili zaostale neravnoteže uravnoteženog rotora zadovoljavaju zahtjeve tolerancije utvrđene u tehničkoj dokumentaciji, postupak balansiranja može se dovršiti.
Otherwise, the balancing process may continue. This allows the method of successive approximations to correct possible errors that may occur during the installation (removal) of the corrective weight on a balanced rotor.
When continuing the balancing process on the balancing rotor, it is necessary to install (remove) additional corrective mass, the parameters of which are indicated in the “Result” window.
In the “Result” window there are two control buttons can be used – “F4-Inf.Coeff“, “F5 – Change correction planes“.
Influence coefficients (2 planes)
The “F4-Inf.CoeffTipka ” (ili funkcijska tipka F4 na tipkovnici računala) koristi se za pregled i spremanje koeficijenata balansiranja rotora u memoriju računala, izračunatih iz rezultata dvaju pokretanja kalibracije.
Kada se pritisne, "Influence coefficients (two planes)Na zaslonu računala pojavljuje se radni prozor ” u kojem su prikazani koeficijenti uravnoteženja izračunati na temelju rezultata prva tri početka kalibracije.

Fig. 7.41. Working window with balancing coefficients in 2 planes.
U budućnosti, prilikom balansiranja takvog tipa stroja, pretpostavlja se da će biti potrebno koristiti "Saved coeff." način rada i koeficijenti uravnoteženja pohranjeni u memoriji računala.
To save coefficients, click the “F9 – Save” button and go to the “Influence coefficients archive (2planes)” windows (see Fig. 7.42)
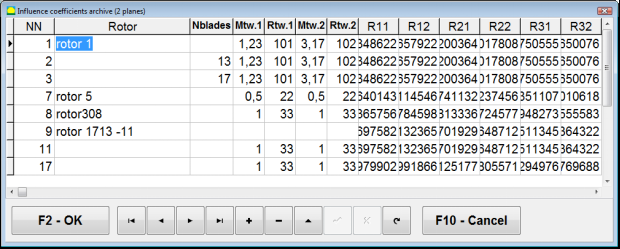
Fig. 7.42. The second page of the working window with balancing coefficients in 2 planes.
Change correction planes
The “F5 – Change correction planesGumb ” se koristi kada je potrebno promijeniti položaj korekcijskih ravnina, kada je potrebno ponovno izračunati mase i kutove ugradnje korektivnih utega.
This mode is primarily useful when balancing rotors of complex shape (for example, crankshafts).
Kada se pritisne ovaj gumb, radni prozor “Recalculation of correction weights mass and angle to other correction planes" prikazuje se na zaslonu računala.
In this working window, you should select one of the 4 possible options by clicking corresponding picture.
Izvorne korekcijske ravnine (Н1 i Н2) označene su zelenom bojom, a nove (K1 i K2), za koje se ponovno izračunava, crvenom bojom.
Zatim, u "Calculation data" unesite tražene podatke, uključujući:
- udaljenost između odgovarajućih korekcijskih ravnina (a, b, c);
- nove vrijednosti radijusa ugradnje korektivnih utega na rotor (R1 ', R2').
After entering the data, you must press the button “F9-calculate“
Rezultati izračuna (mase M1, M2 i kutovi ugradnje korektivnih utega f1, f2) prikazani su u odgovarajućem dijelu ovog radnog prozora.
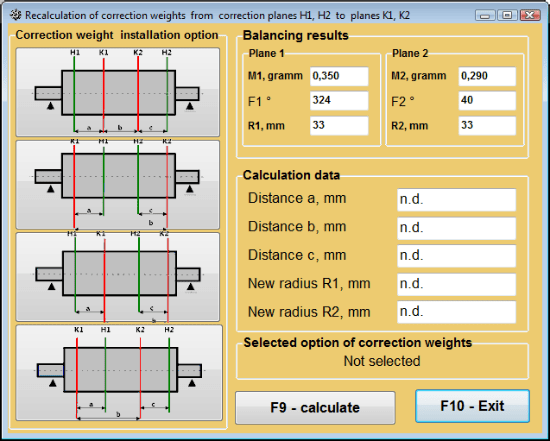
Sl. 7.43 Promjena korekcijskih ravnina. Ponovni izračun korekcijske mase i kuta u odnosu na druge korekcijske ravnine.
Ušteđeni koeficijent balansiranja u 2 ravnine
Saved coeff. balancing can be performed on a machine for which balancing coefficients have already been determined and saved in the computer memory.
Attention!
When re-balancing, the vibration sensors and the phase angle sensor must be installed in the same way as during the initial balancing.
Unos početnih podataka za ponovno uravnoteženje počinje u "Ravnoteža u dvije ravnine. Postavke balansiranja“.
In this case, in the “Influence coefficients” section, select the “Saved coeff."Stavka. U ovom slučaju, prozor "Influence coefficients archive (2planes)Pojavit će se ” u kojem je pohranjena arhiva prethodno određenih koeficijenata uravnoteženja.
Kretanjem kroz tablicu ove arhive pomoću tipki „►“ ili „◄“ možete odabrati željeni zapis s koeficijentima uravnoteženja stroja koji nas zanima. Zatim, da biste ove podatke koristili u trenutnim mjerenjima, pritisnite tipku „F2 – OKgumb ” i povratak na prethodni radni prozor.
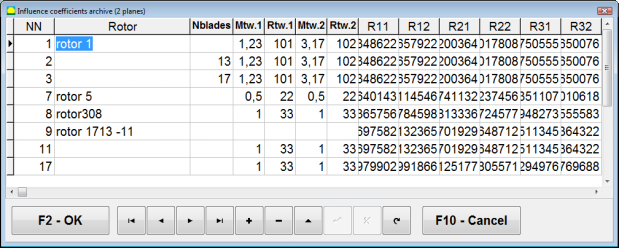
Fig. 7.44. The second page of the working window with balancing coefficients in 2 planes.
Nakon toga, sadržaj svih ostalih prozora "Balansiranje u 2 pl. Izvorni podaci" se popunjava automatski.
Saved coeff. Balancing
“Saved coeff.„Balansiranje zahtijeva samo jedno podešavanje i barem jedno probno pokretanje stroja za balansiranje.“
Vibration measurement at the tuning start (Run # 0) stroja se izvodi u "Balancing in 2 planes”radni prozor s tablicom rezultata balansiranja u Run # 0 section.
Attention!
Before starting the measurement, it is necessary to turn on the rotation of the rotor of the balancing machine and make sure that it has entered the operating mode with a stable speed.
To measure vibration parameters in the Run # 0 u odjeljku kliknite na "F7 – Run#0” button (or press the F7 key on the computer keyboard).
The results of measuring the rotor speed (RPM), as well as the value of the components of the RMS (VО1, VО2) and phases (F1, F2) of the 1x vibration appear in the corresponding fields of the Run # 0 section.
U isto vrijeme, “ResultOtvara se kartica ” koja prikazuje rezultate izračuna parametara korektivnih utega koji se moraju ugraditi na rotor kako bi se kompenzirala njegova neravnoteža.
Štoviše, u slučaju korištenja polarnog koordinatnog sustava, zaslon prikazuje vrijednosti mase i kutove ugradnje korektivnih utega.
In the case of decomposition of corrective weights on the blades, the numbers of the blades of the balancing rotor and the mass of weight that need to be installed on them are displayed.
Further, the balancing process is carried out in accordance with the recommendations set out in section 7.6.1.2. for primary balancing.
Attention!:
- After completion of the measurement process after the second start of the balanced machine stop the rotation of its rotor and remove the previously set trial weight. Only then you can begin to install (or remove) correction weight on the rotor.
- Counting the angular position of the place of adding (or removing) of the correction weight from the rotor is carried out on the installation site of trial weight in the polar coordinate system. Counting direction coincides with the direction of the angle of rotor rotation.
- U slučaju balansiranja na lopaticama – balansirana lopatica rotora, označena kao pozicija 1, podudara se s mjestom postavljanja probnog utega. Smjer referentnog broja lopatice prikazan na zaslonu računala izvodi se u smjeru vrtnje rotora.
- U ovoj verziji programa prema zadanim postavkama prihvaćeno je da će se na rotor dodati korekcijski uteg. Oznaka postavljena u polju "Dodavanje" to potvrđuje. U slučaju korekcije neravnoteže uklanjanjem utega (na primjer bušenjem) potrebno je postaviti oznaku u polje "Uklanjanje", tada će se kutni položaj korekcijskog utega automatski promijeniti na 180º.
Eliminacija ekscentričnosti trna (balansiranje indeksa) – dvije ravnine
If during balancing the rotor is installed in a cylindrical mandrel, then the eccentricity of the mandrel may introduce an additional error. To eliminate this error, the rotor should be deployed in the mandrel 180 degrees and carry out an additional start. This is called index balancing.
To carry out index balancing, a special option is provided in the Balanset-1A program. When checked Mandrel eccentricity elimination an additional RunEcc section appears in the balancing window.
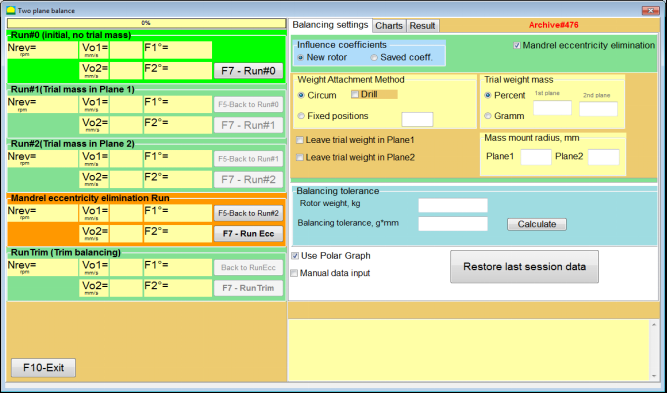
Fig. 7.45. The working window for Index balancing.
After running Run # 2 (Trial mass Plane 2), a window will appear
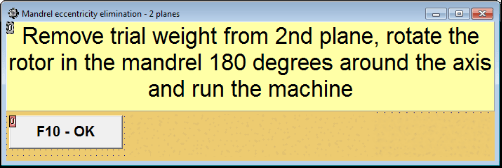
Fig. 7.46. Attention windows
Nakon ugradnje rotora s okretom od 180°, mora se dovršiti Run Ecc. Program će automatski izračunati stvarnu neravnotežu rotora bez utjecaja na ekscentricitet trna.
7.6 Način rada s grafikonima
Rad u načinu rada „Grafikoni“ započinje iz početnog prozora (vidi sliku 7.1) pritiskom na tipku „F8 – Grafikoni”. Zatim se otvara prozor „Mjerenje vibracija na dva kanala. Grafikoni” (vidi sliku 7.19).

Sl. 7.47. Radni prozor „Mjerenje vibracija na dva kanala. Grafikoni“.
Tijekom rada u ovom načinu rada moguće je iscrtati četiri verzije vibracijske karte.
Prva verzija omogućuje dobivanje vremenske funkcije ukupne vibracije (brzine vibracije) na prvom i drugom mjernom kanalu.
Druga verzija vam omogućuje da dobijete grafikone vibracija (brzine vibracija), koje se javljaju na frekvenciji rotacije i njenim višim harmonijskim komponentama.
Ti su grafikoni dobiveni kao rezultat sinkronog filtriranja ukupne funkcije vremena vibracija.
Treća verzija nudi vibracijske karte s rezultatima harmonijske analize.
Četvrta verzija omogućuje dobivanje grafikona vibracija s rezultatima analize spektra.
Grafikoni ukupnih vibracija
Za iscrtavanje ukupne vibracijske karte u radnom prozoru "Mjerenje vibracija na dva kanala. Karte"potrebno je odabrati način rada"ukupne vibracije” klikom na odgovarajući gumb. Zatim postavite mjerenje vibracija u okviru "Trajanje, u sekundama", klikom na gumb «▼» i odaberite iz padajućeg popisa željeno trajanje procesa mjerenja, koje može biti jednako 1, 5, 10. , 15 ili 20 sekundi;
Kada ste spremni, pritisnite (kliknite) gumb "F9Tipkom "-Mjerenje" postupak mjerenja vibracija započinje istovremeno na dva kanala.
Nakon završetka procesa mjerenja u radnom prozoru pojavljuju se grafikoni vremenske funkcije ukupne vibracije prvog (crveno) i drugog (zeleno) kanala (vidi sl. 7.47).
Na ovim dijagramima vrijeme je ucrtano na X-osi, a amplituda brzine vibracija (mm/s) je ucrtana na Y-osi.
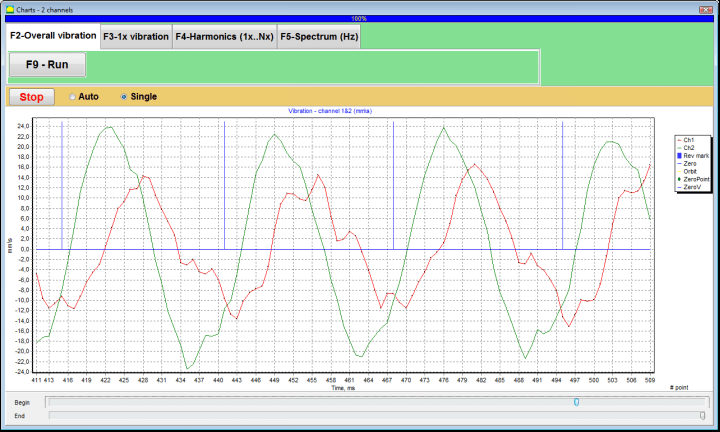
Sl. 7.48. Radni prozor za izlaz vremenske funkcije ukupnih dijagrama vibracija
Na ovim grafikonima također postoje oznake (plave boje) koje povezuju grafikone ukupnih vibracija s frekvencijom vrtnje rotora. Osim toga, svaka oznaka označava početak (kraj) sljedećeg okretaja rotora.
U slučaju potrebe za promjenom mjerila grafikona na X-osi, klizač, usmjeren strelicom na sl. 7.20, može se koristiti.
Grafikoni 1x vibracije
Za crtanje dijagrama vibracija 1x u radnom prozoru "Mjerenje vibracija na dva kanala. Karte"potrebno je odabrati način rada"1x vibracija" klikom na odgovarajući gumb.
Zatim se pojavljuje radni prozor „1x vibracija“.
Pritisnite (kliknite) gumb "F9Tipkom "-Mjerenje" postupak mjerenja vibracija započinje istovremeno na dva kanala.
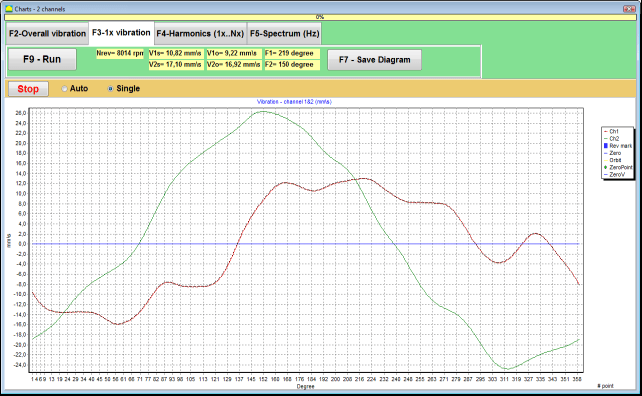
Sl. 7.49. Radni prozor za izlaz 1x dijagrama vibracija.
Nakon završetka procesa mjerenja i matematičkog izračuna rezultata (sinkrono filtriranje vremenske funkcije ukupne vibracije) na zaslonu u glavnom prozoru u razdoblju jednakom jedan okretaj rotora pojavljuju se grafikoni 1x vibracija na dva kanala.
U ovom slučaju, grafikon za prvi kanal je prikazan crvenom bojom, a za drugi kanal zelenom bojom. Na ovim dijagramima kut okretaja rotora ucrtan je (od oznake do oznake) na X-osi, a amplituda brzine vibracija (mm/s) ucrtana je na Y-osi.
Osim toga, u gornjem dijelu radnog prozora (desno od gumba „F9 – Mjera„) numeričke vrijednosti mjerenja vibracija oba kanala, slične onima koje dobivamo u „Vibration meter” prikazuju se.
Konkretno: RMS vrijednost ukupne vibracije (V1s, V2s), veličina RMS (V1o, V2o) i faza (Fi, Fj) od 1x vibracija i brzine rotora (Nrev).
Vibracijski dijagrami s rezultatima harmonijske analize
Za crtanje grafikona s rezultatima harmonijske analize u operativnom prozoru “Mjerenje vibracija na dva kanala. Karte"potrebno je odabrati način rada"Harmonijska analiza" klikom na odgovarajući gumb.
Zatim se pojavljuje operativni prozor za istovremeni ispis dijagrama privremene funkcije i spektra harmonijskih aspekata vibracija čiji je period jednak ili višekratnik frekvencije vrtnje rotora.
Attention!
Pri radu u ovom načinu rada potrebno je koristiti senzor faznog kuta koji sinkronizira proces mjerenja s frekvencijom rotora strojeva na koje je senzor postavljen.
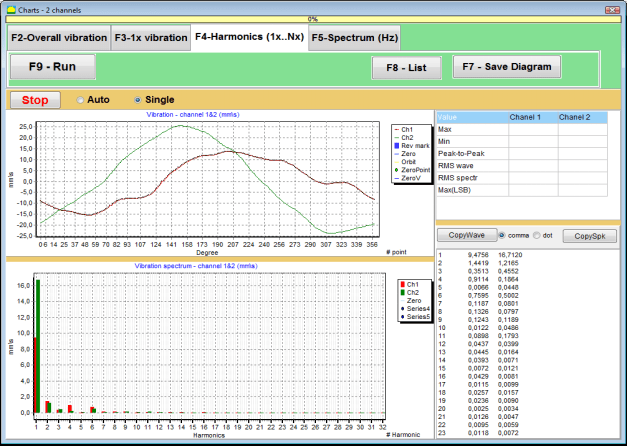
Sl. 7.50. Harmonici radnog prozora 1x vibracije.
Kada ste spremni, pritisnite (kliknite) gumb "F9Tipkom "-Mjerenje" postupak mjerenja vibracija započinje istovremeno na dva kanala.
Nakon završetka procesa mjerenja u radnom prozoru pojavljuju se grafovi vremenske funkcije (gornji graf) i harmonici 1x vibracije (donji graf).
Broj harmonijskih komponenata ucrtan je na X-osi, a RMS brzine vibracija (mm/s) ucrtan je na Y-osi.
Grafikoni vremenske domene i spektra vibracija
Za crtanje spektralnog dijagrama koristite “F5-Spectrumkartica ":
Zatim se pojavljuje operativni prozor za istovremeni prikaz grafikona valnog i spektra vibracija.

Sl. 7.51. Radni prozor za izlaz spektra vibracija.
Kada ste spremni, pritisnite (kliknite) gumb "F9Tipkom "-Mjerenje" postupak mjerenja vibracija započinje istovremeno na dva kanala.
Nakon završetka procesa mjerenja u radnom prozoru pojavljuju se grafikoni vremenske funkcije (gornji grafikon) i spektra vibracija (donji grafikon).
Frekvencija vibracija ucrtana je na X-osi, a RMS brzine vibracija (mm/s) ucrtana je na Y-osi.
U ovom slučaju, grafikon za prvi kanal je prikazan crvenom bojom, a za drugi kanal zelenom bojom.
8. Opće upute za rad i održavanje uređaja
8.1 Uravnoteženje kriterija kvalitete (standard ISO 2372)
Kvaliteta balansiranja može se procijeniti korištenjem razina vibracija utvrđenih normom ISO 2372. Tablica u nastavku prikazuje prihvatljive razine vibracija za različite klase strojeva:
| Klasa stroja | Dobro (mm/s RMS) |
Prihvatljiv (mm/s RMS) |
Još uvijek prihvatljivo (mm/s RMS) |
Neprihvatljivo (mm/s RMS) |
|---|---|---|---|---|
| Razred 1 Mali strojevi na krutim temeljima (motori do 15 kW) |
< 0,7 | 0.7 – 1.8 | 1.8 – 4.5 | > 4.5 |
| Razred 2 Srednji strojevi bez temelja (motori 15-75 kW), pogonski mehanizmi do 300 kW |
< 1.1 | 1.1 – 2.8 | 2.8 – 7.1 | > 7.1 |
| Razred 3 Veliki strojevi na krutim temeljima (oprema preko 300 kW) |
< 1,8 | 1.8 – 4.5 | 4.5 – 11 | > 11 |
| Razred 4 Veliki strojevi na laganim temeljima (oprema preko 300 kW) |
< 2.8 | 2.8 – 7.1 | 7.1 – 18 | > 18 |
Napomena: Ove vrijednosti pružaju smjernice za procjenu kvalitete balansiranja. Uvijek se pozivajte na specifikacije proizvođača specifične opreme i primjenjive standarde za vašu primjenu.
8.2 Zahtjevi za održavanje
Redovito održavanje
- Redovita kalibracija senzora prema specifikacijama proizvođača
- Održavajte senzore čistima i bez magnetskih ostataka
- Opremu čuvajte u zaštitnoj kutiji kada se ne koristi
- Zaštitite laserski senzor od prašine i vlage
- Redovito provjeravajte spojeve kabela na istrošenost ili oštećenja
- Ažurirajte softver prema preporuci proizvođača
- Održavajte sigurnosne kopije važnih podataka o uravnoteženju
Standardi EU za održavanje
Održavanje opreme mora biti u skladu sa:
- EN ISO 9001: Zahtjevi sustava upravljanja kvalitetom
- EN 13306: Terminologija i definicije održavanja
- EN 15341: Ključni pokazatelji uspješnosti održavanja
- Redovite sigurnosne inspekcije prema direktivi EU o strojevima
PRILOG 1. BALANSIRANJE ROTORA
Rotor je tijelo koje se okreće oko određene osi i drži ga ležajne površine u nosačima. Ležajne površine rotora prenose težinu na nosače putem kotrljajućih ili kliznih ležajeva. Kada koristimo izraz "ležajna površina", jednostavno se odnosimo na rukavac* ili površine koje zamjenjuju rukavac.
*Čep (Zapfen na njemačkom za „čep“, „igla“) – dio je vratila ili osi koji nosi držač (ležajna kutija).
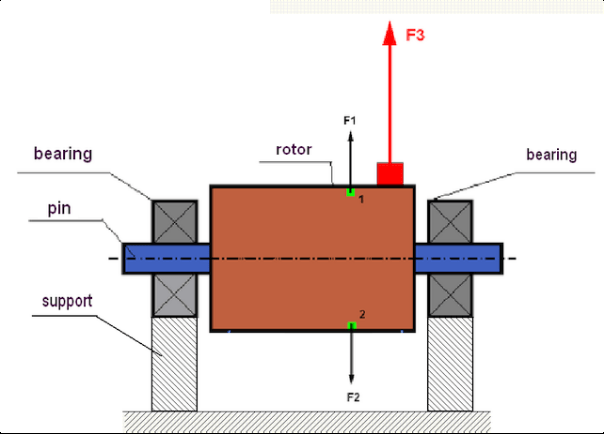
fig.1 Rotor and centrifugal forces.
In a perfectly balanced rotor, its mass is distributed symmetrically regarding the axis of the rotation. This means that any element of the rotor can correspond to another element located symmetrically in a relation to the axis of the rotation. During rotation, each rotor element acts upon by a centrifugal force directed in the radial direction (perpendicular to the axis of the rotor rotation). In a balanced rotor, the centrifugal force influencing any element of the rotor is balanced by the centrifugal force that influences the symmetrical element. For example, elements 1 and 2 (shown in fig.1 and colored in green) are influenced by centrifugal forces F1 and F2: equal in value and absolutely opposite in directions. This is true for all symmetrical elements of the rotor and thus the total centrifugal force influencing the rotor is equal to 0 the rotor is balanced. But if the symmetry of the rotor is broken (in Figure 1, the asymmetric element is marked in red), then the unbalanced centrifugal force F3 begins to act on the rotor.
Prilikom rotacije, ova sila mijenja smjer zajedno s rotacijom rotora. Dinamičko opterećenje koje proizlazi iz ove sile prenosi se na ležajeve, što dovodi do njihovog ubrzanog trošenja. Osim toga, pod utjecajem ove promjenjive sile dolazi do cikličke deformacije nosača i temelja na kojem je rotor pričvršćen, što stvara vibracije. Kako bi se uklonila neravnoteža rotora i prateće vibracije, potrebno je postaviti uravnotežujuće mase koje će vratiti simetriju rotora.
Rotor balancing is an operation to eliminate imbalance by adding balancing masses.
The task of balancing is to find the value and places (angle) of the installation of one or more balancing masses.
Vrste rotora i neravnoteža
Considering the strength of the rotor material and the magnitude of the centrifugal forces influencing it, the rotors can be divided into two types: rigid and flexible.
Kruti rotori u radnim uvjetima pod utjecajem centrifugalne sile mogu se malo deformirati, ali utjecaj te deformacije u proračunima se stoga može zanemariti.
Deformation of flexible rotors on the other hand should never be neglected. The deformation of flexible rotors complicates the solution for the balancing problem and requires the use of some other mathematical models in comparison with the task of balancing rigid rotors. It is important to mention that the same rotor at low speeds of rotation can behave like rigid one and at high speeds it will behave like flexible one. Further on we will consider the balancing of rigid rotors only.
Ovisno o raspodjeli neravnotežnih masa duž duljine rotora, mogu se razlikovati dvije vrste neravnoteže - statička i dinamička. Isto vrijedi i za statičko i dinamičko balansiranje rotora.
The static imbalance of the rotor occurs without the rotation of the rotor. In other words, it is quiescent when the rotor is under the influence of gravity and in addition it turns the “heavy point” down. An example of a rotor with the static imbalance is presented in Fig.2

Fig.2
The dynamic imbalance occurs only when the rotor spins.
An example of a rotor with the dynamic imbalance is presented in Fig.3.
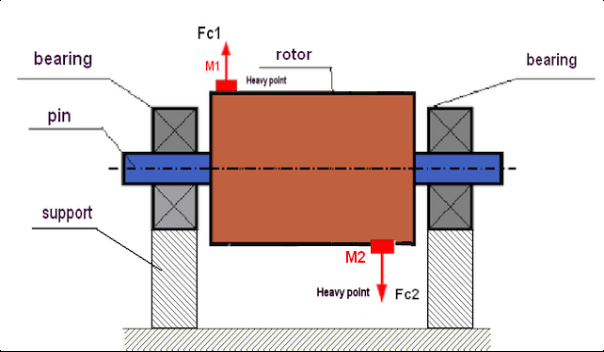
Fig.3. Dynamic imbalance of rotor – couple of the centrifugal forces
U ovom slučaju, neuravnotežene jednake mase M1 i M2 nalaze se na različitim površinama – na različitim mjestima duž duljine rotora. U statičkom položaju, tj. kada se rotor ne okreće, na rotor može utjecati samo gravitacija i mase će se stoga međusobno uravnotežiti. U dinamici, kada se rotor okreće, na mase M1 i M2 počinju utjecati centrifugalne sile FЎ1 i FЎ2. Ove sile su jednake vrijednosti i suprotnog smjera. Međutim, budući da se nalaze na različitim mjestima duž duljine osovine i nisu na istoj liniji, sile se međusobno ne kompenziraju. Sile FЎ1 i FЎ2 stvaraju moment koji djeluje na rotor. Zato ova neravnoteža ima i drugi naziv "trenutna". Sukladno tome, na nosače ležajeva djeluju nekompenzirane centrifugalne sile koje mogu znatno premašiti sile na koje smo se oslanjali, a također i smanjiti vijek trajanja ležajeva.
Since this type of imbalance occurs only in dynamics during the rotor spinning, thus it is called dynamic. It can not be eliminated in the static balancing (or so called “on the knives”) or in any other similar ways. To eliminate the dynamic imbalance, it is necessary to set two compensating weights that will create a moment equal in value and opposite in direction to the moment arising from the masses of M1 and M2. Compensating masses do not necessarily have to be installed opposite to the masses M1 and M2 and be equal to them in value. The most important thing is that they create a moment that fully compensates right at the moment of imbalance.
Općenito, mase M1 i M2 ne moraju biti jednake, pa će postojati kombinacija statičke i dinamičke neravnoteže. Teoretski je dokazano da je za uklanjanje neravnoteže krutog rotora potrebno i dovoljno ugraditi dva utega raspoređena duž duljine rotora. Ovi utezi će kompenzirati i moment koji nastaje zbog dinamičke neravnoteže i centrifugalnu silu koja nastaje zbog asimetrije mase u odnosu na os rotora (statička neravnoteža). Kao i obično, dinamička neravnoteža je tipična za duge rotore, poput osovina, a statička - za uske. Međutim, ako je uski rotor postavljen nagnuto u odnosu na os, ili još gore, deformirano (tzv. "klimanje kotača"), u tom slučaju bit će teško ukloniti dinamičku neravnotežu (vidi sliku 4), zbog činjenice da je teško postaviti korektivne utege koji stvaraju pravi kompenzacijski moment.
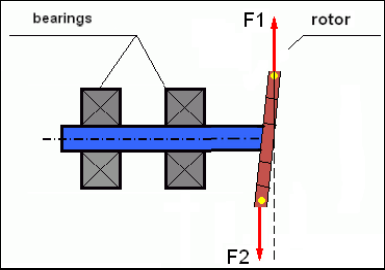
Fig.4 Dynamic balancing of the wobbling wheel
Since the narrow rotor shoulder creates a short moment, it may require correcting weights of a large mass. But at the same time there is an additional so-called “induced imbalance” associated with the deformation of the narrow rotor under the influence of centrifugal forces from the correcting masses.
See the example:
” Methodical instructions on rigid rotors balancing” ISO 1940-1:2003 Mechanical vibration – Balance quality requirements for rotors in a constant (rigid) state – Part 1: Specification and verification of balance tolerances
This is visible for narrow fan wheels, which, in addition to the power imbalance, also influences an aerodynamic imbalance. And it is important to bear in mind that the aerodynamic imbalance, in fact the aerodynamic force, is directly proportional to the angular velocity of the rotor, and to compensate it, the centrifugal force of the correcting mass is used, which is proportional to the square of the angular velocity. Therefore, the balancing effect may only occur at a specific balancing frequency. At other speeds there would be an additional gap. The same can be said about electromagnetic forces in an electromagnetic motor, which are also proportional to the angular velocity. In other words it is impossible to eliminate all causes of vibration of the mechanism by any means of balancing.
Osnove vibracija
Vibracija je reakcija konstrukcije mehanizma na djelovanje cikličke pobudne sile. Ta sila može imati različitu prirodu.
- Centrifugalna sila koja nastaje zbog neravnoteže rotora je nekompenzirana sila koja utječe na "tešku točku". Upravo ta sila, kao i vibracije uzrokovane njome, eliminiraju se uravnoteženjem rotora.
- Međusobne sile koje imaju „geometrijsku“ prirodu i nastaju zbog pogrešaka u proizvodnji i ugradnji dijelova koji se spajaju. Ove sile mogu nastati, na primjer, zbog neravnosti rukavca vratila, pogrešaka u profilima zuba u zupčanicima, valovitosti staza ležaja, neusklađenosti dijelova koji se spajaju itd. U slučaju neravnosti vratova, os vratila će se pomicati ovisno o kutu rotacije vratila. Iako se ta vibracija manifestira pri brzini rotora, gotovo ju je nemoguće eliminirati balansiranjem.
- Aerodynamic forces arising from the rotation of the impeller fans and other blade mechanisms. Hydrodynamic forces arising from the rotation of hydraulic pump impellers, turbines, etc.
- Elektromagnetske sile koje nastaju radom električnih strojeva kao rezultat, na primjer, asimetrije namota rotora, prisutnosti kratkospojenih zavoja itd.
The magnitude of vibration (for example, its amplitude AB) depends not only on the magnitude of the excitation force Fт acting on the mechanism with the circular frequency ω, but also on the stiffness k of the structure of the mechanism, its mass m, and damping coefficient C.

Various types of sensors can be used to measure vibration and balance mechanisms, including:
- absolute vibration sensors designed to measure vibration acceleration (accelerometers) and vibration velocity sensors;
- relativni senzori vibracija vrtložnih struja ili kapacitivni, dizajnirani za mjerenje vibracija.
In some cases (when the structure of the mechanism allows it) sensors of force can also be used to examine its vibration weight.
Particularly, they are widely used to measure the vibration weight of the supports of hardbearing balancing machines.
Therefore vibration is the reaction of the mechanism to the influence of external forces. The amount of vibration depends not only on the magnitude of the force acting on the mechanism, but also on the rigidity of the mechanism. Two forces with the same magnitude can lead to different vibrations. In mechanisms with a rigid support structure, even with the small vibration, the bearing units can be significantly influenced by dynamic weights. Therefore, when balancing mechanisms with stiff legs apply the force sensors, and vibration (vibro accelerometers). Vibration sensors are only used on mechanisms with relatively pliable supports, right when the action of unbalanced centrifugal forces leads to a noticeable deformation of the supports and vibration. Force sensors are used in rigid supports even when significant forces arising from imbalance do not lead to significant vibration.
Rezonancija strukture
We have previously mentioned that rotors are divided into rigid and flexible. The rigidity or flexibility of the rotor should not be confused with the stiffness or mobility of the supports (foundation) on which the rotor is located. The rotor is considered rigid when its deformation (bending) under the action of centrifugal forces can be neglected. The deformation of the flexible rotor is relatively large: it cannot be neglected.
U ovom članku proučavamo samo balansiranje krutih rotora. Kruti (nedeformabilni) rotor pak može biti smješten na krutim ili pomičnim (savitljivim) nosačima. Jasno je da je ta krutost/pokretljivost nosača relativna ovisno o brzini vrtnje rotora i veličini rezultirajućih centrifugalnih sila. Konvencionalna granica je frekvencija slobodnih oscilacija nosača rotora/temelja. Za mehaničke sustave, oblik i frekvencija slobodnih oscilacija određeni su masom i elastičnošću elemenata mehaničkog sustava. To jest, frekvencija vlastitih oscilacija je unutarnja karakteristika mehaničkog sustava i ne ovisi o vanjskim silama. Budući da su otklonjeni iz ravnotežnog stanja, nosači se zbog elastičnosti nastoje vratiti u ravnotežni položaj. Ali zbog inercije masivnog rotora, ovaj proces ima prirodu prigušenih oscilacija. Ove oscilacije su vlastite oscilacije sustava rotor-nosač. Njihova frekvencija ovisi o omjeru mase rotora i elastičnosti nosača.
When the rotor begins to rotate and the frequency of its rotation approaches the frequency of its own oscillations, the vibration amplitude increases sharply, which can even lead to the destruction of the structure.
There is a phenomenon of mechanical resonance. In the resonance region, a change in the speed of rotation by 100 rpm can lead to an increase in a vibration tenfold. In this case (in the resonance region) the vibration phase changes by 180°.
Ako je dizajn mehanizma loše projektiran, a radna brzina rotora je blizu vlastite frekvencije oscilacija, rad mehanizma postaje nemoguć zbog neprihvatljivo visokih vibracija. Standardne metode balansiranja također su nemoguće, jer se parametri dramatično mijenjaju čak i uz malu promjenu brzine vrtnje. Koriste se posebne metode u području rezonantnog balansiranja, ali one nisu dobro opisane u ovom članku. Frekvenciju vlastitih oscilacija mehanizma možete odrediti na izlazu (kada je rotor isključen) ili udarom s naknadnom spektralnom analizom odziva sustava na udar. „Balanset-1“ pruža mogućnost određivanja vlastitih frekvencija mehaničkih struktura ovim metodama.
For mechanisms whose operating speed is higher than the resonance frequency, that is, operating in the resonant mode, supports are considered as mobile ones and vibration sensors are used to measure, mainly vibration accelerometers that measure the acceleration of structural elements. For mechanisms operating in hard bearing mode, supports are considered as rigid. In this case, force sensors are used.
Linearni i nelinearni modeli mehaničkog sustava
Mathematical models (linear) are used for calculations when balancing rigid rotors. The linearity of the model means that one model is directly proportionally (linearly) dependent on the other. For example, if the uncompensated mass on the rotor is doubled, then the vibration value will be doubled correspondingly. For rigid rotors you can use a linear model because such rotors are not deformed. It is no longer possible to use a linear model for flexible rotors. For a flexible rotor, with an increase of the mass of a heavy point during rotation, an additional deformation will occur, and in addition to the mass, the radius of the heavy point will also increase. Therefore, for a flexible rotor, the vibration will more than double, and the usual calculation methods will not work. Also, a violation of the linearity of the model can lead to a change in the elasticity of the supports at their large deformations, for example, when small deformations of the supports work some structural elements, and when large in the work include other structural elements. Therefore it is impossible to balance the mechanisms that are not fixed at the base, and, for example, are simply established on a floor. With significant vibrations, the unbalance force can detach the mechanism from the floor, thereby significantly changing the stiffness characteristics of the system. The engine legs must be securely fastened, bolted fasteners tightened, the thickness of the washers must provide sufficient rigidity, etc. With broken bearings, a significant displacement of the shaft and its impacts is possible, which will also lead to a violation of linearity and the impossibility of carrying out high-quality balancing.
Methods and devices for balancing
As mentioned above, balancing is the process of combining the main Central axis of inertia with the axis of rotation of the rotor.
The specified process can be executed in two ways.
The first method involves the processing of the rotor axles, which is performed in such a way that the axis passing through the centers of the section of the axles with the main Central axis of inertia of the rotor. This technique is rarely used in practice and will not be discussed in detail in this article.
The second (most common) method involves moving, installing or removing corrective masses on the rotor, which are placed in such a way that the axis of inertia of the rotor is as close as possible to the axis of its rotation.
Moving, adding or removing corrective masses during balancing can be done using a variety of technological operations, including: drilling, milling, surfacing, welding, screwing or unscrewing screws, burning with a laser beam or electron beam, electrolysis, electromagnetic welding, etc.
The balancing process can be performed in two ways:
- Sklop uravnoteženih rotora (u vlastitim ležajevima);
- balansiranje rotora na strojevima za balansiranje.
To balance the rotors in their own bearings we usually use specialized balancing devices (kits), which allows us to measure the vibration of the balanced rotor at the speed of its rotation in a vector form, i.e. to measure both the amplitude and phase of vibration.
Currently, these devices are manufactured on the basis of microprocessor technology and (in addition to the measurement and analysis of vibration) provide automated calculation of the parameters of corrective weights that must be installed on the rotor to compensate its imbalance.
These devices include:
- mjerna i računalna jedinica, izrađena na bazi računala ili industrijskog kontrolera;
- dva (ili više) senzora vibracija;
- senzor faznog kuta;
- oprema za ugradnju senzora u objektu;
- specijalizirani softver dizajniran za izvođenje punog ciklusa mjerenja parametara neravnoteže rotora u jednoj, dvije ili više ravnina korekcije.
For balancing rotors on balancing machines in addition to a specialized balancing device (measuring system of the machine) it is required to have an “unwinding mechanism” designed to install the rotor on the supports and ensure its rotation at a fixed speed.
Currently, the most common balancing machines exist in two types:
- prerezonantno (s podatnim nosačima);
- tvrdi ležaj (s krutim nosačima).
Over-resonant machines have a relatively pliable supports, made, for example, on the basis of the flat springs.
The natural oscillation frequency of these supports is usually 2-3 times lower than the speed of the balanced rotor, which is mounted on them.
Vibration sensors (accelerometers, vibration velocity sensors, etc.) are usually used to measure the vibration of the supports of a resonant machine.
In the hardbearing balancing machines are used relatively-rigid supports, natural oscillation frequencies of which should be 2-3 times higher than the speed of the balanced rotor.
Force sensors are usually used to measure the vibration weight on the supports of the machine.
The advantage of the hard bearing balancing machines is that they can be balanced at relatively low rotor speeds (up to 400-500 rpm), which greatly simplifies the design of the machine and its foundation, as well as increases the productivity and safety of balancing.
Balancing technique
Balancing eliminates only the vibration which is caused by the asymmetry of the rotor mass distribution relative to its axis of rotation. Other types of the vibration cannot be eliminated by the balancing!
Balancing is the subject to technically serviceable mechanisms, the design of which ensures the absence of resonances at the operating speed, securely fixed on the foundation, installed in serviceable bearings.
The faulty mechanism is the subject to a repair, and only then – to a balancing. Otherwise, qualitative balancing impossible.
Balancing cannot be a substitute for repair!
The main task of balancing is to find the mass and the place (angle) of installation of compensating weights, which are balanced by centrifugal forces.
As mentioned above, for rigid rotors it is generally necessary and sufficient to install two compensating weights. This will eliminate both the static and dynamic rotor imbalance. A general scheme of the vibration measurement during balancing looks like the following:
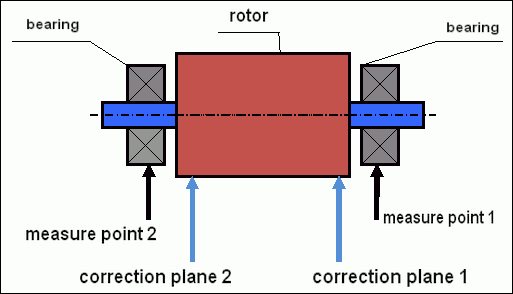
fig.5 Dynamic balancing – correction planes and measure points
Vibration sensors are installed on the bearing supports at points 1 and 2. The speed mark is fixed right on the rotor, a reflective tape is glued usually. The speed mark is used by the laser tachometer to determine the speed of the rotor and the phase of the vibration signal.
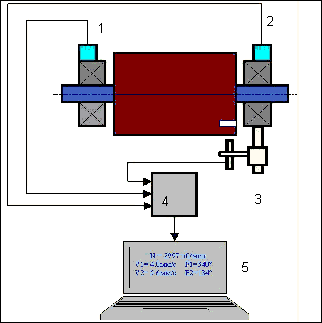
sl. 6. Ugradnja senzora tijekom balansiranja u dvije ravnine, korištenjem Balanset-1
1,2-vibration sensors, 3-phase, 4- USB measuring unit, 5-laptop
In most cases, dynamic balancing is carried out by the method of three starts. This method is based on the fact that test weights of an already-known mass are installed on the rotor in series in 1 and 2 planes; so the masses and the place of installation of balancing weights are calculated based on the results of changing the vibration parameters.
Mjesto ugradnje utega naziva se korekcijska ravnina. Obično se korekcijske ravnine odabiru u području nosača ležajeva na kojima je rotor montiran.
Početne vibracije se mjere pri prvom pokretanju. Zatim se probni uteg poznate mase postavlja na rotor bliže jednom od nosača. Nakon toga se izvodi drugo pokretanje i mjerimo parametre vibracija koji bi se trebali promijeniti zbog postavljanja probnog utega. Nakon toga se probni uteg u prvoj ravnini uklanja i postavlja u drugu ravninu. Izvodi se treće pokretanje i mjere se parametri vibracija. Kada se probni uteg ukloni, program automatski izračunava masu i mjesto (kutove) postavljanja utega za uravnoteženje.
The point in setting up test weights is to determine how the system responds to the imbalance change. When we know the masses and the location of the sample weights, the program can calculate the so-called influence coefficients, showing how the introduction of a known imbalance affects the vibration parameters. The coefficients of influence are the characteristics of the mechanical system itself and depend on the stiffness of the supports and the mass (inertia) of the rotor-support system.
For the same type of mechanisms of the same design, the coefficients of influence will be similar. You can save them in your computer memory and use them afterwards for balancing the same type of mechanisms without carrying out test runs, which greatly improves the performance of the balancing. We should also note that the mass of test weights should be chosen as such so that the vibration parameters vary markedly when installing test weights. Otherwise, the error in calculating the coefficients of the affect increases and the quality of balancing deteriorates.
Vodič za uređaj Balanset-1 daje formulu kojom se približno može odrediti masa probnog utega, ovisno o masi i brzini vrtnje uravnoteženog rotora. Kao što se može vidjeti na slici 1, centrifugalna sila djeluje u radijalnom smjeru, tj. okomito na os rotora. Stoga senzore vibracija treba postaviti tako da im je os osjetljivosti također usmjerena u radijalnom smjeru. Obično je krutost temelja u horizontalnom smjeru manja, pa su vibracije u horizontalnom smjeru veće. Stoga, radi povećanja osjetljivosti, senzore treba postaviti tako da im je os osjetljivosti također usmjerena horizontalno. Iako nema temeljne razlike. Osim vibracija u radijalnom smjeru, potrebno je kontrolirati i vibracije u aksijalnom smjeru, duž osi vrtnje rotora. Ove vibracije obično nisu uzrokovane neravnotežom, već drugim razlozima, uglavnom zbog neusklađenosti i neusklađenosti osovina spojenih spojnicom. Ove vibracije se ne uklanjaju uravnoteženjem, u ovom slučaju je potrebno poravnanje. U praksi, obično kod takvih mehanizama postoji neravnoteža rotora i neusklađenost osovina, što uvelike komplicira zadatak uklanjanja vibracija. U takvim slučajevima, prvo morate poravnati, a zatim uravnotežiti mehanizam. (Iako se kod jakog neravnoteže momenta vibracije javljaju i u aksijalnom smjeru zbog "uvijanja" temeljne konstrukcije).
Točnost mjerenja i analiza pogrešaka
Razumijevanje točnosti mjerenja ključno je za profesionalne operacije balansiranja. Balanset-1A pruža sljedeću preciznost mjerenja:
| Parametar | Formula točnosti | Primjer (za tipične vrijednosti) |
|---|---|---|
| RMS brzina vibracija | ±(0,1 + 0,1×Vizmjereno) mm/s | Za 5 mm/s: ±0,6 mm/s Za 10 mm/s: ±1,1 mm/s |
| Frekvencija rotacije | ±(1 + 0,005 × Nizmjereno) okretaja u minuti | Za 1000 okretaja u minuti: ±6 okretaja u minuti Za 3000 okretaja u minuti: ±16 okretaja u minuti |
| Mjerenje faze | ±1° | Konstantna točnost pri svim brzinama |
Ključno za precizno balansiranje:
- Probni uteg mora uzrokovati promjenu amplitude >20-30% i/ili promjena faze >20-30°
- Ako su promjene manje, pogreške mjerenja značajno se povećavaju
- Amplituda vibracija i fazna stabilnost ne bi smjele varirati više od 10-15% između mjerenja.
- Ako varijacija prelazi 15%, provjerite ima li rezonantnih uvjeta ili mehaničkih problema.
Kriteriji za procjenu kvalitete mehanizama uravnoteženja
Quality of rotor (mechanisms) balancing can be estimated in two ways. The first method involves comparing the value of the residual imbalance determined during the balancing with the tolerance for the residual imbalance. The specified tolerances for various classes of rotors installed in the standard ISO 1940-1-2007. «Vibration. Requirements for the balancing quality of rigid rotors. Part 1. Determination of permissible imbalance”.
Međutim, primjena ovih tolerancija ne može u potpunosti jamčiti pouzdanost rada mehanizma povezanu s postizanjem minimalne razine vibracija. To je zbog činjenice da vibracije mehanizma nisu određene samo veličinom sile povezane s preostalom neravnotežom njegovog rotora, već ovise i o nizu drugih parametara, uključujući: krutost K strukturnih elemenata mehanizma, njegovu masu M, koeficijent prigušenja i brzinu. Stoga se za procjenu dinamičkih svojstava mehanizma (uključujući kvalitetu njegove ravnoteže) u nekim slučajevima preporučuje procjena razine preostalih vibracija mehanizma, što je regulirano nizom standarda.
The most common standard regulating permissible vibration levels of mechanisms is ISO 10816-3:2009 Preview Mechanical vibration – Evaluation of machine vibration by measurements on non-rotating parts — Part 3: Industrial machines with nominal power above 15 kW and nominal speeds between 120 r/min and 15 000 r/min when measured in situ.»
With its help, you can set the tolerance on all types of machines, taking into account the power of their electric drive.
In addition to this universal standard, there are a number of specialized standards developed for specific types of mechanisms. For example,
- ISO 14694:2003 „Industrijski ventilatori – Specifikacije za kvalitetu uravnoteženja i razinu vibracija“
- ISO 7919-1-2002 “Vibration of machines without reciprocating motion. Measurements on rotating shafts and evaluation criteria. General guidance.»
Važna sigurnosna razmatranja za usklađenost s propisima EU
- Potrebna procjena rizika: Provedite procjenu rizika prema EN ISO 12100 prije operacija balansiranja
- Kvalificirano osoblje: Samo obučeno i certificirano osoblje smije obavljati operacije balansiranja
- Osobna zaštitna oprema: Uvijek koristite odgovarajuću osobnu zaštitnu opremu prema normama EN 166 (zaštita za oči) i EN 352 (zaštita za sluh)
- Postupci u hitnim slučajevima: Utvrdite jasne postupke za isključivanje u nuždi i osigurajte da su svi operateri upoznati s njima
- Dokumentacija: Vodite detaljne zapise o svim operacijama uravnoteženja radi sljedivosti i usklađenosti
EU Compliance and Safety Information
Izjava o sukladnosti
Prijenosni balanser Balanset-1A u skladu je sa sljedećim direktivama i standardima Europske unije:
| EU direktiva/standard | Detalji o usklađenosti | Sigurnosni zahtjevi |
|---|---|---|
| Direktiva o strojevima 2006/42/EZ | Sigurnosni zahtjevi za strojeve i sigurnosne komponente | Procjena rizika, sigurnosne upute, oznaka CE |
| Direktiva o elektromagnetskoj kompatibilnosti 2014/30/EU | Zahtjevi za elektromagnetsku kompatibilnost | Otpornost na elektromagnetske smetnje |
| Direktiva RoHS 2011/65/EU | Ograničenje opasnih tvari | Komponente bez olova, žive i kadmija |
| Direktiva o otpadnoj električnoj i elektroničkoj opremi 2012/19/EU | Otpadna električna i elektronička oprema | Pravilni postupci odlaganja i recikliranja |
| EN ISO 12100:2010 | Sigurnost strojeva – Opća načela projektiranja | Procjena rizika i smanjenje rizika |
| EN 60825-1:2014 | Sigurnost laserskih proizvoda – 1. dio | Sigurnosni zahtjevi za lasere klase 2 |
| EN ISO 14120:2015 | Stražari – Opći zahtjevi | Zaštita od opasnosti rotirajućih strojeva |
Standardi električne sigurnosti
- EN 61010-1: Sigurnosni zahtjevi za električnu opremu za mjerenje, upravljanje i laboratorijsku upotrebu
- EN 60950-1: Sigurnost opreme informacijske tehnologije (uređaj s USB napajanjem)
- Serija IEC 61000: Standardi elektromagnetske kompatibilnosti
- Radni napon: 5 V DC putem USB-a (izuzetno niski napon)
- Potrošnja energije: < 2,5 W
- Klasa zaštite: IP20 (za unutarnju upotrebu)
Sigurnost rotirajuće opreme
Mandatory Safety Procedures (EN ISO 12100)
UPOZORENJE: When working with rotating machinery, observe the following safety requirements:
- EN ISO 14118: Prevention of unexpected start-up – Use lockout/tagout procedures before sensor installation
- EN ISO 14120: Ensure all rotating equipment is properly guarded
- EN ISO 13857: Održavajte minimalne sigurne udaljenosti od rotirajućih dijelova (500 mm za tijelo, 120 mm za prste)
- Osobna zaštitna oprema: Wear safety glasses per EN 166, hearing protection per EN 352, and avoid loose clothing
- Nikada ne postavljajte senzore ili probne utege na rotirajuće strojeve dok su u pokretu.
- Prije ugradnje senzora provjerite je li stroj potpuno zaustavljen i osiguran
- Zaustavljanje u nuždi: Mora biti dostupan unutar 3 metra od položaja operatera
- Samo kvalificirano i certificirano osoblje smije obavljati operacije balansiranja
Klasifikacija sigurnosti lasera
Laserski uređaj klase 2 (EN 60825-1:2014)
- Valna duljina: 650 nm (crvena vidljiva svjetlost)
- Maksimalna izlazna snaga: < 1 mW
- Promjer grede: 3-5 mm na udaljenosti od 100 mm
- Divergencija: < 1,5 mrad
- Sigurnosna klasifikacija: Sigurno za oči pri kratkotrajnoj izloženosti (< 0,25 sekundi)
- Obavezno označavanje: „LASERSKO ZRAČENJE – NE GLEDAJTE U ZRAKU – LASERSKI PROIZVOD KLASE 2“
- Klasa pristupa: Neograničeno (opći pristup dopušten)
Sigurnosni postupci za lasere:
- Nikada namjerno ne gledajte u lasersku zraku
- Ne usmjeravajte laser prema osobama, vozilima ili zrakoplovima
- Izbjegavajte gledanje laserske zrake optičkim instrumentima (teleskopi, dalekozori)
- Budite svjesni zrcalnih refleksija sa sjajnih površina
- Isključite laser kada ga ne koristite
- Odmah prijavite sve incidente izlaganja očiju
- Za dulje izlaganje koristite zaštitne naočale za laser (OD 2+ na 650 nm).
Točnost mjerenja i kalibracija
| Parametar | Točnost | Frekvencija kalibracije |
|---|---|---|
| Amplituda vibracije | ±5% očitanja | Godišnje ili nakon 1000 sati |
| Mjerenje faze | ±1° | Godišnje |
| Brzina rotacije | ±0,1% očitanja | Godišnje |
| Osjetljivost senzora | 13 mV/(mm/s) ±10% | Prilikom zamjene senzora |
Usklađenost s okolišem
- Radno okruženje: 5°C do 50°C, < 85% RH bez kondenzacije
- Okruženje za pohranu: -20°C do 70°C, < 95% RH bez kondenzacije
- Nadmorska visina: Do 2000 m nadmorske visine
- Otpornost na vibracije: IEC 60068-2-6 (10-500 Hz, ubrzanje 2g)
- Otpornost na udarce: IEC 60068-2-27 (15 g, trajanje 11 ms)
- IP ocjena: IP20 (zaštita od tvrdih predmeta > 12 mm)
Zahtjevi za rad
- Operateri moraju biti obučeni o sigurnosti strojeva prema standardima EU-a
- Procjena rizika potrebna je prema normi EN ISO 12100 prije upotrebe
- Održavajte opremu prema specifikacijama proizvođača
- Odmah prijavite sve sigurnosne incidente ili kvarove opreme
- Vodite detaljne zapise o svim operacijama uravnoteženja radi sljedivosti
Zahtjevi za dokumentaciju
Za usklađenost s propisima EU-a, vodite sljedeću dokumentaciju:
- Dokumentacija procjene rizika prema normi EN ISO 12100
- Zapisi o obuci i certifikati operatera
- Dnevnici kalibracije i održavanja opreme
- Uravnoteženje zapisa operacija s datumima, operatorima i rezultatima
- Izvješća o sigurnosnim incidentima i korektivne mjere
- Dokumentacija o modifikaciji ili popravku opreme
Tehnička podrška i servis
Za tehničku podršku, usluge kalibracije i rezervne dijelove:
- Proizvođač: Vibromera
- Mjesto: Narva, Estonija (EU)
- Web stranica: https://vibromera.eu
- Jezici podrške: All major languages. Text-based communication available.
- Pokrivenost uslugama: Dostupna dostava diljem svijeta
- Jamstvo: 12 mjeseci od datuma kupnje
- Usluga kalibracije: Dostupno putem ovlaštenih servisnih centara