
PORTABLE BALANCER ""БАЛАНСЕТ-1А""
Двоканални систем динамичког балансирања базиран на рачунару
OPERATION MANUAL
rev. 1.56 May 2023
2023 | Португал, Порто
БЕЗБЕДНОСНО ОБАВЕШТЕЊЕ: Овај уређај је у складу са безбедносним стандардима ЕУ. Ласерски производ класе 2. Пратите безбедносне процедуре за ротирајућу опрему. Погледајте комплетне безбедносне информације испод →
TABLE OF CONTENTS
1. ПРЕГЛЕД СИСТЕМА БАЛАНСИРАЊА
Balanset-1A balancer пружа услуге динамичког балансирања у једној и две равни за вентилаторе, брусне точкове, вретена, дробилице, пумпе и друге ротирајуће машине.
Балансет-1А укључује два вибросензора (акцелерометра), ласерски фазни сензор (тахометар), двоканалну USB интерфејс јединицу са претпојачавачима, интеграторима и ADC аквизиционим модулом и софтвер за балансирање базиран на Windows-у. Balanset-1A захтева лаптоп или други Windows (WinXP...Win11, 32 или 64bit) компатибилан рачунар.
Balancing software provides the correct balancing solution for single-plane and two-plane balancing automatically. Balanset-1A is simple to use for non-vibration experts.
All balancing results saved in archive and can be used to create the reports.
Кључне карактеристике
Једноставан за употребу
- • Корисник може да изабере пробну масу
- • Искачући прозор за валидност масовне пробе
- • Ручни унос података
Могућности мерења
- • О/мин, амплитуда и фаза
- • FFT анализа спектра
- • Приказ таласног облика и спектра
- • Двоканални истовремени подаци
Напредне функције
- • Сачувани коефицијенти утицаја
- • Балансирање трима
- • Израчунавање ексцентричности трна.
- • Израчунавање толеранције по ISO 1940.
Управљање подацима
- • Неограничено складиштење података за балансирање
- • Складиштење вибрационих таласних облика
- • Архива и извештаји
Алати за израчунавање
- • Израчунавање подељене тежине
- • Прорачун бушилице
- • Промена корекционих равни
- • Визуелизација поларног графика
Опције анализе
- • Уклоните или оставите пробне тегове
- • RunDown графикони (експериментално)
2. SPECIFICATION
| Параметар | Спецификација |
|---|---|
| Measurement range of the root-mean-square value (RMS) of the vibration velocity, mm/sec (for 1x vibration) | from 0.02 to 100 |
| The frequency range of the RMS measurement of the vibration velocity, Hz | од 5 до 550 |
| Number of the correction planes | 1 or 2 |
| Range of the frequency of rotation measurement, rpm | 100 – 100000 |
| Range of the vibration phase measurement, angular degrees | from 0 to 360 |
| Error of the vibration phase measurement, angular degrees | ± 1 |
| Тачност мерења RMS брзине вибрација | ±(0,1 + 0,1×Vизмерено) мм/сек |
| Тачност мерења фреквенције ротације | ±(1 + 0,005×Nизмерено) обртаја у минути |
| Средње време између кварова (MTBF), сати, мин | 1000 |
| Просечан век трајања, године, мин | 6 |
| Димензије (у тврдој кутији), цм | 39*33*13 |
| Маса, кг | <5 |
| Укупне димензије вибраторског сензора, мм, макс. | 25*25*20 |
| Маса вибраторског сензора, кг, макс. | 0.04 |
|
Услови рада: - Температурни опсег: од 5°C до 50°C - Релативна влажност: < 85%, незасићена - Без јаког електромагнетног поља и јаког удара |
|
3. PACKAGE
Балансет-1А балансер укључује два једноосна акцелерометра, ласерски фазни референтни маркер (дигитални тахометар), двоканалну USB интерфејс јединицу са претпојачавачима, интеграторима и ADC аквизиционим модулом и софтвер за балансирање базиран на Windows-у.
Комплет за испоруку
| Description | Number | Note |
|---|---|---|
| USB interface unit | 1 | |
| Laser phase reference marker (tachometer) | 1 | |
| Једноосни акцелерометри | 2 | |
| Magnetic stand | 1 | |
| Digital scales | 1 | |
| Hard case for transportation | 1 | |
| "Балансет-1А". Упутство за употребу. | 1 | |
| Flash disk with balancing software | 1 |
4. BALANCE PRINCIPLES
4.1. ""Balanset-1A" укључује (слика 4.1) USB интерфејс јединицу (1), два акцелерометра (2) и (3), маркер фазе (4) и преносиви рачунар (није укључен) (5).
Комплет испоруке такође укључује магнетни сталак (6) користи се за монтирање фазног референтног маркера и дигиталних скала 7.
X1 and X2 connectors intended for connection of the vibration sensors respectively to 1 and 2 measuring channels, and the X3 connector used for connection of the phase reference marker.
The USB cable provides power supply and connection of the USB interface unit to the computer.

Сл. 4.1. Комплет испоруке "Balanset-1A"
Механичке вибрације изазивају електрични сигнал пропорционалан убрзању вибрација на излазу сензора вибрација. Дигитализовани сигнали са ADC модула се преносе преко USB-а на преносни рачунар. (5). Фазни референтни маркер генерише импулсни сигнал који се користи за израчунавање фреквенције ротације и фазног угла вибрације. Софтвер базиран на Windows-у пружа решење за балансирање у једној и две равни, анализу спектра, графиконе, извештаје, чување коефицијената утицаја.
5. SAFETY PRECAUTIONS
⚡ ПАЖЊА - Електрична безбедност
5.1. When operating on 220V electrical safety regulations must be observed. It is not allowed to repair the device when connected to 220 V.
5.2. Ако користите уређај у окружењу са наизменичном струјом лошег квалитета или у присуству мрежних сметњи, препоручује се коришћење аутономног напајања из батерије рачунара.
⚠️ Додатни безбедносни захтеви за ротирајућу опрему
- !Закључавање машине: Увек примените одговарајуће процедуре закључавања/обележавања пре инсталирања сензора
- !Лична заштитна опрема: Носите заштитне наочаре, заштиту за уши и избегавајте широку одећу у близини ротирајућих машина
- !Безбедна инсталација: Уверите се да су сви сензори и каблови безбедно причвршћени и да их ротирајући делови не могу захватити
- !Поступци у ванредним ситуацијама: Знајте локацију заустављања у хитним случајевима и поступке за искључивање
- !Обука: Само обучено особље треба да користи опрему за балансирање на ротирајућим машинама
6. ПОДЕШАВАЊА СОФТВЕРА И ХАРДВЕРА
6.1. USB drivers and balancing software installation
Before working install drivers and balancing software.
Листа фасцикли и датотека
Installation disk (flash drive) contains the following files and folders:
- Bs1Av###Setup – фасцикла са софтвером за балансирање "Balanset-1A" (### – број верзије)
- АрдДрв – УСБ драјвери
- ЕБаланцеров_приручник.пдф – овај приручник
- Бал1Ав1ТП5Т1ТП5Т1ТП5ТСетуп.еке – датотека за подешавање. Ова датотека садржи све горе поменуте архивиране датотеке и фасцикле. ### – верзија софтвера "Balanset-1A".
- Ebalanc.cfg – вредност осетљивости
- Бал.ини – неки подаци за иницијализацију
Поступак инсталације софтвера
For installing drivers and specialized software run file Бал1Ав1ТП5Т1ТП5Т1ТП5ТСетуп.еке and follow setup instructions by pressing buttons «Next», «ОК» etc.
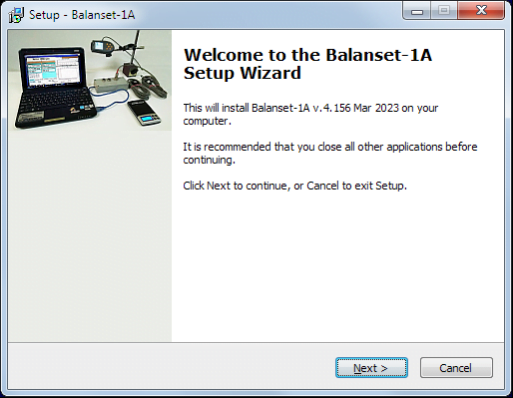
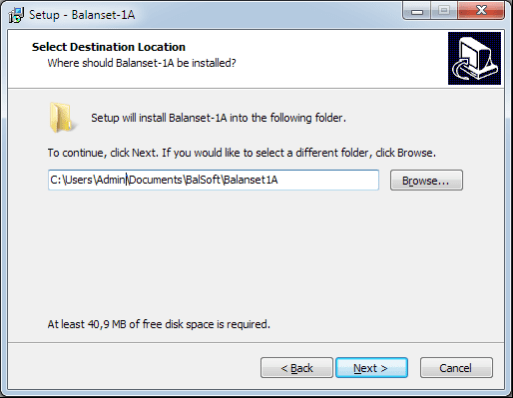
Choose setup folder. Usually the given folder should not be changed.
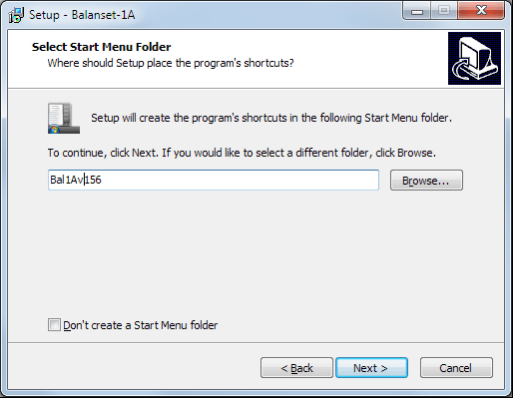
Then the program requires specifying Program group and desktop folders. Press button Next.
Завршна инсталација
- ✓Install sensors on the inspected or balanced mechanism (Detailed information about how to install the sensors is given in Annex 1)
- ✓Connect vibration sensors 2 and 3 to the inputs X1 and X2, and phase angle sensor to the input X3 of USB interface unit.
- ✓Connect USB interface unit to the USB-port of the computer.
- ✓Када користите напајање наизменичном струјом, повежите рачунар на електричну мрежу. Прикључите напајање на 220 V, 50 Hz.
- ✓Кликните на пречицу "Balanset-1A" на радној површини.
7. СОФТВЕР ЗА БАЛАНСИРАЊЕ
7.1. Опште
Initial window
Приликом покретања програма "Balanset-1A" појављује се почетни прозор, приказан на слици 7.1.

Сл. 7.1. Почетни прозор "Balanset-1A"
У почетном прозору се налази 9 дугмади са називима функција које се остварују кликом на њих.
F1-«About»
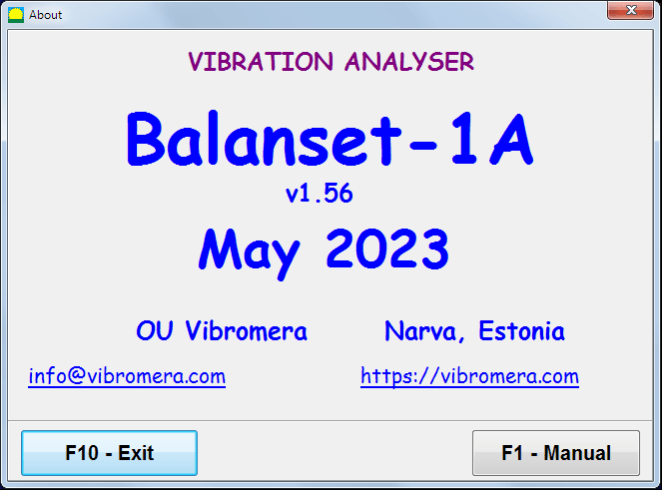
Сл. 7.2. F1-прозор „О нама“
F2-«Single plane», F3-«Two plane»
Притиском на ""F2- Једноравнински"" (или F2 функцијски тастер на тастатури рачунара) бира мерење вибрација на каналу X1.
After clicking this button, the computer display diagram shown in Fig. 7.1 illustrating a process of measuring the vibration only on the first measuring channel (or the balancing process in a single plane).
Притиском на дугме "F3-Дворавни"" (или F3 function key on the computer keyboard) selects the mode of vibration measurements on two channels X1 и X2 simultaneously. (Fig. 7.3.)
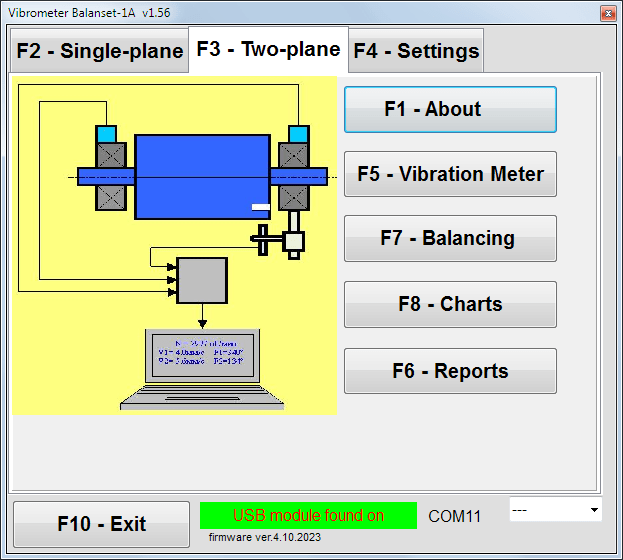
Сл. 7.3. Почетни прозор "Balanset-1A". Балансирање у две равни.
F4 – „Подешавања“
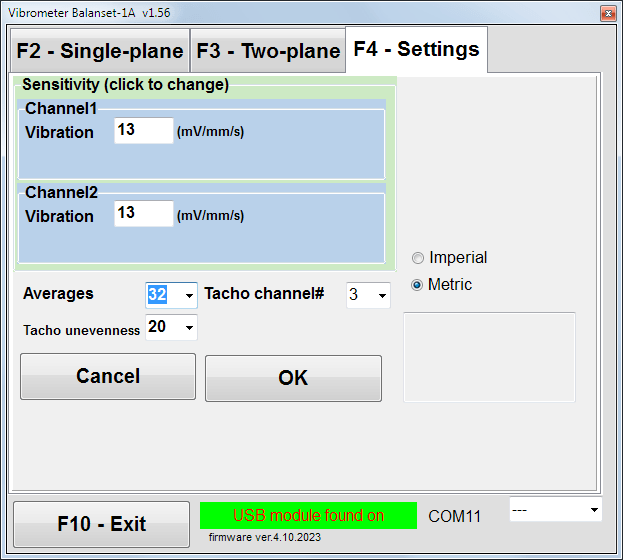
Сл. 7.4. Прозор "Подешавања"
In this window you can change some Balanset-1A settings.
- Sensitivity. The nominal value is 13 mV / mm/s.
Changing the sensitivity coefficients of sensors is required only when replacing sensors!
Attention!
Када унесете коефицијент осетљивости, његов разломљени део се одваја од целог дела децималном тачком (знаком ",").
- Averaging - број усредњавања (број обртаја ротора током којих се подаци усредњавају ради веће тачности)
- Tacho channel# - канал# Тахо је повезан. Подразумевано - 3. канал.
- Unevenness - разлика у трајању између суседних тахо импулса, што горе наведено даје упозорење ""Failure of the tachometer"
- Imperial/Metric - Изаберите систем јединица.
Com port number is assigned automatically.
F5 – „Мерач вибрација“
Pressing this button (or a function key of F5 на тастатури рачунара) активира режим мерења вибрација на једном или два мерна канала виртуелног мерача вибрација у зависности од стања дугмади ""F2-једноравни", ""F3-дворавнински".
Ф6 – „Извештаји“
Pressing this button (or F6 function key on the computer keyboard) switches on the balancing Archive, from which you can print the report with the results of balancing for a specific mechanism (rotor).
F7 – «Balancing»
Притиском на ово дугме (или функцијски тастер F7 на вашој тастатури) активира се режим балансирања у једној или две равни корекције у зависности од тога који је режим мерења изабран притиском на дугмад "F2-једноравни", ""F3-дворавнински".
F8 – «Charts»
Pressing this button (or F8 функцијски тастер на тастатури рачунара) омогућава графички мерач вибрација, чија имплементација приказује на дисплеју истовремено са дигиталним вредностима амплитуде и фазе вибрација графикон његове временске функције.
F10 – „Излаз“
Pressing this button (or F10 функцијски тастер на тастатури рачунара) завршава програм "Balanset-1A".
7.2. "Мерач вибрација"
Пре рада у "Vibration meter"режим“, инсталирајте сензоре вибрација на машину и повежите их, респективно, са конекторима X1 и X2 USB интерфејс јединице. Тахо сензор треба повезати са улазом X3 USB интерфејс јединице.

Fig. 7.5 USB interface unit
Поставите рефлектујућу траку на површину ротора за рад тахомеханичара.

Сл. 7.6. Рефлектујућа трака.
Recommendations for the installation and configuration of sensors are given in Annex 1.
Да бисте започели мерење у режиму мерења вибрација, кликните на дугме ""F5 – Vibration Meter"" у почетном прозору програма (видети сл. 7.1).
Vibration Meter window appears (see. Fig.7.7)

Fig. 7.7. Vibration meter mode. Wave and Spectrum.
Да бисте започели мерења вибрација, кликните на дугме ""F9 – Трчи"" (или притисните функцијски тастер F9 on the keyboard).
If Режим окидача Аутоматски је означено - резултати мерења вибрација ће се периодично приказивати на екрану.
У случају истовременог мерења вибрација на првом и другом каналу, прозори који се налазе испод речи "Plane 1""и""Plane 2"биће попуњено.
Мерење вибрација у режиму "Вибрација" може се извршити и са искљученим сензором фазног угла. У почетном прозору програма вредност укупне RMS вибрације (V1s, V2s) will only be displayed.
Постоје следећа подешавања у режиму мерења вибрација
- RMS Low, Hz – најнижа фреквенција за израчунавање RMS укупне вибрације
- Пропусни опсег - пропусни опсег фреквенције вибрација у графикону
- Averages - број просека за већу тачност мерења
Да бисте завршили рад у режиму "Мерач вибрација", кликните на дугме "F10 – Exit"" и вратите се на почетни прозор.

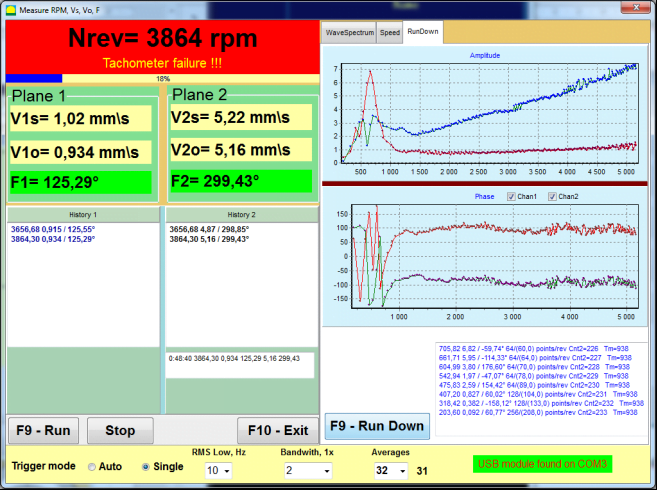
Fig. 7.8. Vibration meter mode. Rotation speed Unevenness, 1x vibration wave form.
Fig. 7.9. Vibration meter mode. Rundown (beta version, no warranty!).
7.3 Поступак балансирања
Balancing is performed for mechanisms in good technical condition and correctly mounted. Otherwise, before the balancing the mechanism must be repaired, installed in proper bearings and fixed. Rotor should be cleaned of contaminants that can hinder from balancing procedure.
Before balancing measure vibration in Vibration meter mode (F5 button) to be sure that mainly vibration is 1x vibration.
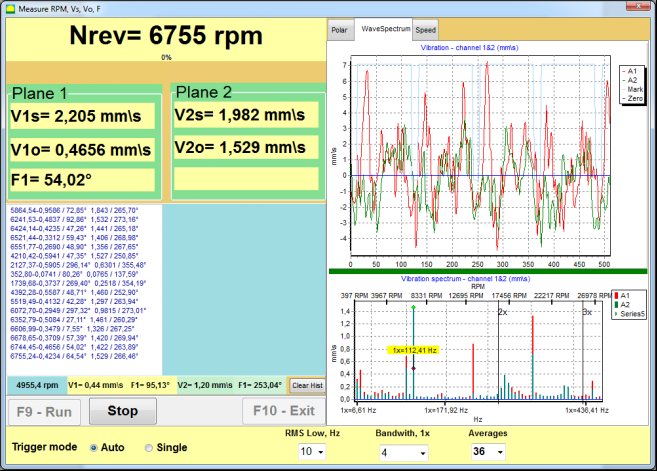
Fig. 7.10. Vibration meter mode. Checking overall (V1s,V2s) and 1x (V1o,V2o) vibration.
Ако је вредност укупних вибрација V1s (V2s) приближно једнака величини вибрација на ротационој фреквенцији (1x вибрација) V1o (V2o), може се претпоставити да главни допринос механизму вибрација долази од неравнотеже ротора. Ако је вредност укупних вибрација V1s (V2s) много већа од 1x компоненте вибрација V1o (V2o), препоручује се провера стања механизма – стање лежајева, њихово монтирање на основу, осигуравање да нема контакта између фиксних делова и ротора током ротације итд.
Такође треба обратити пажњу на стабилност измерених вредности у режиму мерења вибрација – амплитуда и фаза вибрација не би требало да варирају за више од 10-15% током процеса мерења. У супротном, може се претпоставити да механизам ради у области блиској резонанцији. У том случају, промените брзину ротације ротора, а ако то није могуће – промените услове постављања машине на темељ (на пример, привремено је монтирајте на опружне носаче).
За балансирање ротора метода коефицијента утицаја Треба користити балансирање (метода са 3 пролаза).
Trial runs are done to determine the effect of trial mass on vibration change, mass and place (angle) of installation of correction weights.
First determine the original vibration of a mechanism (first start without weight), and then set the trial weight to the first plane and made the second start. Then, remove the trial weight from the first plane, set in a second plane and made the second start.
The program then calculates and indicates on the screen the weight and location (angle) of installation of correction weights.
When balancing in a single plane (static), the second start is not required.
Trial weight is set to an arbitrary location on the rotor where it is convenient, and then the actual radius is entered in the setup program.
(Position Radius is used only for calculating the unbalance amount in grams * mm)
Important!
- Measurements should be carried out with the constant speed of rotation of the mechanism!
- Correction weights must be installed on the same radius as the trial weights!
Маса пробног тега је одабрана тако да се након фазе његове инсталације (> 20-30°) и (20-30%) амплитуда вибрација значајно промени. Ако су промене премале, грешка се значајно повећава у наредним прорачунима. Погодно је поставити пробни тег на исто место (под истим углом) као и ознака фазе.
Формула за израчунавање масе пробне тежине
Mt = Mr × Kослој × Kвибрација / (Rt × (N/100)²)
Где:
- Планина - маса пробног тега, g
- Господин - маса ротора, g
- Kподршка - коефицијент крутости носача (1-5)
- Квибрација - коефицијент нивоа вибрација (0,5-2,5)
- Дес. - радијус постављања пробне тежине, цм
- Н - брзина ротора, о/мин
Коефицијент крутости носача (Ksupport):
- 1.0 - Веома мекани носачи (гумени амортизери)
- 2.0-3.0 - Средња крутост (стандардни лежајеви)
- 4.0-5.0 - Крути носачи (масивни темељ)
Коефицијент нивоа вибрација (Квибрација):
- 0.5 - Ниске вибрације (до 5 мм/сек)
- 1.0 - Нормалне вибрације (5-10 мм/сек)
- 1.5 - Повишене вибрације (10-20 мм/сек)
- 2.0 - Високе вибрације (20-40 мм/сек)
- 2.5 - Веома високе вибрације (>40 мм/сек)
🔗 Користите наш онлајн калкулатор:
Калкулатор пробне тежине →⚠️ Важно!
After each test run trial mass are removed! Correction weights set at an angle calculated from the place of trial weight installation in the direction of rotation of the rotor!
Објашњење израчунавања угла:
Угао постављања корекционог тега је УВЕК рачунајући од тачке постављања пробног тега у смеру ротације ротора.
- Нулта тачка (0°): Тачна локација где сте поставили пробни тег постаје ваша референтна тачка (0 степени).
- Смер: Измерите угао у истом смеру у којем се ротор окреће.
Пример: Ако се ротор окреће у смеру казаљке на сату, измерите угао у смеру казаљке на сату од положаја пробног тега. - Тумачење: Ако програм приказује угао 120°, морате инсталирати корекциону тежину 120 степени напред положаја пробног тега у смеру ротације.
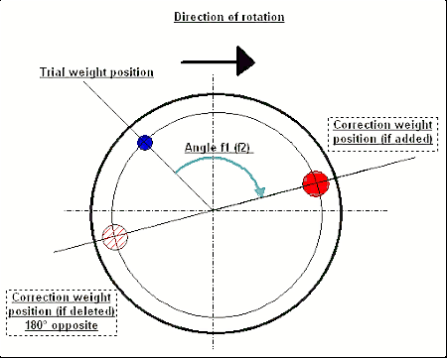
Слика 7.11. Монтажа корекције тежине.
Препоручено!
Пре извођења динамичког балансирања, препоручује се да се уверите да статички дисбаланс није превисок. Код ротора са хоризонталном осом, ротор се може ручно ротирати за угао од 90 степени у односу на тренутни положај. Ако је ротор статички небалансиран, ротираће се у положај равнотеже. Када ротор заузме положај равнотеже, потребно је поставити балансни тег на горњу тачку, приближно у средњем делу дужине ротора. Тег треба одабрати тако да се ротор не помера ни у једном положају.
Такво претходно балансирање ће смањити количину вибрација при првом покретању јако небалансираног ротора.
Инсталација и монтажа сензора
Вibration sensor must be installed on the machine in the selected measuring point and connected to the input X1 of the USB interface unit.
Постоје две конфигурације монтаже:
- Магнети
- Threaded studs M4
Optical tacho sensor should be connected to the input X3 of the USB interface unit. Furthermore, for use of this sensor a special reflecting mark should be applied on surface of a rotor.
📏 Захтеви за инсталацију оптичког сензора
- ✓Удаљеност од површине ротора: 50-500 мм (у зависности од модела сензора)
- ✓Ширина рефлектујуће траке: Минимум 1-1,5 цм (зависи од брзине и радијуса)
- ✓Оријентација: Нормално на површину ротора
- ✓Монтажа: Користите магнетни сталак или стезаљку за стабилно позиционирање
- ✓Избегавајте директну сунчеву светлост или јако вештачко осветљење на сензору/траци
💡 Израчунавање ширине траке: За оптималне перформансе, израчунајте ширину траке користећи:
L ≥ (N × R)/30000 ≥ 1,0-1,5 цм
Где је: L - ширина траке (цм), N - брзина ротора (о/мин), R - полупречник траке (цм)
Detailed requirements on site selection of the sensors and their attachment to the object when balancing are set out in Annex 1.
7.4 Балансирање једне равни
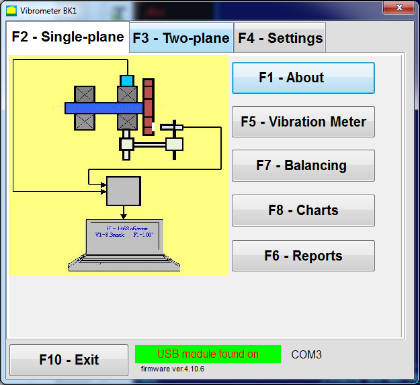
Слика 7.12. "Балансирање једног авиона"
Архива балансирања
Да бисте започели рад на програму у "Single-Plane balancing"режим", кликните на „F2-Single-plane"дугме“ (или притисните тастер F2 на тастатури рачунара).
Затим кликните на "F7 – Balancing"дугме „“, након чега Single Plane balancing archive window will appear, in which the balancing data will be saved (see Fig. 7.13).

Fig. 7.13 The window for selecting the balancing archive in single plane.
In this window, you need to enter data on the name of the rotor (Rotor name), place of rotor installation (Place), tolerances for vibration and residual imbalance (Tolerance), date of measurement. This data is stored in a database. Also, a folder Arc### is created in, where ### is the number of the archive in which the charts, a report file, etc. will be saved. After the balancing is completed, a report file will be generated that can be edited and printed in the built-in editor.
Након уноса потребних података, потребно је да кликнете на дугме "F10-OK"дугме "“, након чега „Single-Plane balancing""прозор ће се отворити (видети слику 7.13)
Balancing settings (1-plane)
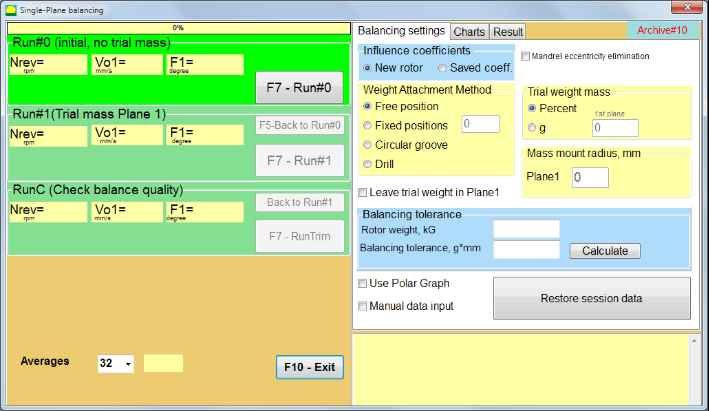
Fig. 7.14. Single plane. Balancing settings
На левој страни овог прозора приказују се подаци мерења вибрација и дугмад за контролу мерења."Run # 0", "Run # 1", "RunTrim".
На десној страни овог прозора налазе се три картице:
- Balancing settings
- Charts
- Резултат
""Balancing settings"Картица " се користи за унос подешавања балансирања:
- "Коефицијент утицаја" -
- "New Rotor"- избор балансирања новог ротора, за који нема сачуваних коефицијената балансирања и потребна су два покушаја да би се одредила маса и угао уградње корекционог тега.“.
- "Saved coeff."" - избор ребалансирања ротора, за које постоје сачувани коефицијенти балансирања и потребан је само један покушај за одређивање тежине и угла уградње корективне тежине.
- ""Маса пробне тежине"" -
- "Percent"- корективна тежина се израчунава као проценат пробне тежине.“.
- "Gram"" - уноси се позната маса пробног тега и израчунава се маса корективног тега grams or in oz for Imperial system.
⚠️ Пажња! Ако је потребно користити "Saved coeff."Режим за даљи рад током почетног балансирања, маса пробне тежине мора се унети у грамима или унцама, а не у %. Ваге су укључене у пакет испоруке.“.
- "Метод причвршћивања тежине"
- "Free position"" - тегови се могу поставити у произвољним угаоним положајима на обиму ротора.
- "Fixed position"- тег се може поставити у фиксне угаоне положаје на ротору, на пример, на лопатице или рупе (на пример 12 рупа – 30 степени), итд. Број фиксних положаја мора се унети у одговарајуће поље. Након балансирања, програм ће аутоматски поделити тег на два дела и назначити број положаја на којима је потребно утврдити добијене масе.“.
- "Circular groove"" – користи се за балансирање брусних точкова У овом случају се користе 3 противтега за елиминацију неравнотеже
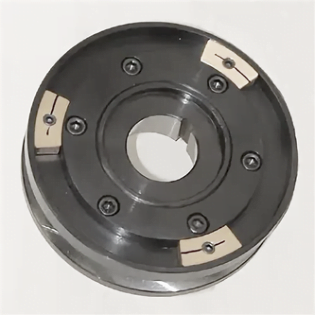
Fig. 7.17 Grinding wheel balancing with 3 counterweights
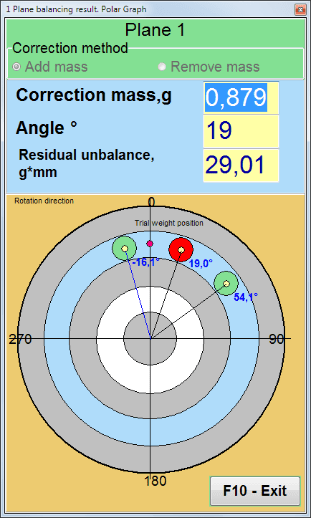
Fig. 7.18 Grinding wheel balancing. Polar graph.

Fig. 7.15. Result tab. Fixed position of correction weight mounting.
Z1 и Z2 – положаји постављених корективних тегова, израчунати из положаја Z1 према смеру ротације. Z1 је положај где је постављен пробни тег.
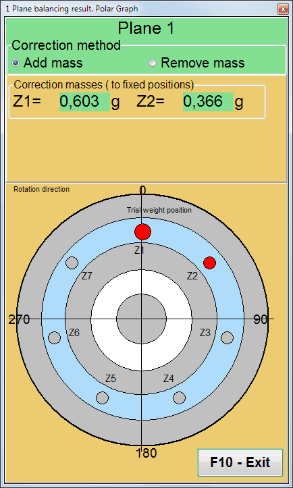
Fig. 7.16 Fixed positions. Polar diagram.
- "Mass mount radius, mm"- "Раван1" - Полупречник пробног тега у равни 1. Потребно је израчунати величину почетног и резидуалног дисбаланса да би се утврдила усклађеност са толеранцијом за резидуални дисбаланс након балансирања.
- "Leave trial weight in Plane1."Обично се пробни тег уклања током процеса балансирања. Али у неким случајевима га је немогуће уклонити, тада је потребно да означите ову пољу како бисте урачунали масу пробног тега у прорачуне.
- "Manual data input"- користи се за ручни унос вредности вибрације и фазе у одговарајућа поља на левој страни прозора и израчунавање масе и угла уградње корекционог тега при преласку на"Results"картица
- Дугме ""Restore session data". Током балансирања, измерени подаци се чувају у датотеци session1.ini. Ако је процес мерења прекинут због замрзавања рачунара или из других разлога, кликом на ово дугме можете вратити податке мерења и наставити балансирање од тренутка прекида.“.
- Mandrel eccentricity elimination (Index balancing) Balancing with additional start to eliminate the influence of the eccentricity of the mandrel (balancing arbor). Mount the rotor alternately at 0° and 180° relative to the. Measure the unbalances in both positions.
- Balancing tolerance Entering or calculating residual imbalance tolerances in g x mm (G-classes)
- Use Polar Graph Use polar graph to display balancing results
1-plane Balancing. New rotor
Као што је горе наведено, "New Rotor"Балансирање захтева два пробна рада и најмање један пробни рад машине за балансирање.“.
Run#0 (Initial run)
Након инсталирања сензора на балансирајућем ротору и уноса параметара подешавања, потребно је укључити ротацију ротора и, када достигне радну брзину, притиснути тастер "Run#0"Дугме " за почетак мерења. Дугме „Charts"Картица „„ ће се отворити у десном панелу, где ће бити приказан облик таласа и спектар вибрације. У доњем делу картице чува се датотека историје, у којој су сачувани резултати свих покретања са временском референцом. На диску се ова датотека чува у архивској фасцикли под називом memo.txt.
Attention!
Before starting the measurement, it is necessary to turn on the rotation of the rotor of the balancing machine (Run#0) and make sure that the rotor speed is stable.
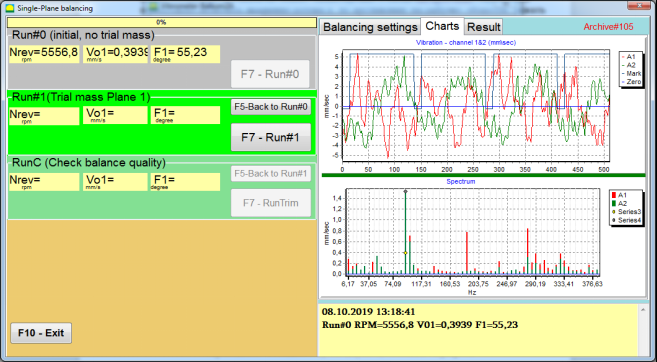
Fig. 7.19. Balancing in one plane. Initial run (Run#0). Charts Tab
After measurement process finished, in the Run#0 У одељку на левој плочи појављују се резултати мерења - брзина ротора (RPM), RMS (Vo1) и фаза (F1) 1x вибрације.
""F5-Back to Run#0"Дугме " (или функционални тастер F5) се користи за повратак на одељак Run#0 и, ако је потребно, за поновно мерење параметара вибрација.
Run#1 (Trial mass Plane 1)
Пре почетка мерења параметара вибрација у одељку "Run#1 (Trial mass Plane 1), пробни тег треба инсталирати према ""Trial weight mass"поље“.
The goal of installing a trial weight is to evaluate how the vibration of the rotor changes when a known weight is installed at a known place (angle). Trial weight must changes the vibration amplitude by either 30% lower or higher of initial amplitude or change phase by 30 degrees or more of initial phase.
Ако је потребно користити "Saved coeff."балансирање за даљи рад, место (угао) постављања пробног тега мора бити исто као и место (угао) рефлектујуће ознаке.“.
Поново укључите ротацију ротора балансирајуће машине и уверите се да је његова фреквенција ротације стабилна. Затим кликните на "F7-Run#1"дугме „“ (или притисните тастер F7 на тастатури рачунара).
Након мерења у одговарајућим прозорима "Run#1 (Trial mass Plane 1)"у одељку“, појављују се резултати мерења брзине ротора (RPM), као и вредност RMS компоненте (Vо1) и фазе (F1) 1x вибрације.
Истовремено, "Резултат"Картица „“ се отвара на десној страни прозора.
This tab displays the results of calculating the mass and angle of corrective weight, which must be installed on the rotor to compensate imbalance.
Штавише, у случају коришћења поларног координатног система, дисплеј приказује вредност масе (M1) и угао уградње (f1) корекционог тега.
У случају "Fixed positions"Биће приказани бројеви позиција (Zi, Zj) и подељена маса пробне тежине.
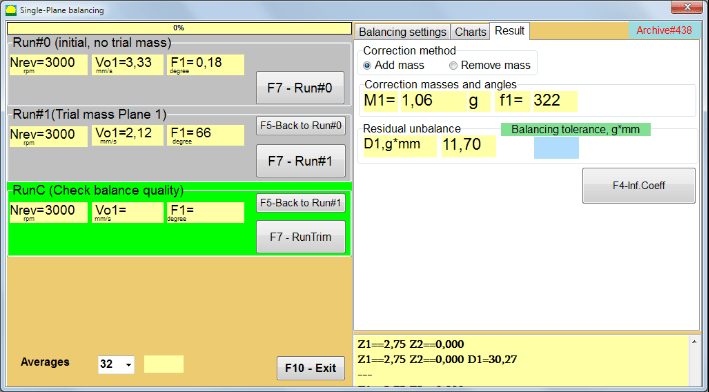
Fig. 7.20. Balancing in one plane. Run#1 and balancing result.
If Polar graph is checked polar diagram will be shown.
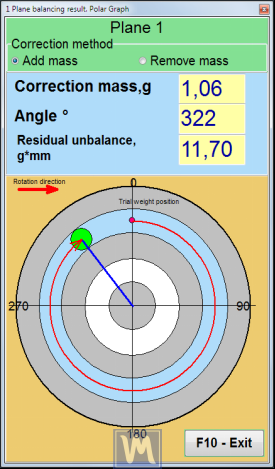
Слика 7.21. Резултат балансирања. Поларни граф.
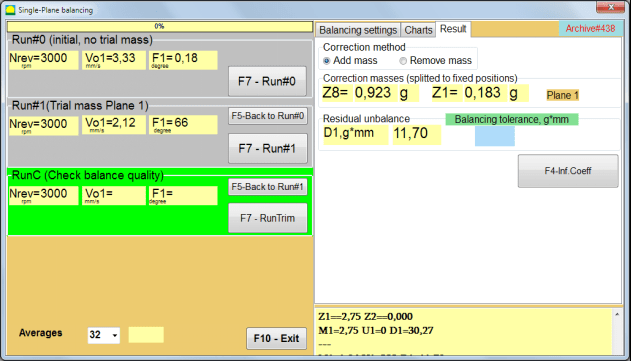
Fig. 7.22. The result of balancing. Weight splitted (fixed positions)
Такође, ако "Polar graph" је означено, приказаће се поларни графикон.
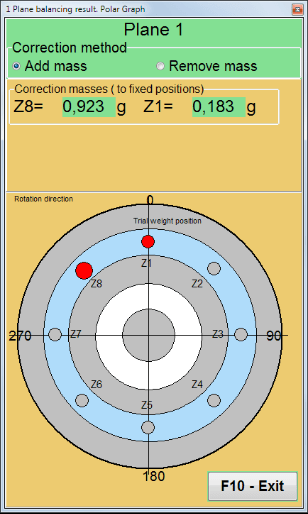
Слика 7.23. Тежина подељена на фиксне позиције. Поларни граф
⚠️ Пажња!
- Након завршетка процеса мерења у другом покушају ("Run#1 (Trial mass Plane 1)"") балансирајуће машине, потребно је зауставити ротацију и уклонити инсталирани пробни тег. Затим инсталирати (или уклонити) корективни тег на ротор према подацима са табеле резултата.
Ако пробни тег није уклоњен, потребно је да пређете на "Balancing settings"таб" и укључите поље за потврду у „Leave trial weight in Plane1"". Затим се вратите на ""Резултат"" таб. Тежина и угао уградње корекционог тега се аутоматски поново израчунавају.
- Угаони положај корективног тега се врши са места уградње пробног тега. Правац референце угла се поклапа са смером ротације ротора.
- У случају "Fixed position""- 1st position (Z1), coincides with the place of installation of the trial weight. The counting direction of the position number is in the direction of rotation of the rotor.
- Подразумевано, корективни тег ће бити додат ротору. То је назначено ознаком постављеном у "Add"" поље. Ако уклањате тежину (на пример, бушењем), морате поставити ознаку у поље ""Delete"" поље, након чега ће се угаони положај корекционог тега аутоматски променити за 180º.
Након постављања корекционог тега на балансирајући ротор у радном прозору, потребно је извршити RunC (подешавање) и проценити ефикасност извршеног балансирања.
RunC (Check balance quality)
⚠️ Пажња! Before starting the measurement on the RunC, it is necessary to turn on the rotation of the rotor of the machine and make sure that it has entered the operating mode (stable rotation frequency).
Да бисте извршили мерење вибрација у ""RunC (Check balance quality)"у одељку", кликните на „F7 – RunTrim"дугме “ (или притисните тастер F7 на тастатури).
Након успешног завршетка процеса мерења, у "RunC (Check balance quality)"У одељку „ „ на левом панелу, појављују се резултати мерења брзине ротора (RPM), као и вредност RMS компоненте (Vo1) и фазе (F1) 1x вибрације.
У ""Резултат", приказују се резултати израчунавања масе и угла уградње додатног корективног тега.
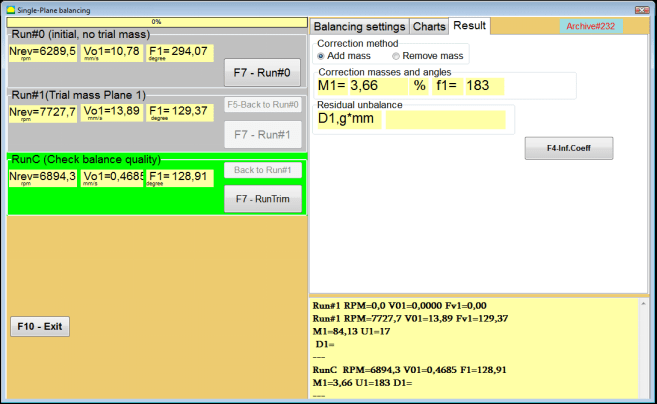
Fig. 7.24. Balancing in one plane. Performing a RunTrim. Result Tab
This weight can be added to the correction weight that is already mounted on the rotor to compensate for the residual imbalance. In addition, the residual rotor unbalance achieved after balancing is displayed in the lower part of this window.
In the case when the amount of residual vibration and / or residual unbalance of the balanced rotor meets the tolerance requirements established in the technical documentation, the balancing process can be completed.
Otherwise, the balancing process may continue. This allows the method of successive approximations to correct possible errors that may occur during the installation (removal) of the corrective weight on a balanced rotor.
Приликом наставка процеса балансирања на балансирајућем ротору, потребно је инсталирати (уклонити) додатну корективну масу, чији су параметри назначени у одељку ""Correction masses and angles".
Influence coefficients (1-plane)
""F4-Inf.Coeff"дугме "у“Резултат"Картица „“ се користи за преглед и чување у меморији рачунара коефицијената балансирања ротора (коефицијената утицаја) израчунатих из резултата калибрационих вожњи.
Када се притисне, тачка "Influence coefficients (single plane)"на екрану рачунара се појављује прозор у којем су приказани коефицијенти балансирања израчунати из резултата калибрационих (тестних) вожњи. Ако се током накнадног балансирања ове машине предвиђа коришћење "Saved coeff."Режим, ови коефицијенти морају бити сачувани у меморији рачунара.“.
Да бисте то урадили, кликните на дугме "F9 - Сачувај"дугме " и идите на другу страницу „Архива коефицијената утицаја. Једна раван."

Fig. 7.25. Balancing coefficients in the 1st plane
Затим треба да унесете име ове машине у поље "Rotor"колона и кликните"F2-Save"дугме“ да бисте сачували наведене податке на рачунару.
Затим се можете вратити на претходни прозор притиском на дугме "F10-Exit"дугме „“ (или функцијски тастер F10 на тастатури рачунара).
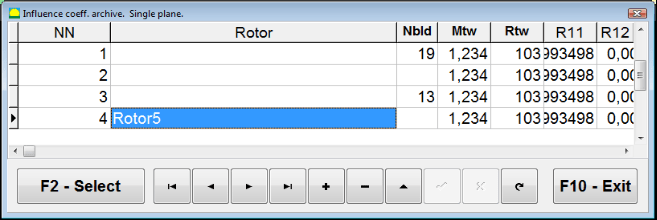
Сл. 7.26. "Архива коефицијената утицаја. Једна раван."
Balancing report
Након балансирања, сви подаци су сачувани и извештај о балансирању је креиран. Извештај можете прегледати и уређивати у уграђеном уређивачу. У прозору ""Балансирање архиве у једној равни"" (Сл. 7.9) притисните дугме ""F9 -Report"да бисте приступили уређивачу извештаја о билансирању“.
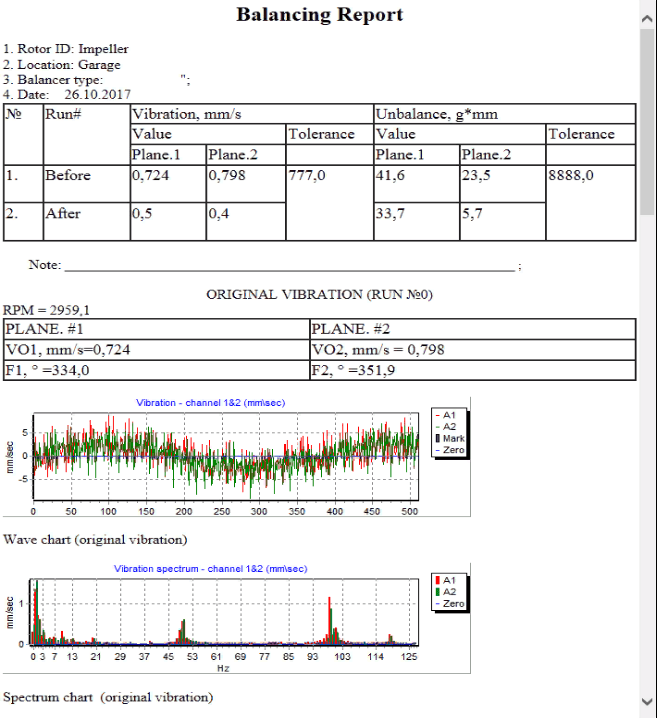
Сл. 7.27. Извештај о балансирању.
Поступак балансирања сачуваних коефицијената са сачуваним коефицијентима утицаја у 1 равни
Подешавање мерног система (унос почетних података)
Saved coeff. balancing can be performed on a machine for which balancing coefficients have already been determined and entered into the computer memory.
⚠️ Пажња! When balancing with saved coefficients, the vibration sensor and the phase angle sensor must be installed in the same way as during the initial balancing.
Input of the initial data for Saved coeff. balancing (као у случају примарног(""New rotor"") балансирање) почиње у ""Single plane balancing. Balancing settings.".
У овом случају, у "Influence coefficients"у одељку", изаберите „Saved coeff"ставка". У овом случају, друга страница „Influence coeff. archive. Single plane.", који чува архиву сачуваних коефицијената балансирања.
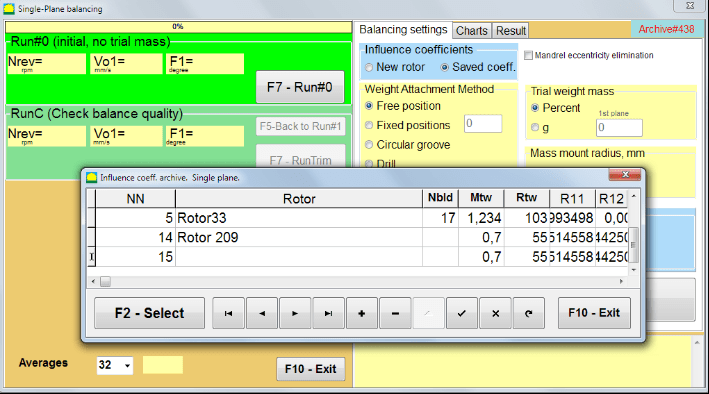
Fig. 7.28. Balancing with saved influence coefficients in 1 plane
Крећући се кроз табелу ове архиве помоћу контролних дугмади "►" или "◄", можете одабрати жељени запис са коефицијентима балансирања машине која нас занима. Затим, да бисте користили ове податке у тренутним мерењима, притисните дугме "F2 – Select"дугме „.
Након тога, садржај свих осталих прозора "Single plane balancing. Balancing settings."" се попуњавају аутоматски.
After completing the input of the initial data, you can begin to measure.
Мерења током балансирања са сачуваним коефицијентима утицаја
Balancing with saved influence coefficients requires only one initial run and at least one test run of the balancing machine.
⚠️ Пажња! Before starting the measurement, it is necessary to turn on the rotation of the rotor and make sure that rotating frequency is stable.
Да би се извршило мерење параметара вибрација у ""Run#0 (Initial, no trial mass)"одељак "притисните“F7 – Run#0"(или притисните тастер F7 на тастатури рачунара).“.
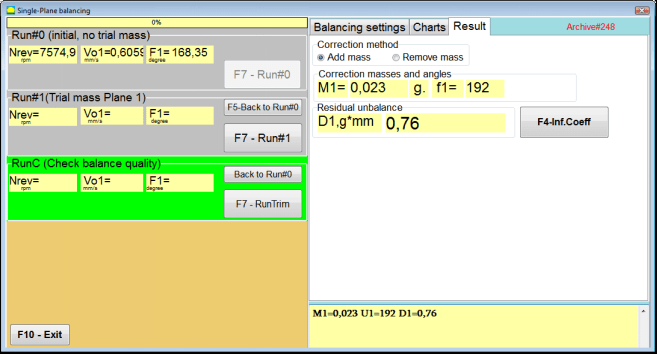
Fig. 7.29. Balancing with saved influence coefficients in one plane. Results after one run.
У одговарајућим пољима "Run#0"У одељку „, појављују се резултати мерења брзине ротора (RPM), вредност RMS компоненте (Vо1) и фазе (F1) 1x вибрације.
Истовремено, "Резултат"Картица „“ приказује резултате израчунавања масе и угла корективне тежине, која мора бити инсталирана на ротору да би се компензовала неравнотежа.
Штавише, у случају коришћења поларног координатног система, дисплеј приказује вредности масе и углове уградње корекционих тегова.
In the case of splitting of the corrective weight on the fixed positions, the numbers of the positions of the balancing rotor and the mass of weight that need to be installed on them are displayed.
Further, the balancing process is carried out in accordance with the recommendations set out in section 7.4.2. for primary balancing.
Mandrel eccentricity elimination (Index balancing)
If during balancing the rotor is installed in a cylindrical mandrel, then the eccentricity of the mandrel may introduce an additional error. To eliminate this error, the rotor should be deployed in the mandrel 180 degrees and carry out an additional start. This is called index balancing.
To carry out index balancing, a special option is provided in the Balanset-1A program. When checked Mandrel eccentricity elimination an additional RunEcc section appears in the balancing window.

Fig. 7.30. The working window for Index balancing.
After running Run # 1 (Trial mass Plane 1), a window will appear
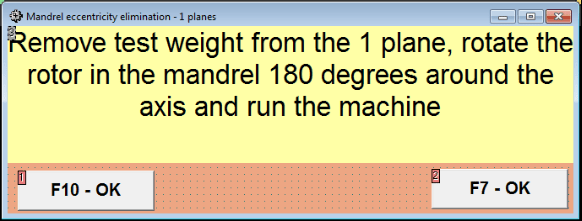
Fig. 7.31 Index balancing attention window.
Након инсталирања ротора са окретом од 180°, мора се завршити Run Ecc. Програм ће аутоматски израчунати стварну неравнотежу ротора без утицаја на ексцентричност трна.
7.5 Балансирање у две равни
Before starting work in the Two plane balancing mode, it is necessary to install vibration sensors on the machine body at the selected measurement points and connect them to the inputs X1 and X2 of the measuring unit, respectively.
An optical phase angle sensor must be connected to input X3 of the measuring unit. In addition, to use this sensor, a reflective tape must be glued onto the accessible rotor surface of the balancing machine.
Detailed requirements for choosing the installation location of sensors and their mounting at the facility during balancing are set out in Appendix 1.
Рад на програму у "Two plane balancing"режим“ почиње из главног прозора програма.
Кликните на "F3-Two plane"дугме „“ (или притисните тастер F3 на тастатури рачунара).
Даље, кликните на дугме "F7 – Балансирање", након чега ће се на екрану рачунара појавити радни прозор (видети слику 7.13), избор архиве за чување података приликом балансирања у две равни.
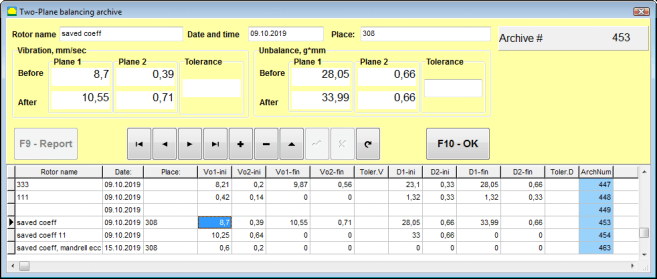
Fig. 7.32 Two plane balancing archive window.
У овом прозору треба да унесете податке о балансираном ротору. Након притиска на дугме "F10-OK"дугме“, појавиће се прозор за балансирање.
Balancing settings (2-plane)
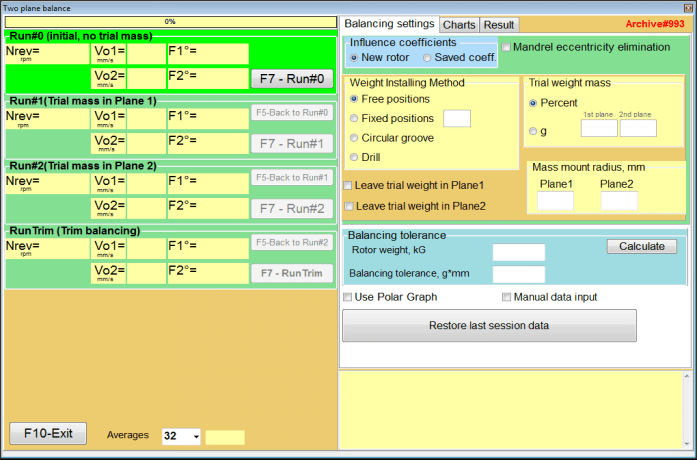
Fig. 7.33. Balancing in two planes window.
На десној страни прозора је "Balancing settings"Картица“ за унос подешавања пре балансирања.
- Influence coefficients - Балансирање новог ротора или балансирање коришћењем сачуваних коефицијената утицаја (коефицијенти балансирања)
- Mandrel eccentricity elimination - Балансирање са додатним стартом ради елиминисања утицаја ексцентричности трна
- Weight Attachment Method - Уградња корективних тегова на произвољно место на обиму ротора или у фиксни положај. Прорачуни за бушење при уклањању масе.
- "Free position"" - тегови се могу поставити у произвољним угаоним положајима на обиму ротора.
- "Fixed position"- тег се може поставити у фиксне угаоне положаје на ротору, на пример, на лопатице или рупе (на пример 12 рупа – 30 степени), итд. Број фиксних положаја мора се унети у одговарајуће поље. Након балансирања, програм ће аутоматски поделити тег на два дела и назначити број положаја на којима је потребно утврдити добијене масе.“.
- Trial weight mass - Пробна тежина
- Leave trial weight in Plane1 / Plane2 - Уклоните или оставите пробни тег приликом балансирања.
- Mass mount radius, mm - Радијус монтаже пробних и корективних тегова
- Balancing tolerance - Унос или израчунавање толеранција преосталог дисбаланса у г-мм
- Use Polar Graph - Користите поларни графикон за приказ резултата балансирања
- Manual data input - Ручни унос података за израчунавање балансних тегова
- Restore last session data - Опоравак података мерења из последње сесије у случају неуспеха у наставку балансирања.
2 planes balancing. New rotor
Подешавање мерног система (унос почетних података)
Input of the initial data for the New rotor balancing у ""Балансирање у две равни. Подешавања".
У овом случају, у "Influence coefficients"у одељку", изаберите „New rotor""ставка".
Даље, у одељку "Trial weight mass"", морате одабрати јединицу мере масе пробног тега - ""Gram"или"Percent".
Приликом избора јединице мере ""Percent", сва даља прорачунавања масе корективног тега биће извршена у процентима у односу на масу пробног тега.
Приликом избора "Gram"јединица мере, сви даљи прорачуни масе корективног тега биће извршени у грамима. Затим унесите у прозоре који се налазе десно од натписа"Gram"маса пробних тегова који ће бити инсталирани на ротору.
⚠️ Пажња! Ако је потребно користити "Saved coeff."Режим за даљи рад током почетног балансирања, маса пробних тегова мора бити унета у grams.
Затим изаберите "Weight Attachment Method" - "Circum"или"Fixed position".
Ако изаберете "Fixed position", морате унети број позиција.
Calculation of tolerance for residual imbalance (Balancing tolerance)
Толеранција за преосталу неравнотежу (толеранција балансирања) може се израчунати у складу са поступком описаним у стандарду ISO 1940 Вибрације. Захтеви за квалитет балансирања ротора у константном (крутом) стању. Део 1. Спецификација и верификација толеранција балансирања.

Fig. 7.34. Balancing tolerance calculation window
Initial run (Run#0)
При балансирању у две равни у ""New rotor"режим“, балансирање захтева три калибрациона рада и најмање један пробни рад машине за балансирање.
Мерење вибрација при првом покретању машине се врши у ""Two plane balance"радни прозор у"Run#0"одељак“.
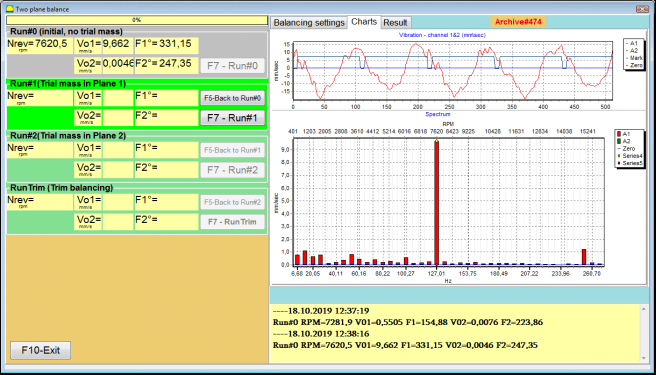
Слика 7.35. Резултати мерења при балансирању у две равни након иницијалне вожње.
⚠️ Пажња! Пре почетка мерења, потребно је укључити ротацију ротора балансирајуће машине (први рад) и уверити се да је ушла у режим рада са стабилном брзином.
To measure vibration parameters in the Run#0 у одељку, кликните на "F7 – Run#0"дугме „“ (или притисните тастер F7 на тастатури рачунара)
Резултати мерења брзине ротора (RPM), вредност RMS (VО1, VО2) и фазе (F1, F2) 1x вибрације појављују се у одговарајућим прозорима Run#0 section.
Run#1.Trial mass in Plane1
Пре него што почнете са мерењем параметара вибрација у ""Run#1.Trial mass in Plane1"у одељку", требало би да зауставите ротацију ротора балансирајуће машине и на њега поставите пробни тег, масе изабране у „Trial weight mass"одељак“.
⚠️ Пажња!
- Питање избора масе пробних тегова и њихових места уградње на ротору балансирајуће машине детаљно је размотрено у Додатку 1.
- Ако је потребно користити Saved coeff. Mode in future work, the place for installing the trial weight must necessarily coincide with the place for installing the mark used to read the phase angle.
After this, it is necessary to turn on the rotation of the rotor of the balancing machine again and make sure that it has entered the operating mode.
За мерење параметара вибрација у ""Run # 1.Trial mass in Plane1"у одељку", кликните на „F7 – Run#1"дугме „“ (или притисните тастер F7 на тастатури рачунара).
Након успешног завршетка процеса мерења, враћате се на картицу резултата мерења.
У овом случају, у одговарајућим прозорима "Run#1. Trial mass in Plane1"одељак“, резултати мерења брзине ротора (RPM), као и вредности компоненти RMS (Vо1, Vо2) и фаза (F1, F2) 1x вибрације.
""Покрени # 2. Пробна маса у равни2""
Пре него што почнете са мерењем параметара вибрација у одељку "Run # 2.Trial mass in Plane2", морате извршити следеће кораке:
- зауставити ротацију ротора балансирајуће машине;
- уклоните пробни тег инсталиран у равни 1;
- инсталирајте пробни тег у равни 2, масе изабране у одељку ""Trial weight mass".
After this, turn on the rotation of the rotor of the balancing machine and make sure that it has entered the operating speed.
Да бисте започели мерење вибрација у ""Run # 2.Trial mass in Plane2"у одељку", кликните на „F7 – Run # 2"дугме "“ (или притисните тастер F7 на тастатури рачунара). Затим дугме „Резултат"Отвара се картица“.
In the case of using the Weight Attachment Method" - "Free positions, дисплеј приказује вредности масе (M1, M2) и углове уградње (f1, f2) корективних тегова.
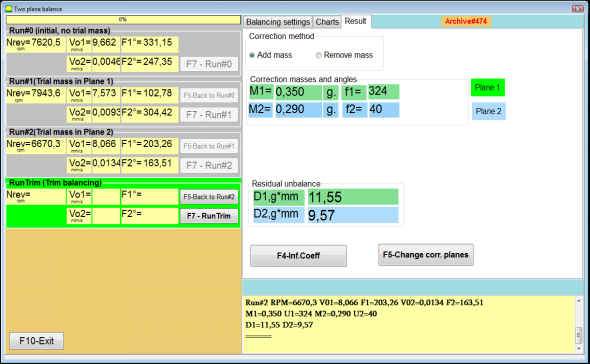
Fig. 7.36. Results of calculation of corrective weights – free position
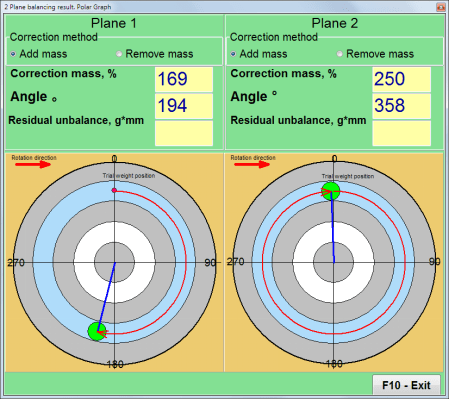
Слика 7.37. Резултати израчунавања корективних тежина – слободна позиција. Поларни дијаграм
In the case of using the Weight Attachment Method" – "Fixed positions

Сл. 7.38. Резултати израчунавања корективних тегова – фиксни положај.
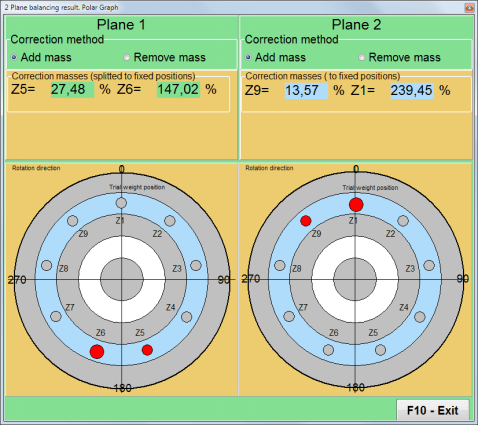
Слика 7.39. Резултати прорачуна корективних тежина – фиксна позиција. Поларни дијаграм.
У случају коришћења методе причвршћивања тежине" – ""Circular groove"
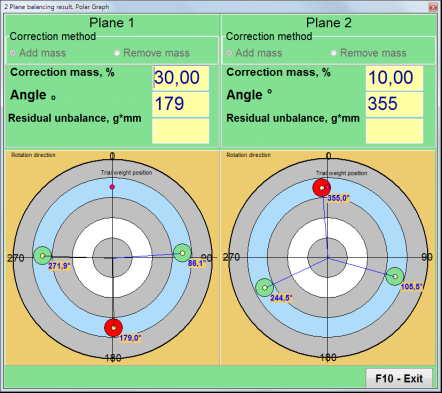
Сл. 7.40. Резултати израчунавања корективних тегова – Кружни жлеб.
⚠️ Пажња!
- Након завршетка процеса мерења на RUN#2 of the balancing machine, stop the rotation of the rotor and remove the trial weight previously installed. Then you can to install (or remove) corrective weights.
- Угаони положај корективних тегова у поларном координатном систему се рачуна од места уградње пробног тега у смеру ротације ротора.
- У случају "Fixed position""- 1st position (Z1), coincides with the place of installation of the trial weight. The counting direction of the position number is in the direction of rotation of the rotor.
- Подразумевано, корективни тег ће бити додат ротору. То је назначено ознаком постављеном у "Add"" поље. Ако уклањате тежину (на пример, бушењем), морате поставити ознаку у поље ""Delete"" поље, након чега ће се угаони положај корекционог тега аутоматски променити за 180º.
RunC (Trim run)
After installing the correction weight on the balancing rotor it is necessary to carry out a RunC (trim) and evaluate the effectiveness of the performed balancing.
⚠️ Пажња! Пре почетка мерења на пробном раду, потребно је укључити ротацију ротора машине и уверити се да је достигла радну брзину.
Да бисте измерили параметре вибрација у одељку RunTrim (Провери квалитет баланса), кликните на "F7 – RunTrim"дугме „“ (или притисните тастер F7 на тастатури рачунара).
The results of measuring the rotor rotation frequency (RPM), as well as the value of the RMS component (Vо1) and phase (F1) of 1x vibration will be shown.
""Резултат"„ се појављује картица са табелом резултата мерења на десној страни радног прозора, која приказује резултате израчунавања параметара додатних корективних тегова.
These weights can be added to corrective weights that are already installed on the rotor to compensate for residual imbalance.
In addition, the residual rotor unbalance achieved after balancing is displayed in the lower part of this window.
У случају када вредности заостале вибрације и/или заостале неуравнотежености уравнотеженог ротора задовољавају захтеве толеранције утврђене у техничкој документацији, процес балансирања се може завршити.
Otherwise, the balancing process may continue. This allows the method of successive approximations to correct possible errors that may occur during the installation (removal) of the corrective weight on a balanced rotor.
Приликом наставка процеса балансирања на балансирајућем ротору, потребно је инсталирати (уклонити) додатну корективну масу, чији су параметри назначени у прозору "Резултат".
У ""Резултат"прозору постоје два контролна дугмета која се могу користити -"F4-Inf.Coeff", "F5 – Change correction planes".
Influence coefficients (2 planes)
""F4-Inf.Coeff"Дугме „“ (или функционални тастер F4 на тастатури рачунара) се користи за преглед и чување коефицијената балансирања ротора у меморији рачунара, израчунатих из резултата два покретања калибрације.
Када се притисне, тачка "Influence coefficients (two planes)"На екрану рачунара се појављује радни прозор у којем су приказани коефицијенти балансирања израчунати на основу резултата прва три покретања калибрације.“.

Fig. 7.41. Working window with balancing coefficients in 2 planes.
У будућности, приликом балансирања такве машине, претпоставља се да ће бити потребно користити ""Saved coeff."режим и коефицијенти балансирања сачувани у меморији рачунара.“.
Да бисте сачували коефицијенте, кликните на "F9 – Save"дугме " и идите на „Influence coefficients archive (2planes)"прозори (видети слику 7.42)
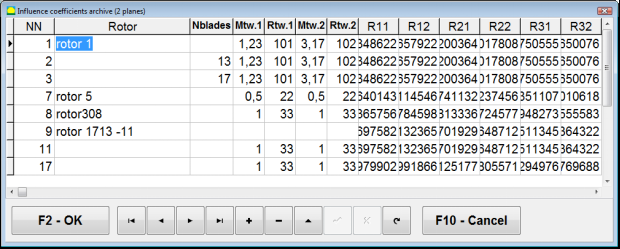
Fig. 7.42. The second page of the working window with balancing coefficients in 2 planes.
Change correction planes
""F5 – Change correction planes"Дугме „“ се користи када је потребно променити положај корекционих равни, када је потребно поново израчунати масе и углове уградње корективних тегова.
This mode is primarily useful when balancing rotors of complex shape (for example, crankshafts).
Када се притисне ово дугме, радни прозор "Recalculation of correction weights mass and angle to other correction planes"" се приказује на екрану рачунара.
In this working window, you should select one of the 4 possible options by clicking corresponding picture.
Оригиналне равни корекције (Н1 и Н2) су означене зеленом бојом, а нове (К1 и К2), за које се пребројава, црвеном бојом.
Затим, у "Calculation data"унесите тражене податке, укључујући:“
- растојање између одговарајућих корекционих равни (а, б, ц);
- нове вредности радијуса уградње корективних тегова на ротор (R1 ', R2').
Након уноса података, морате притиснути дугме "F9-calculate"
Резултати прорачуна (масе M1, M2 и углови уградње корективних тегова f1, f2) приказани су у одговарајућем одељку овог радног прозора.
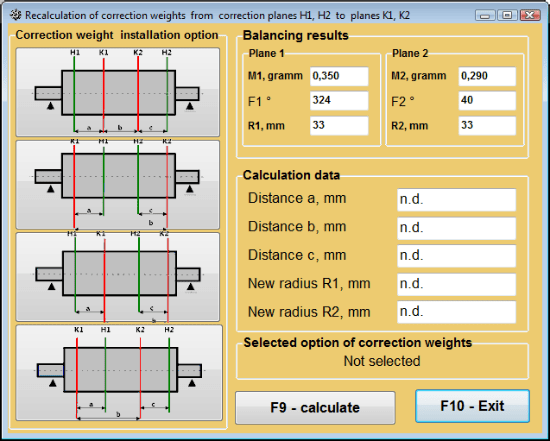
Сл. 7.43 Промена корекционих равни. Поновно израчунавање корекционе масе и угла у односу на друге корекционе равни.
Уштеђени коефицијент балансирања у 2 равни
Saved coeff. balancing can be performed on a machine for which balancing coefficients have already been determined and saved in the computer memory.
⚠️ Пажња! When re-balancing, the vibration sensors and the phase angle sensor must be installed in the same way as during the initial balancing.
Унос почетних података за ребалансирање почиње у ""Баланс у две равни. Подешавања балансирања".
У овом случају, у "Influence coefficients"у одељку", изаберите „Saved coeff."Ставка. У овом случају, прозор"Influence coefficients archive (2planes)"" ће се појавити, у којој је сачувана архива претходно одређених коефицијената балансирања.
Крећући се кроз табелу ове архиве помоћу контролних дугмади "►" или "◄", можете одабрати жељени запис са коефицијентима балансирања машине која нас занима. Затим, да бисте користили ове податке у тренутним мерењима, притисните дугме "F2 – OK"дугме“ и вратите се на претходни радни прозор.
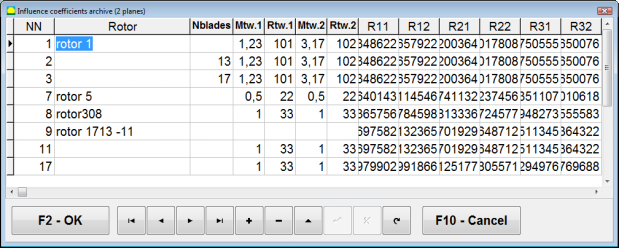
Fig. 7.44. The second page of the working window with balancing coefficients in 2 planes.
Након тога, садржај свих осталих прозора "Балансирање у 2 п.л. Изворни подаци" се попуњава аутоматски.
Saved coeff. Balancing
"Saved coeff."Балансирање захтева само једно подешавање и најмање једно пробно покретање машине за балансирање.“.
Vibration measurement at the tuning start (Run # 0) машине се изводи у ""Balancing in 2 planes"радни прозор са табелом резултата балансирања у Run # 0 section.
⚠️ Пажња! Before starting the measurement, it is necessary to turn on the rotation of the rotor of the balancing machine and make sure that it has entered the operating mode with a stable speed.
To measure vibration parameters in the Run # 0 у одељку, кликните на "F7 – Run#0"дугме „“ (или притисните тастер F7 на тастатури рачунара).
The results of measuring the rotor speed (RPM), as well as the value of the components of the RMS (VО1, VО2) and phases (F1, F2) of the 1x vibration appear in the corresponding fields of the Run # 0 section.
Истовремено, "Резултат"Отвара се картица „“, која приказује резултате израчунавања параметара корективних тегова који морају бити инсталирани на ротору да би се компензовала његова неравнотежа.
Штавише, у случају коришћења поларног координатног система, дисплеј приказује вредности масе и углове уградње корективних тегова.
In the case of decomposition of corrective weights on the blades, the numbers of the blades of the balancing rotor and the mass of weight that need to be installed on them are displayed.
Further, the balancing process is carried out in accordance with the recommendations set out in section 7.6.1.2. for primary balancing.
⚠️ Пажња!
- After completion of the measurement process after the second start of the balanced machine stop the rotation of its rotor and remove the previously set trial weight. Only then you can begin to install (or remove) correction weight on the rotor.
- Counting the angular position of the place of adding (or removing) of the correction weight from the rotor is carried out on the installation site of trial weight in the polar coordinate system. Counting direction coincides with the direction of the angle of rotor rotation.
- У случају балансирања на лопатицама – балансирана лопатица ротора, означена као позиција 1, поклапа се са местом постављања пробног тега. Смер референтног броја лопатице приказан на екрану рачунара изводи се у смеру ротације ротора.
- У овој верзији програма је подразумевано прихваћено да ће корекциони тег бити додат на ротор. Ознака постављена у пољу "Додавање" потврђује то. У случају корекције неравнотеже уклањањем тега (на пример бушењем), потребно је поставити ознаку у поље "Уклањање", тада ће се угаони положај корекционог тега аутоматски променити на 180º.
Елиминација ексцентричности трна (балансирање индекса) - две равни
If during balancing the rotor is installed in a cylindrical mandrel, then the eccentricity of the mandrel may introduce an additional error. To eliminate this error, the rotor should be deployed in the mandrel 180 degrees and carry out an additional start. This is called index balancing.
To carry out index balancing, a special option is provided in the Balanset-1A program. When checked Mandrel eccentricity elimination an additional RunEcc section appears in the balancing window.
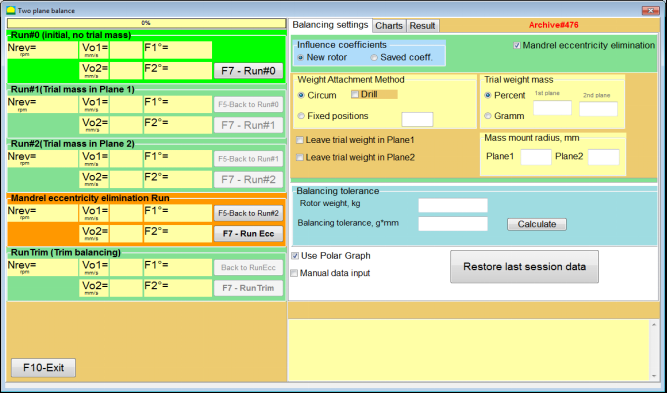
Fig. 7.45. The working window for Index balancing.
After running Run # 2 (Trial mass Plane 2), a window will appear
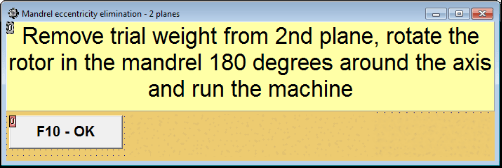
Fig. 7.46. Attention windows
Након инсталирања ротора са окретом од 180°, мора се завршити Run Ecc. Програм ће аутоматски израчунати стварну неравнотежу ротора без утицаја на ексцентричност трна.
7.6 Режим графикона
Рад у режиму "Графикони" почиње од почетног прозора (видети слику 7.1) притиском на "F8 – Графикони". Затим се отвара прозор "Мерење вибрација на два канала. Графикони" (видети слику 7.19).

Сл. 7.47. Оперативни прозор "Мерење вибрација на два канала. Графикони".
While working in this mode it is possible to plot four versions of vibration chart.
The first version allows to get a timeline function of the overall vibration (of vibration velocity) on the first and second measuring channels.
The second version allows you to get graphs of vibration (of vibration velocity), which occurs on rotation frequency and its higher harmonical components.
These graphs are obtained as a result of the synchronous filtering of the overall vibration time function.
The third version provides vibration charts with the results of the harmonical analysis.
The fourth version allows to get a vibration chart with the results of the spectrum analysis.
Графикони укупних вибрација
Да бисте исцртали укупни дијаграм вибрација у оперативном прозору ""Measurement of vibration on two channels. Charts"потребно је одабрати режим рада"overall vibration"кликом на одговарајуће дугме. Затим подесите мерење вибрација у пољу "Трајање, у секундама" кликом на дугме «▼» и изаберите из падајуће листе жељено трајање процеса мерења, које може бити једнако 1, 5, 10, 15 или 20 секунди;
Када сте спремни, притисните (кликните) дугме ""F9дугме "-Мери“, процес мерења вибрација почиње истовремено на два канала.
After completion of the measurement process in the operating window appear charts of time function of the overall vibration of the first (red) and the second (green) channels (see. Fig. 7.47).
On these charts time is plotted on X-axis and the amplitude of the vibration velocity (mm/sec) is plotted on Y-axis.
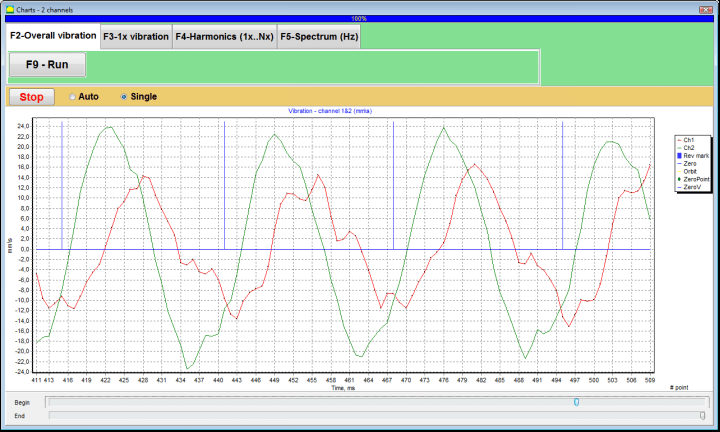
Сл. 7.48. Оперативни прозор за излаз временске функције укупних дијаграма вибрација
There are also marks (blue-colored) in these graphs connecting charts of overall vibration with the rotation frequency of the rotor. In addition, each mark indicates beginning (end) of the next revolution of the rotor.
In need of the scale change of the chart on X-axis the slider, pointed by an arrow on fig. 7.20, can be used.
Графикони 1x вибрација
Да бисте исцртали дијаграм вибрација од 1x у оперативном прозору ""Measurement of vibration on two channels. Charts"потребно је одабрати режим рада"1x vibration"кликом на одговарајуће дугме.“.
Затим се појављује оперативни прозор "1x вибрација".
Притисните (кликните) дугме ""F9дугме "-Мери“, процес мерења вибрација почиње истовремено на два канала.
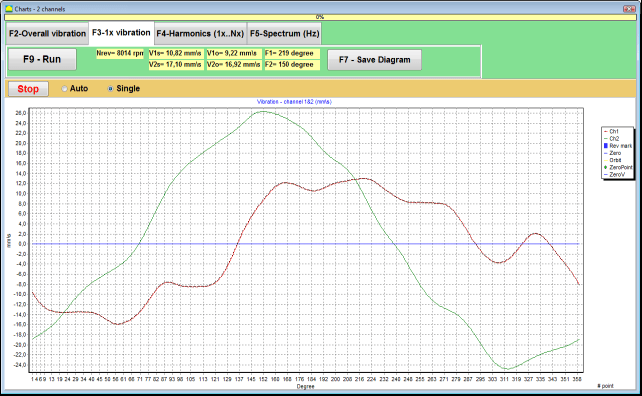
Сл. 7.49. Оперативни прозор за излаз 1x вибрационих дијаграма.
After completion of the measurement process and mathematical calculation of results (synchronous filtering of the time function of the overall vibration) on display in the main window on a period equal to one revolution of the rotor appear charts of the 1x vibration on two channels.
In this case, a chart for the first channel is depicted in red and for the second channel in green. On these charts angle of the rotor revolution is plotted (from mark to mark) on X-axis and the amplitude of the vibration velocity (mm/sec) is plotted on Y-axis.
Поред тога, у горњем делу радног прозора (десно од дугмета "F9 – Мерење"") нумеричке вредности мерења вибрација оба канала, сличне онима које добијамо у ""Vibration meter"режим“, се приказују.
In particular: RMS value of the overall vibration (V1s, V2s), the magnitude of RMS (V1o, V2o) and phase (Fi, Fj) of the 1x vibration and rotor speed (Nrev).
Вибрациони дијаграми са резултатима хармонијске анализе
Да бисте цртали графикон са резултатима хармонијске анализе у оперативном прозору ""Measurement of vibration on two channels. Charts"потребно је одабрати режим рада"Harmonical analysis"кликом на одговарајуће дугме.“.
Затим се појављује оперативни прозор за истовремени приказ дијаграма привремене функције и спектра хармонијских аспеката вибрација чији је период једнак или вишеструк фреквенцији ротације ротора.
Attention!
When operating in this mode it is necessary to use the phase angle sensor which synchronizes the measurement process with the rotor frequency of the machines to which the sensor is set.
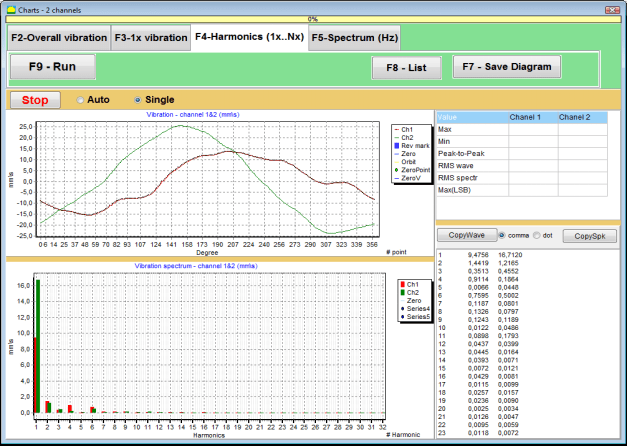
Сл. 7.50. Хармоници радног прозора 1x вибрације.
Када сте спремни, притисните (кликните) дугме ""F9дугме "-Мери“, процес мерења вибрација почиње истовремено на два канала.
Након завршетка процеса мерења у радном прозору се појављују графикони временске функције (горњи графикон) и хармоници 1x вибрације (доњи графикон).
The number of harmonic components is plotted on X-axis and RMS of the vibration velocity (mm/sec) is plotted on Y-axis.
Дијаграми временског домена и спектра вибрација
За цртање спектралног графикона користите ""F5-Spectrum"картица „:“
Затим се појављује оперативни прозор за истовремени приказ дијаграма таласа и спектра вибрација.

Сл. 7.51. Оперативни прозор за излаз спектра вибрација.
Када сте спремни, притисните (кликните) дугме ""F9дугме "-Мери“, процес мерења вибрација почиње истовремено на два канала.
Након завршетка процеса мерења у радном прозору се појављују графикони временске функције (горњи графикон) и спектра вибрација (доњи графикон).
The vibration frequency is plotted on X-axis and RMS of the vibration velocity (mm/sec) is plotted on Y-axis.
In this case, a chart for the first channel is depicted in red and for the second channel in green.
8. Општа упутства за рад и одржавање уређаја
8.1 Уравнотежење критеријума квалитета (стандард ISO 2372)
Квалитет балансирања може се проценити коришћењем нивоа вибрација утврђених стандардом ISO 2372. Табела испод приказује прихватљиве нивое вибрација за различите класе машина:
| Класа машине | Добро (мм/с RMS) |
Прихватљиво (мм/с RMS) |
И даље прихватљиво (мм/с RMS) |
Неприхватљиво (мм/с RMS) |
|---|---|---|---|---|
| Класа 1 Мале машине на чврстим темељима (мотори до 15 kW) |
< 0.7 | 0.7 - 1.8 | 1.8 - 4.5 | > 4.5 |
| Класа 2 Средње машине без темеља (мотори 15-75 kW), погонски механизми до 300 kW |
< 1.1 | 1.1 - 2.8 | 2.8 - 7.1 | > 7.1 |
| Разред 3 Велике машине на чврстим темељима (опрема преко 300 kW) |
< 1.8 | 1.8 - 4.5 | 4.5 - 11 | > 11 |
| Разред 4 Велике машине на лаганим темељима (опрема преко 300 kW) |
< 2.8 | 2.8 - 7.1 | 7.1 - 18 | > 18 |
Напомена: Ове вредности пружају смернице за процену квалитета балансирања. Увек се позивајте на спецификације произвођача опреме и важеће стандарде за вашу примену.
8.2 Захтеви за одржавање
🔧 Редовно одржавање
- ✓Редовна калибрација сензора према спецификацијама произвођача
- ✓Држите сензоре чистим и без магнетних остатака
- ✓Чувајте опрему у заштитној кутији када се не користи
- ✓Заштитите ласерски сензор од прашине и влаге
- ✓Редовно проверавајте кабловске спојеве на хабање или оштећења
- ✓Ажурирајте софтвер како препоручује произвођач
- ✓Чувајте резервне копије важних података о балансирању
📋 Стандарди одржавања ЕУ
Одржавање опреме мора бити у складу са:
- ЕН ИСО 9001: Захтеви система управљања квалитетом
- ЕН 13306: Терминологија и дефиниције одржавања
- ЕН 15341: Кључни индикатори учинка одржавања
- Редовне безбедносне инспекције у складу са директивом ЕУ о машинама
ПРИЛОГ 1. БАЛАНСИРАЊЕ РОТОРА
Ротор је тело које се окреће око одређене осе и држи га његове површине лежаја у носачима. Површине лежаја ротора преносе тежину на носаче путем котрљајућих или клизних лежајева. Када користимо термин "површина лежаја", једноставно се позивамо на чаурац* или површине које замењују чаурац.
*Чеп (Zapfen на немачком за "чеп", "иглицу") - је део вратила или осовине који носи држач (кућиште лежаја).
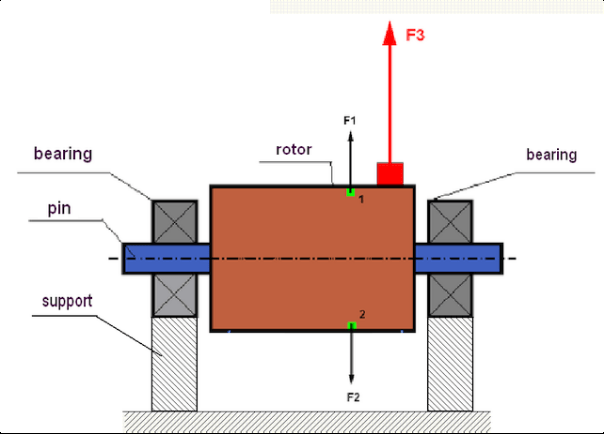
fig.1 Rotor and centrifugal forces.
In a perfectly balanced rotor, its mass is distributed symmetrically regarding the axis of the rotation. This means that any element of the rotor can correspond to another element located symmetrically in a relation to the axis of the rotation. During rotation, each rotor element acts upon by a centrifugal force directed in the radial direction (perpendicular to the axis of the rotor rotation). In a balanced rotor, the centrifugal force influencing any element of the rotor is balanced by the centrifugal force that influences the symmetrical element. For example, elements 1 and 2 (shown in fig.1 and colored in green) are influenced by centrifugal forces F1 and F2: equal in value and absolutely opposite in directions. This is true for all symmetrical elements of the rotor and thus the total centrifugal force influencing the rotor is equal to 0 the rotor is balanced. But if the symmetry of the rotor is broken (in Figure 1, the asymmetric element is marked in red), then the unbalanced centrifugal force F3 begins to act on the rotor.
Приликом ротације, ова сила мења смер заједно са ротацијом ротора. Динамичко оптерећење које настаје услед ове силе преноси се на лежајеве, што доводи до њиховог убрзаног хабања. Поред тога, под утицајем ове променљиве силе, долази до цикличне деформације носача и темеља на којем је ротор фиксиран, што производи вибрације. Да би се елиминисала неравнотежа ротора и пратеће вибрације, потребно је поставити балансирајуће масе, које ће вратити симетрију ротора.
Rotor balancing is an operation to eliminate imbalance by adding balancing masses.
The task of balancing is to find the value and places (angle) of the installation of one or more balancing masses.
Врсте ротора и неравнотежа
Considering the strength of the rotor material and the magnitude of the centrifugal forces influencing it, the rotors can be divided into two types: rigid and flexible.
Крути ротори у радним условима под утицајем центрифугалне силе могу се мало деформисати, али се утицај ове деформације у прорачунима стога може занемарити.
Deformation of flexible rotors on the other hand should never be neglected. The deformation of flexible rotors complicates the solution for the balancing problem and requires the use of some other mathematical models in comparison with the task of balancing rigid rotors. It is important to mention that the same rotor at low speeds of rotation can behave like rigid one and at high speeds it will behave like flexible one. Further on we will consider the balancing of rigid rotors only.
У зависности од расподеле неуравнотежених маса дуж дужине ротора, могу се разликовати две врсте неуравнотежености – статичка и динамичка. Исто важи и за статичко и динамичко балансирање ротора.
Статички дисбаланс ротора се јавља без ротације ротора. Другим речима, он је у стању мировања када је ротор под утицајем гравитације и поред тога окреће "тешку тачку" надоле. Пример ротора са статичким дисбалансом је приказан на слици 2.

Fig.2
The dynamic imbalance occurs only when the rotor spins.
An example of a rotor with the dynamic imbalance is presented in Fig.3.
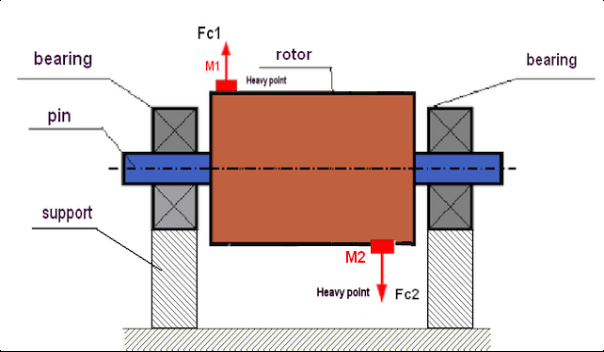
Fig.3. Dynamic imbalance of rotor – couple of the centrifugal forces
У овом случају, неуравнотежене једнаке масе M1 и M2 налазе се на различитим површинама – на различитим местима дуж дужине ротора. У статичком положају, тј. када се ротор не окреће, на ротор може утицати само гравитација и масе ће се стога међусобно уравнотежити. У динамици, када се ротор окреће, на масе M1 и M2 почињу да утичу центрифугалне силе FЎ1 и FЎ2. Ове силе су једнаке вредности и супротног смера. Међутим, пошто се налазе на различитим местима дуж дужине вратила и нису на истој линији, силе се међусобно не компензују. Силе FЎ1 и FЎ2 стварају момент који делује на ротор. Зато овај дисбаланс има и други назив "тренутни". Сходно томе, на носаче лежајева делују некомпензоване центрифугалне силе, које могу значајно премашити силе на које смо се ослањали, а такође и смањити век трајања лежајева.
Пошто се ова врста неравнотеже јавља само у динамици током окретања ротора, стога се назива динамичком. Не може се елиминисати статичким балансирањем (или тзв. "на ножевима") или на било који други сличан начин. Да би се елиминисала динамичка неравнотежа, потребно је поставити две компензационе тежине које ће створити момент једнаке вредности и супротног смера од момента који настаје из маса M1 и M2. Компензационе масе не морају нужно бити постављене насупрот масама M1 и M2 и бити једнаке њима по вредности. Најважније је да оне стварају момент који у потпуности компензује управо у тренутку неравнотеже.
Генерално, масе M1 и M2 могу бити различите, па ће доћи до комбинације статичке и динамичке неравнотеже. Теоретски је доказано да је за елиминисање неравнотеже крутог ротора неопходно и довољно инсталирати два тега распоређена дуж дужине ротора. Ови тегови ће компензовати и момент који настаје услед динамичке неравнотеже и центрифугалну силу која настаје услед асиметрије масе у односу на осу ротора (статичка неравнотежа). Као и обично, динамичка неравнотежа је типична за дугачке роторе, као што су вратила, а статичка - за уске. Међутим, ако је уски ротор постављен искривљено у односу на осу, или још горе, деформисан (тзв. "колутање точка"), у овом случају ће бити тешко елиминисати динамичку неравнотежу (видети слику 4), због чињенице да је тешко подесити корективне тегове који стварају прави компензациони момент.
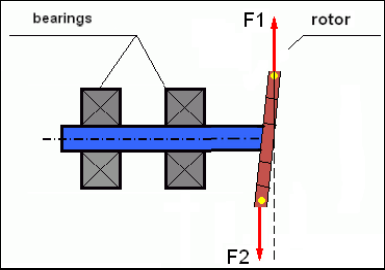
Fig.4 Dynamic balancing of the wobbling wheel
Пошто уско раме ротора ствара кратак момент, може бити потребно коригујући тегови велике масе. Али истовремено постоји додатна такозвана "индукована неравнотежа" повезана са деформацијом уског ротора под утицајем центрифугалних сила из коригујућих маса.
See the example:
""Методска упутства за балансирање крутих ротора"" ISO 1940-1:2003 Mechanical vibration – Balance quality requirements for rotors in a constant (rigid) state – Part 1: Specification and verification of balance tolerances
This is visible for narrow fan wheels, which, in addition to the power imbalance, also influences an aerodynamic imbalance. And it is important to bear in mind that the aerodynamic imbalance, in fact the aerodynamic force, is directly proportional to the angular velocity of the rotor, and to compensate it, the centrifugal force of the correcting mass is used, which is proportional to the square of the angular velocity. Therefore, the balancing effect may only occur at a specific balancing frequency. At other speeds there would be an additional gap. The same can be said about electromagnetic forces in an electromagnetic motor, which are also proportional to the angular velocity. In other words it is impossible to eliminate all causes of vibration of the mechanism by any means of balancing.
Основе вибрација
Вибрација је реакција дизајна механизма на дејство цикличне силе побуђивања. Ова сила може имати различиту природу.
- Центрифугална сила која настаје услед неравнотеже ротора је некомпензована сила која утиче на "тешку тачку". Посебно ова сила, као и вибрације које она изазива, елиминишу се балансирањем ротора.
- Интеракцијске силе, које имају "геометријску" природу и настају због грешака у производњи и уградњи делова за спајање. Ове силе могу настати, на пример, због неокруглости носача вратила, грешака у профилима зубаца код зупчаника, таласастости стаза лежаја, неусклађености спојених вратила итд. У случају неокруглости врата, оса вратила ће се померати у зависности од угла ротације вратила. Иако се ова вибрација манифестује при брзини ротора, готово је немогуће елиминисати је балансирањем.
- Aerodynamic forces arising from the rotation of the impeller fans and other blade mechanisms. Hydrodynamic forces arising from the rotation of hydraulic pump impellers, turbines, etc.
- Електромагнетне силе које настају услед рада електричних машина као резултат, на пример, асиметрије намотаја ротора, присуства краткоспојених намотаја итд.
The magnitude of vibration (for example, its amplitude AB) depends not only on the magnitude of the excitation force Fт acting on the mechanism with the circular frequency ω, but also on the stiffness k of the structure of the mechanism, its mass m, and damping coefficient C.

Various types of sensors can be used to measure vibration and balance mechanisms, including:
- absolute vibration sensors designed to measure vibration acceleration (accelerometers) and vibration velocity sensors;
- релативни сензори вибрација вртложних струја или капацитивни, дизајнирани за мерење вибрација.
In some cases (when the structure of the mechanism allows it) sensors of force can also be used to examine its vibration weight.
Particularly, they are widely used to measure the vibration weight of the supports of hardbearing balancing machines.
Therefore vibration is the reaction of the mechanism to the influence of external forces. The amount of vibration depends not only on the magnitude of the force acting on the mechanism, but also on the rigidity of the mechanism. Two forces with the same magnitude can lead to different vibrations. In mechanisms with a rigid support structure, even with the small vibration, the bearing units can be significantly influenced by dynamic weights. Therefore, when balancing mechanisms with stiff legs apply the force sensors, and vibration (vibro accelerometers). Vibration sensors are only used on mechanisms with relatively pliable supports, right when the action of unbalanced centrifugal forces leads to a noticeable deformation of the supports and vibration. Force sensors are used in rigid supports even when significant forces arising from imbalance do not lead to significant vibration.
Резонанција структуре
We have previously mentioned that rotors are divided into rigid and flexible. The rigidity or flexibility of the rotor should not be confused with the stiffness or mobility of the supports (foundation) on which the rotor is located. The rotor is considered rigid when its deformation (bending) under the action of centrifugal forces can be neglected. The deformation of the flexible rotor is relatively large: it cannot be neglected.
У овом чланку проучавамо само балансирање крутих ротора. Крути (недеформабилни) ротор заузврат може бити постављен на крутим или покретним (савитљивим) носачима. Јасно је да је ова крутост/покретљивост носача релативна у зависности од брзине ротације ротора и величине резултирајућих центрифугалних сила. Конвенционална граница је фреквенција слободних осцилација носача/темеља ротора. За механичке системе, облик и фреквенција слободних осцилација одређени су масом и еластичношћу елемената механичког система. То јест, фреквенција природних осцилација је унутрашња карактеристика механичког система и не зависи од спољашњих сила. Будући да су скренути из равнотежног стања, носачи теже да се врате у свој равнотежни положај због еластичности. Али због инерције масивног ротора, овај процес је у природи пригушених осцилација. Ове осцилације су сопствене осцилације система ротор-носач. Њихова фреквенција зависи од односа масе ротора и еластичности носача.
When the rotor begins to rotate and the frequency of its rotation approaches the frequency of its own oscillations, the vibration amplitude increases sharply, which can even lead to the destruction of the structure.
There is a phenomenon of mechanical resonance. In the resonance region, a change in the speed of rotation by 100 rpm can lead to an increase in a vibration tenfold. In this case (in the resonance region) the vibration phase changes by 180°.
Ако је дизајн механизма лоше пројектован, а брзина рада ротора је близу природне фреквенције осцилација, рад механизма постаје немогућ због неприхватљиво високих вибрација. Стандардне методе балансирања су такође немогуће, јер се параметри драматично мењају чак и при малој промени брзине ротације. Користе се посебне методе у области резонантног балансирања, али оне нису добро описане у овом чланку. Фреквенцију природних осцилација механизма можете одредити на искоришћењу (када је ротор искључен) или ударом са накнадном спектралном анализом одговора система на удар. "Балансет-1" пружа могућност одређивања природних фреквенција механичких структура овим методама.
For mechanisms whose operating speed is higher than the resonance frequency, that is, operating in the resonant mode, supports are considered as mobile ones and vibration sensors are used to measure, mainly vibration accelerometers that measure the acceleration of structural elements. For mechanisms operating in hard bearing mode, supports are considered as rigid. In this case, force sensors are used.
Линеарни и нелинеарни модели механичког система
Mathematical models (linear) are used for calculations when balancing rigid rotors. The linearity of the model means that one model is directly proportionally (linearly) dependent on the other. For example, if the uncompensated mass on the rotor is doubled, then the vibration value will be doubled correspondingly. For rigid rotors you can use a linear model because such rotors are not deformed. It is no longer possible to use a linear model for flexible rotors. For a flexible rotor, with an increase of the mass of a heavy point during rotation, an additional deformation will occur, and in addition to the mass, the radius of the heavy point will also increase. Therefore, for a flexible rotor, the vibration will more than double, and the usual calculation methods will not work. Also, a violation of the linearity of the model can lead to a change in the elasticity of the supports at their large deformations, for example, when small deformations of the supports work some structural elements, and when large in the work include other structural elements. Therefore it is impossible to balance the mechanisms that are not fixed at the base, and, for example, are simply established on a floor. With significant vibrations, the unbalance force can detach the mechanism from the floor, thereby significantly changing the stiffness characteristics of the system. The engine legs must be securely fastened, bolted fasteners tightened, the thickness of the washers must provide sufficient rigidity, etc. With broken bearings, a significant displacement of the shaft and its impacts is possible, which will also lead to a violation of linearity and the impossibility of carrying out high-quality balancing.
Methods and devices for balancing
As mentioned above, balancing is the process of combining the main Central axis of inertia with the axis of rotation of the rotor.
The specified process can be executed in two ways.
The first method involves the processing of the rotor axles, which is performed in such a way that the axis passing through the centers of the section of the axles with the main Central axis of inertia of the rotor. This technique is rarely used in practice and will not be discussed in detail in this article.
The second (most common) method involves moving, installing or removing corrective masses on the rotor, which are placed in such a way that the axis of inertia of the rotor is as close as possible to the axis of its rotation.
Moving, adding or removing corrective masses during balancing can be done using a variety of technological operations, including: drilling, milling, surfacing, welding, screwing or unscrewing screws, burning with a laser beam or electron beam, electrolysis, electromagnetic welding, etc.
The balancing process can be performed in two ways:
- склоп уравнотежених ротора (у сопственим лежајевима);
- балансирање ротора на машинама за балансирање.
To balance the rotors in their own bearings we usually use specialized balancing devices (kits), which allows us to measure the vibration of the balanced rotor at the speed of its rotation in a vector form, i.e. to measure both the amplitude and phase of vibration.
Currently, these devices are manufactured on the basis of microprocessor technology and (in addition to the measurement and analysis of vibration) provide automated calculation of the parameters of corrective weights that must be installed on the rotor to compensate its imbalance.
These devices include:
- мерна и рачунарска јединица, направљена на бази рачунара или индустријског контролера;
- два (или више) сензора вибрација;
- сензор фазног угла;
- опрема за уградњу сензора на објекту;
- специјализовани софтвер дизајниран за извођење пуног циклуса мерења параметара неуравнотежености ротора у једној, две или више равни корекције.
За балансирање ротора на машинама за балансирање, поред специјализованог уређаја за балансирање (мерног система машине), потребан је и "механизам за одмотавање" који је дизајниран да постави ротор на носаче и обезбеди његово окретање фиксном брзином.
Currently, the most common balancing machines exist in two types:
- пререзонантно (са гипким носачима);
- тврдо лежиште (са крутим носачима).
Over-resonant machines have a relatively pliable supports, made, for example, on the basis of the flat springs.
The natural oscillation frequency of these supports is usually 2-3 times lower than the speed of the balanced rotor, which is mounted on them.
Vibration sensors (accelerometers, vibration velocity sensors, etc.) are usually used to measure the vibration of the supports of a resonant machine.
In the hardbearing balancing machines are used relatively-rigid supports, natural oscillation frequencies of which should be 2-3 times higher than the speed of the balanced rotor.
Force sensors are usually used to measure the vibration weight on the supports of the machine.
The advantage of the hard bearing balancing machines is that they can be balanced at relatively low rotor speeds (up to 400-500 rpm), which greatly simplifies the design of the machine and its foundation, as well as increases the productivity and safety of balancing.
Balancing technique
⚠️ Балансирање елиминише само вибрације које су узроковане асиметријом расподеле масе ротора у односу на његову осу ротације. Остале врсте вибрација се не могу елиминисати балансирањем!
Balancing is the subject to technically serviceable mechanisms, the design of which ensures the absence of resonances at the operating speed, securely fixed on the foundation, installed in serviceable bearings.
🚫 Неисправан механизам подлеже поправци, а тек онда – балансирању. У супротном, квалитетно балансирање је немогуће.
Balancing cannot be a substitute for repair!
The main task of balancing is to find the mass and the place (angle) of installation of compensating weights, which are balanced by centrifugal forces.
As mentioned above, for rigid rotors it is generally necessary and sufficient to install two compensating weights. This will eliminate both the static and dynamic rotor imbalance. A general scheme of the vibration measurement during balancing looks like the following:
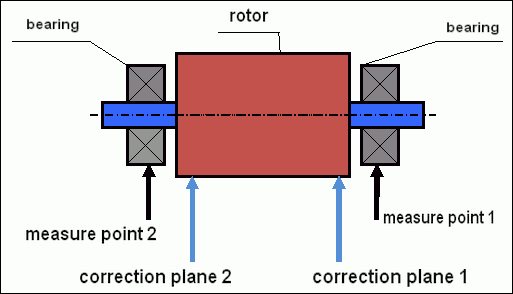
fig.5 Dynamic balancing – correction planes and measure points
Vibration sensors are installed on the bearing supports at points 1 and 2. The speed mark is fixed right on the rotor, a reflective tape is glued usually. The speed mark is used by the laser tachometer to determine the speed of the rotor and the phase of the vibration signal.
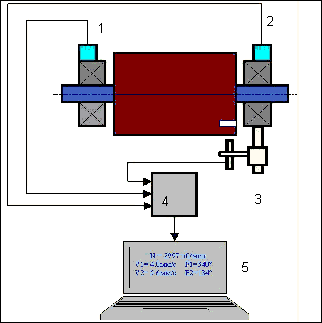
сл. 6. Инсталација сензора током балансирања у две равни, коришћењем Balanset-1
1,2-vibration sensors, 3-phase, 4- USB measuring unit, 5-laptop
In most cases, dynamic balancing is carried out by the method of three starts. This method is based on the fact that test weights of an already-known mass are installed on the rotor in series in 1 and 2 planes; so the masses and the place of installation of balancing weights are calculated based on the results of changing the vibration parameters.
Место уградње тега назива се корекциона раван. Обично се корекционе равни бирају у подручју носача лежајева на којима је монтиран ротор.
Почетна вибрација се мери при првом покретању. Затим се пробни тег познате масе поставља на ротор ближе једном од носача. Затим се врши друго покретање и меримо параметре вибрација који би требало да се промене због постављања пробног тега. Затим се пробни тег у првој равни уклања и поставља у другу раван. Врши се треће покретање и мере се параметри вибрација. Када се пробни тег уклони, програм аутоматски израчунава масу и место (углове) постављања балансних тегова.
The point in setting up test weights is to determine how the system responds to the imbalance change. When we know the masses and the location of the sample weights, the program can calculate the so-called influence coefficients, showing how the introduction of a known imbalance affects the vibration parameters. The coefficients of influence are the characteristics of the mechanical system itself and depend on the stiffness of the supports and the mass (inertia) of the rotor-support system.
For the same type of mechanisms of the same design, the coefficients of influence will be similar. You can save them in your computer memory and use them afterwards for balancing the same type of mechanisms without carrying out test runs, which greatly improves the performance of the balancing. We should also note that the mass of test weights should be chosen as such so that the vibration parameters vary markedly when installing test weights. Otherwise, the error in calculating the coefficients of the affect increases and the quality of balancing deteriorates.
Упутство за уређај Balanset-1 даје формулу којом се може приближно одредити маса пробног тега, у зависности од масе и брзине ротације уравнотеженог ротора. Као што се може видети са слике 1, центрифугална сила делује у радијалном смеру, односно нормално на осу ротора. Стога, сензоре вибрација треба инсталирати тако да њихова оса осетљивости такође буде усмерена у радијалном смеру. Обично је крутост темеља у хоризонталном смеру мања, па су вибрације у хоризонталном смеру веће. Стога, да би се повећала осетљивост, сензоре треба инсталирати тако да њихова оса осетљивости може бити усмерена и хоризонтално. Иако нема фундаменталне разлике. Поред вибрација у радијалном смеру, потребно је контролисати и вибрације у аксијалном смеру, дуж осе ротације ротора. Ове вибрације обично нису узроковане неравнотежом, већ другим разлозима, углавном због неусклађености и неусклађености вратила повезаних преко спојнице. Ове вибрације се не елиминишу балансирањем, у овом случају је потребно поравнање. У пракси, обично код таквих механизама постоји неравнотежа ротора и неусклађеност вратила, што знатно компликује задатак отклањања вибрација. У таквим случајевима, прво морате поравнати, а затим балансирати механизам. (Иако се код јаке неравнотеже обртног момента вибрације јављају и у аксијалном правцу због "увијања" темељне конструкције).
Тачност мерења и анализа грешака
Разумевање тачности мерења је кључно за професионалне операције балансирања. Balanset-1A пружа следећу прецизност мерења:
| Параметар | Формула тачности | Пример (за типичне вредности) |
|---|---|---|
| RMS брзина вибрација | ±(0,1 + 0,1×Vизмерено) мм/сек | За 5 мм/сек: ±0,6 мм/сек За 10 мм/сек: ±1,1 мм/сек |
| Фреквенција ротације | ±(1 + 0,005×Nизмерено) обртаја у минути | За 1000 обртаја у минути: ±6 обртаја у минути За 3000 обртаја у минути: ±16 обртаја у минути |
| Мерење фазе | ±1° | Константна тачност при свим брзинама |
⚠️ Важно за прецизно балансирање
- !Пробни тег мора изазвати промену амплитуде >20-30% и/или Промена фазе >20-30°
- !Ако су промене мање, грешке мерења се значајно повећавају
- !Амплитуда вибрација и фазна стабилност не би требало да варирају више од 10-15% између мерења
- !Ако варијација прелази 15%, проверите да ли постоје услови резонанције или механички проблеми.
Критеријуми за процену квалитета механизама балансирања
Quality of rotor (mechanisms) balancing can be estimated in two ways. The first method involves comparing the value of the residual imbalance determined during the balancing with the tolerance for the residual imbalance. The specified tolerances for various classes of rotors installed in the standard ISO 1940-1-2007. «Вибрације. Захтеви за квалитет балансирања крутих ротора. Део 1. Одређивање дозвољене неравнотеже".
Међутим, примена ових толеранција не може у потпуности гарантовати поузданост рада механизма повезану са постизањем минималног нивоа вибрација. То је због чињенице да вибрације механизма нису одређене само величином силе повезане са резидуалном неравнотежом његовог ротора, већ зависе и од низа других параметара, укључујући: крутост K структурних елемената механизма, његову масу M, коефицијент пригушења и брзину. Стога се, да би се проценили динамички квалитети механизма (укључујући квалитет његове равнотеже), у неким случајевима препоручује процена нивоа резидуалних вибрација механизма, што је регулисано бројним стандардима.
The most common standard regulating permissible vibration levels of mechanisms is ISO 10816-3:2009 Преглед Механичке вибрације – Процена вибрација машина мерењима на неротирајућим деловима -- Део 3: Индустријске машине са номиналном снагом изнад 15 kW и номиналним брзинама између 120 о/мин и 15 000 о/мин када се мере на лицу места.»
With its help, you can set the tolerance on all types of machines, taking into account the power of their electric drive.
In addition to this universal standard, there are a number of specialized standards developed for specific types of mechanisms. For example,
- ISO 14694:2003 "Индустријски вентилатори – Спецификације за квалитет уравнотежења и ниво вибрација"
- ISO 7919-1-2002 "Вибрације машина без клипног кретања. Мерења на ротирајућим вратилима и критеријуми за процену. Опште смернице.»
🛡️ Важна безбедносна разматрања за усклађеност са прописима ЕУ
- !Потребна процена ризика: Извршите процену ризика према EN ISO 12100 пре балансирања операција
- !Квалификовано особље: Само обучено и сертификовано особље треба да обавља операције балансирања
- !Лична заштитна опрема: Увек користите одговарајућу ЛЗО према стандардима EN 166 (заштита за очи) и EN 352 (заштита за слух)
- !Поступци у ванредним ситуацијама: Успоставите јасне процедуре за искључивање у хитним случајевима и осигурајте да су сви оператери упознати са њима
- !Документација: Водите детаљне евиденције свих операција балансирања ради праћења и усклађености
Информације о усаглашености и безбедности са ЕУ
Изјава о усаглашености
Преносни балансер Balanset-1A је у складу са следећим директивама и стандардима Европске уније:
| Директива/стандард ЕУ | Детаљи о усклађености | Безбедносни захтеви |
|---|---|---|
| Директива о машинама 2006/42/ЕЗ | Безбедносни захтеви за машине и безбедносне компоненте | Процена ризика, безбедносна упутства, CE ознака |
| Директива о електромагнетној съвместимости 2014/30/ЕУ | Захтеви за електромагнетну компатибилност | Имунитет на електромагнетне сметње |
| Директива о ограниченој потрошњи опасних супстанци 2011/65/ЕУ | Ограничење опасних материја | Компоненте без олова, живе и кадмијума |
| Директива о отпадној електричној и електронској опреми 2012/19/ЕУ | Отпад електричне и електронске опреме | Правилне процедуре одлагања и рециклаже |
| ЕН ИСО 12100:2010 | Безбедност машина - Општи принципи пројектовања | Процена ризика и смањење ризика |
| ЕН 60825-1:2014 | Безбедност ласерских производа - 1. део | Захтеви за безбедност ласера класе 2 |
| ЕН ИСО 14120:2015 | Стражари - Општи захтеви | Заштита од опасности ротирајућих машина |
Стандарди електричне безбедности
- ✓ЕН 61010-1: Безбедносни захтеви за електричну опрему за мерење, контролу и лабораторијску употребу
- ✓ЕН 60950-1: Безбедност информационо-технолошке опреме (уређај са USB напајањем)
- ✓Серија IEC 61000: Стандарди електромагнетне компатибилности
- ✓Радни напон: 5V DC преко USB-а (екстра низак напон)
- ✓Потрошња енергије: < 2,5 W
- ✓Класа заштите: IP20 (за употребу у затвореном простору)
Безбедност ротирајуће опреме
⚠️ Обавезне безбедносне процедуре (EN ISO 12100)
УПОЗОРЕЊЕ: Приликом рада са ротирајућим машинама, поштујте следеће безбедносне захтеве:
- !ЕН ИСО 14118: Спречавање неочекиваног покретања - Користите процедуре закључавања/обележавања пре инсталације сензора
- !ЕН ИСО 14120: Уверите се да је сва ротирајућа опрема правилно заштићена
- !ЕН ИСО 13857: Одржавајте минималне безбедне удаљености од ротирајућих делова (500 мм за тело, 120 мм за прсте)
- !Лична заштитна опрема: Носите заштитне наочаре према EN 166, заштиту за слух према EN 352 и избегавајте широку одећу
- !Никада не постављајте сензоре или пробне тегове на ротирајуће машине док су у покрету.
- !Уверите се да је машина потпуно заустављена и осигурана пре инсталирања сензора
- !Заустављање у хитним случајевима: Мора бити доступан унутар 3 метра од положаја оператера
- !Само квалификовано и сертификовано особље треба да обавља операције балансирања
Класификација безбедности ласера
🔴 Ласерски уређај класе 2 (ЕН 60825-1:2014)
- Таласна дужина: 650 nm (црвена видљива светлост)
- Максимална излазна снага: < 1 mW
- Пречник греде: 3-5 mm на растојању од 100 mm
- Дивергенција: < 1,5 мрад
- Класификација безбедности: Безбедно за очи при краткотрајном излагању (< 0,25 сек)
- Обавезно обележавање: ""ЛАСЕРСКО ЗРАЧЕЊЕ - НЕ ГЛЕДАТИ У СНОП - ЛАСЕРСКИ ПРОИЗВОД КЛАСЕ 2""
- Класа приступа: Неограничено (општи приступ дозвољен)
Безбедносне процедуре за рад са ласером:
- Никада намерно не гледајте у ласерски зрак
- Не усмеравајте ласер на особе, возила или авионе
- Избегавајте гледање ласерског зрака оптичким инструментима (телескопима, двогледима)
- Будите свесни рефлексија са сјајних површина
- Искључите ласер када га не користите
- Одмах пријавите сваки инцидент са излагањем очију
- Користите заштитне наочаре за ласер (OD 2+ на 650nm) за дуже излагање
Тачност мерења и калибрација
| Параметар | Тачност | Фреквенција калибрације |
|---|---|---|
| Амплитуда вибрација | ±5% очитавања | Годишње или након 1000 сати |
| Мерење фазе | ±1° | Годишње |
| Брзина ротације | ±0,1% очитавања | Годишње |
| Осетљивост сензора | 13 mV/(mm/s) ±10% | Приликом замене сензора |
Усклађеност са прописима о заштити животне средине
- ✓Оперативно окружење: 5°C до 50°C, < 85% RH без кондензације
- ✓Окружење за складиштење: -20°C до 70°C, < 95% RH без кондензације
- ✓Надморска висина: До 2000 метара надморске висине
- ✓Отпорност на вибрације: IEC 60068-2-6 (10-500 Hz, 2g убрзање)
- ✓Отпорност на ударце: IEC 60068-2-27 (15g, трајање 11ms)
- ✓IP оцена: IP20 (заштита од чврстих предмета > 12 мм)
Захтеви за рад
- ✓Оператери морају бити обучени за безбедност машина према стандардима ЕУ
- ✓Процена ризика је потребна према EN ISO 12100 пре употребе
- ✓Одржавајте опрему према спецификацијама произвођача
- ✓Одмах пријавите све безбедносне инциденте или кварове опреме
- ✓Водите детаљне евиденције свих операција балансирања ради праћења
Захтеви за документацију
За усклађеност са прописима ЕУ, водите следећу документацију:
- ✓Документација о процени ризика према стандарду EN ISO 12100
- ✓Евиденција о обуци и сертификати оператера
- ✓Дневници калибрације и одржавања опреме
- ✓Усклађивање евиденције операција са датумима, оператерима и резултатима
- ✓Извештаји о безбедносним инцидентима и корективне мере
- ✓Документација о модификацији или поправци опреме
Техничка подршка и сервис
За техничку подршку, услуге калибрације и резервне делове:
- ✓Произвођач: Vibromera
- ✓Локација: Руа Алцаиде де Фариа 193, Порто, Португал
- ✓Веб сајт: https://vibromera.eu
- ✓Језици подршке: Сви главни језици. Доступна је текстуална комуникација.
- ✓Покривеност услугама: Доступна је достава широм света
- ✓гаранција: 24 месеца од датума куповине
- ✓Услуга калибрације: Доступно преко овлашћених сервисних центара