ప్రారంభ అసమతుల్యతను అర్థం చేసుకోవడం


ప్రారంభ అసమతుల్యత — దీన్ని మూల అసమతుల్యత లేదా యథాతథ అసమతుల్యత అని కూడా పిలుస్తారు — ఇది unbalance ఒక రోటర్లో ఉండే స్థితి రోటర్ before any బ్యాలెన్సింగ్ దిద్దుబాటు వర్తింపజేయబడిన తర్వాత. ఇది రోటర్ యొక్క ప్రాథమిక స్థితి, బ్యాలెన్సింగ్ విధానం యొక్క మొదటి రన్ సమయంలో నమోదు చేయబడుతుంది. దాని పరిమాణం మరియు కోణీయ స్థానం vibration amplitude and phase రోటర్ తన బ్యాలెన్సింగ్ వేగంతో తిరుగుతున్నప్పుడు కొలత ద్వారా కనుగొనబడతాయి. బ్యాలెన్సింగ్ పని తర్వాత వచ్చే ప్రతిదీ ఈ ప్రారంభ వెక్టర్కు సూచించబడుతుంది: ఇది పని యొక్క ప్రభావాన్ని అంచనా వేయడానికి ప్రమాణంగా ఉంటుంది, మరియు దిద్దుబాటు పూర్తయిన తర్వాత మిగిలేదాన్ని అవశేష అసమతుల్యత.
1. ప్రాథమిక అసమతుల్యత యొక్క కారణాలు
ప్రాథమిక అసమతుల్యత అనేది రోటర్ జీవితకాలంలో — తయారీలో, అసెంబ్లీలో, సేవలో మరియు దాన్ని మెరుగుపరచడానికి ఉద్దేశించిన నిర్వహణ సమయంలో కూడా — అనేక కారణాల వల్ల పేరుకుపోతుంది.
తయారీ సహనశీలతలు
ఖచ్చితమైన యంత్ర పని ఉన్నప్పటికీ, పరిపూర్ణ సౌష్ఠవం అసాధ్యం:
- పదార్థ సాంద్రత వ్యత్యాసాలు: అసమాన పదార్థం, అంతర్గత శూన్యాలు లేదా చేరికలు ద్రవ్యరాశి అసమతుల్యతను సృష్టిస్తాయి.
- యంత్రగత సహనశీలతలు: నిజమైన సాంద్రతకు చిన్న వ్యత్యాసాలు — runout or eccentricity — అసమతుల్యత కలుగజేస్తాయి.
- గోడ మందం వ్యత్యాసం: వార్పు చేయబడిన లేదా తయారు చేయబడిన రోటర్లలో, అసమాన గోడలు అసమాన ద్రవ్యరాశి పంపిణీని కలుగజేస్తాయి.
- రంధ్రాలు మరియు తయారీ లోపాలు: గాలి జేబులు, సంకోచం లేదా స్లాగ్ చేరికలు ద్రవ్యరాశిని మారుస్తాయి.
అసెంబ్లీ లోపాలు మరియు వ్యత్యాసాలు
ఒక రోటర్ అనేక భాగాలతో నిర్మించబడినప్పుడు, ప్రతి భాగం వ్యక్తిగతంగా మంచిదే అయినప్పటికీ అసమతుల్యత ప్రవేశించవచ్చు:
- టాలరెన్స్ స్టాక్-అప్: బాగా బ్యాలెన్స్ చేయబడిన భాగాలు కూడా జోడించవచ్చు vectorially గణనీయమైన మొత్తంగా పేరుకుపోతాయి.
- కీడ్ కనెక్షన్లు: తాళాలు, కీవేలు మరియు స్ప్లైన్లు స్వాభావికంగా అసమ్మిత అయి ఉంటాయి.
- బోల్ట్ రంధ్రాలు మరియు ఫాస్టెనర్లు: అసమాన అంతరాలలో ఉన్న రంధ్రాలు లేదా సరిపోలని ఫాస్టెనర్లు అసమతుల్యతను పెంచుతాయి.
- ఉష్ణ మరియు ప్రెస్ ఫిట్లు: శ్రింక్-ఫిట్ లేదా ప్రెస్-ఫిట్ భాగాలు పూర్తిగా సంకేంద్రికంగా స్థాపితం కాకపోవచ్చు.
కార్యాచరణ కారణాలు
అసమతుల్యత సేవలో కూడా అభివృద్ధి చెందుతుంది, రోటర్ యొక్క అసలు సమతుల్య స్థితి నుండి మారిపోతుంది:
- పదార్థ పేరుకుపోవడం: ధూళి, దుమ్ము, మురికి లేదా ప్రక్రియ ఉత్పత్తులు పేరుకుపోవడం impellers, ఫ్యాన్ బ్లేడ్లు, లేదా రోటర్ ఉపరితలాలు.
- Erosion and wear: రాపిడి వల్ల అసమాన పదార్థ నష్టం, corrosion, or cavitation.
- విరిగిన లేదా తప్పిపోయిన భాగాలు: పోయిన ఫ్యాన్ బ్లేడ్, విరిగిన ఇంపెల్లర్ వేన్, స్థానభ్రంశమైన భాగం.
- Deformation: ప్రభావం, అధిక వేడి లేదా అధిక భారం వల్ల వంగడం, వక్రీకరణ లేదా పలాస్టిక్ వైకల్యం.
- వదులైన భాగాలు: సడలిపోయి స్థానం మారిన భాగాలు.
నిర్వహణ మరియు మరమ్మతు కార్యకలాపాలు
వ్యంగ్యంగా, నిర్వహణ తానే చేరదీయాలనుకున్న అసమతుల్యతను ప్రవేశపెట్టవచ్చు:
- భిన్నమైన ద్రవ్యరాశి లేదా ద్రవ్యరాశి పంపిణీతో రీప్లేస్మెంట్ భాగాలు అమర్చడం.
- అసమ్మితంగా లోహాన్ని జోడించే వెల్డింగ్ మరమ్మతులు.
- పదార్థాన్ని అసమానంగా తొలగించే పునర్నిర్మాణం లేదా యంత్ర పని.
- అసమానంగా వర్తింపజేయబడిన రంగు లేదా పూత.
2. ప్రాథమిక అసమతుల్యత ఎలా కొలవబడుతుంది
ప్రాథమిక అసమతుల్యత అనేది బ్యాలెన్సింగ్ విధానంలో మొదటి కొలత రన్లో పరిమాణాత్మకంగా నిర్ణయించబడుతుంది.
కొలత పారామీటర్లు
- కంపన వ్యాప్తి: 1× (ప్రతి విప్లవానికి ఒకసారి) భాగం యొక్క పరిమాణం, సాధారణంగా mm/s, in/s లేదా mils లో. ఇది అసమతుల్యత తీవ్రతతో నేరుగా సంబంధం కలిగి ఉంటుంది.
- Phase angle: the timing of the 1× vibration peak in degrees, relative to a reference mark detected by a keyphasor or tachometer. This is the response phase, not directly the heavy-spot angle: the vibration lags the actual heavy spot by an amount that depends on how close the running speed is to a resonance (from near 0° well below it, through 90° at it, to near 180° above it), plus sensor and instrumentation delays. The heavy-spot and correction-weight angle is therefore inferred by the balancing algorithm — via the trial-weight (influence-coefficient) method — rather than read straight off the phase display.
- Speed: రీడింగులు తీసుకోబడే తిరుగు వేగం — ముఖ్యమైనది ఎందుకంటే centrifugal force అసమతుల్యత వల్ల కలిగే శక్తి వేగం యొక్క వర్గంతో పెరుగుతుంది.
వెక్టర్ ప్రాతినిధ్యం
ప్రాథమిక అసమతుల్యతను వెక్టర్ “O” (“Original” కు సంకేతంగా) గా పరిమాణం మరియు దిశ రెండూ కలిగి సూచిస్తారు, సాధారణంగా ఒక polar plot where:
- వెక్టర్ పొడవు కంపన వ్యాప్తిని సూచిస్తుంది, మరియు
- the vector’s angle represents the measured response phase (from which the heavy-spot location is later inferred).
3. బ్యాలెన్సింగ్ ప్రక్రియలో ప్రాముఖ్యత
ప్రారంభ అసమతుల్య కొలత ఒకేసారి అనేక పనులు చేస్తుంది.
దిద్దుబాటులకు ప్రాతిపదిక
అన్ని బ్యాలన్సింగ్ గణనలు ప్రారంభ అసమతుల్యతకు సంబంధించినవి. లక్ష్యం ఏమిటంటే జోడించడం కరెక్షన్ వెయిట్లు ఇవి ప్రారంభ వెక్టార్కు సమానమైన మరియు వ్యతిరేకమైన వైబ్రేషన్ వెక్టార్ను సృష్టిస్తాయి, దానిని రద్దు చేస్తాయి.
తీవ్రత అంచనా
ప్రారంభ అసమతుల్యత యొక్క పరిమాణం సమస్య ఎంత తీవ్రంగా ఉందో చూపిస్తుంది మరియు నిర్ణయించడంలో సహాయపడుతుంది:
- బ్యాలన్సింగ్ సరైన చర్య అవునా, లేదా మరొక యాంత్రిక లోపం — looseness లేదా మిస్అలైన్మెంట్ — మొదట వాటిని సరిదిద్దాలి;
- తగిన పరిమాణం trial weights; and
- ఒక దిద్దుబాటు సరిపోతుందా లేదా అనేక పునరావృత్తులు అవసరమా.
రోటర్ను తాకే ముందు ఒక ఉపయోగకరమైన సంజ్ఞాత్మక తనిఖీ ఏమిటంటే, కొలిచిన అమ్ప్లిట్యూడ్ను రోటర్ వాస్తవంగా విసురుతున్న శక్తిగా మార్చడం; మన అన్బ్యాలెన్స్ నుండి సెంట్రిఫ్యుగల్ ఫోర్స్ కాల్కులేటర్ ఇచ్చిన అసమతుల్యత మరియు వేగాన్ని నేరుగా న్యూటన్లలోకి మారుస్తుంది, ఇది అత్యవసరతను స్పష్టంగా చేస్తుంది.
పురోగతి పర్యవేక్షణ
దిద్దుబాటు తర్వాత అవశేష అసమతుల్యతతో ప్రారంభ అసమతుల్యతను పోల్చడం పని ఎంత బాగా జరిగిందో కొలుస్తుంది. మంచి బ్యాలన్స్ సాధారణంగా ప్రారంభ స్థాయి నుండి 70–90% లేదా అంతకంటే ఎక్కువ వైబ్రేషన్ను తగ్గిస్తుంది.
ఇన్ఫ్లుయెన్స్ కోఎఫిషియెంట్ గణన
In the ఇన్ఫ్లుయెన్స్ కోఎఫిషియెంట్ పద్ధతి, ట్రయల్ వెయిట్ యొక్క ప్రభావాన్ని వేరుపరచడానికి ట్రయల్-వెయిట్ రన్ సమయంలో కొలవబడిన వైబ్రేషన్ నుండి ప్రారంభ అసమతుల్య వెక్టార్ తీసివేయబడుతుంది:
T = (O + T) − O, ఇక్కడ O అనేది ప్రారంభ అసమతుల్యత మరియు T అనేది ట్రయల్-వెయిట్ ప్రభావం.
ఆ వేరుపరచబడిన ప్రభావం నుండి విశ్లేషకుడు ఇన్ఫ్లుయెన్స్ కోఎఫిషియెంట్ను గణిస్తాడు మరియు తద్వారా సరైన దిద్దుబాటు ద్రవ్యరాశి మరియు కోణాన్ని నిర్ణయిస్తాడు. సింగిల్-ప్లేన్ పనికి మీరు ఈ అంకగణితాన్ని పునరుత్పత్తి చేయవచ్చు ఇన్ఫ్లుయెన్స్ కోఎఫిషియెంట్ కాలిక్యులేటర్.
4. అవశేష అసమతుల్యతతో సంబంధం
బ్యాలన్సింగ్ యొక్క మొత్తం ఉద్దేశ్యం ప్రారంభ అసమతుల్యతను అనుమతించదగిన తక్కువ అవశేష స్థాయికి తగ్గించడం. సంబంధం ఒక సాధారణ ముందు-తర్వాత విషయం:
- ప్రారంభ అసమతుల్యత: “ముందు” స్థితి.
- Correction: బ్యాలన్సింగ్ విధానం మరియు వెయిట్ ఇన్స్టాలేషన్.
- అవశేష అసమతుల్యత: “తర్వాత” స్థితి.
ఆదర్శంగా అవశేషం ప్రారంభంలో 10–30% కంటే తక్కువగా ఉండాలి, ఖచ్చితమైన లక్ష్యం రోటర్’స్ బ్యాలన్స్-క్వాలిటీ అవసరం ద్వారా నిర్ణయించబడుతుంది ISO 21940-11 (యొక్క ఆధునిక వారసుడు ISO 1940-1). ఎంచుకున్న దాన్ని అనువదించడం G-grade మరియు సర్వీస్ స్పీడ్ను గ్రామ్-మిల్లీమీటర్లలో అనుమతించదగిన సంఖ్యగా మార్చడం వేగంగా జరుగుతుంది అవశేష అసమతుల్యత కాలిక్యులేటర్ (ISO 21940-11).
5. సాధారణ ప్రారంభ అసమతుల్యత స్థాయిలు
ప్రారంభ అసమతుల్యత యొక్క పరిమాణం పరికరాల రకం మరియు సర్వీస్ చరిత్రతో విస్తృతంగా మారుతుంది.
కొత్త లేదా ఇటీవల బ్యాలన్స్ చేయబడిన రోటర్లు
పారిశ్రామిక యంత్రాలకు వైబ్రేషన్ సాధారణంగా 0.5 నుండి 2.0 mm/s (0.02 నుండి 0.08 in/s) వరకు ఉంటుంది — మంచి నుండి ఆమోదయోగ్యమైన బ్యాలన్స్ స్థితి.
మధ్యస్థంగా అసమతుల్యమైన రోటర్లు
2.0 నుండి 7.0 mm/s (0.08 నుండి 0.28 in/s) వైబ్రేషన్ అంటే రోటర్ను త్వరలో బ్యాలన్స్ చేయాలి. ఇది సాధారణ నిర్వహణకు అర్హమైన పరికరాల సాధారణ స్థితి.
తీవ్రంగా అసమతుల్యమైన రోటర్లు
7.0 mm/s (0.28 in/s) పైన వైబ్రేషన్ తక్షణ శ్రద్ధ అవసరమయ్యే తీవ్రమైన అసమతుల్యతను సూచిస్తుంది, తరచుగా పోయిన బ్లేడ్, భారీ నిర్మాణం, లేదా ప్రధాన భాగం దెబ్బతినడం వల్ల.
గమనిక: ఇవి సాధారణ పారిశ్రామిక యంత్రాలకు సాధారణ మార్గదర్శకాలు. నిర్దిష్ట ఆమోదయోగ్యమైన స్థాయి యంత్రం రకం, పరిమాణం, వేగం మరియు మౌంటింగ్పై ఆధారపడి ఉంటుంది, ఇవి వంటి ప్రమాణాల ద్వారా నిర్వచించబడ్డాయి ISO 20816 సిరీస్ (గతంలో ISO 10816).
6. క్షేత్ర కొలత మరియు డాక్యుమెంటేషన్
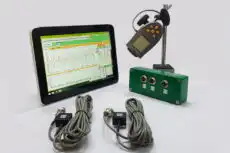
అసెంబుల్ చేయబడిన యంత్రంపై, ప్రారంభ అసమతుల్యత బ్యాలన్సింగ్ మెషీన్పై కాకుండా స్థానంలోనే సేకరించబడుతుంది balancing machine. Balanset-1A వంటి పోర్టబుల్ టూ-చానెల్ అనాలైజర్ Balanset-1A యంత్రం యొక్క సొంత బేరింగ్లలో పనిచేసే వేగంతో 1× వైబ్రేషన్ వ్యాప్తి మరియు దశను చదువుతుంది, అసలు “O” వెక్టర్ను నమోదు చేస్తుంది, ఆపై దానిని తగ్గించే ట్రయల్ వెయిట్ మరియు కరెక్షన్ రన్లను మార్గనిర్దేశం చేస్తుంది — రోటర్ నిజంగా పనిచేసే సమయంలో ఉన్న అసలు స్థితిని, అసెంబ్లీ మరియు థర్మల్ ప్రభావాలతో సహా, shop balancing మెషీన్ ఎన్నటికీ చూడలేని వాటిని కూడా రికార్డు చేస్తుంది.
ఏ పరికరం ఉపయోగించినా, ప్రాథమిక అన్బ్యాలెన్స్ కొలత బ్యాలెన్సింగ్ రికార్డులో చేర్చబడాలి:
- ప్రతి కొలత పాయింట్ వద్ద వైబ్రేషన్ వ్యాప్తి మరియు దశ;
- కొలత సమయంలో పనిచేసే వేగం;
- తేదీ మరియు పరికర గుర్తింపు; మరియు
- తనిఖీ సమయంలో గమనించిన అన్బ్యాలెన్స్కు కనిపించే ఏదైనా కారణం.
ఈ డాక్యుమెంటేషన్ రోటర్’s పరిస్థితి యొక్క చారిత్రక రికార్డును నిర్మిస్తుంది మరియు trend analysis కాలక్రమేణా మద్దతు ఇస్తుంది — ఉదాహరణకు, నిర్మాణం లేదా కోతు వల్ల అన్బ్యాలెన్స్ నెమ్మదిగా పెరుగుతుందా అని వెల్లడించడం మరియు వైబ్రేషన్ తీవ్రంగా మారే ముందే నిర్వహణను ప్రణాళిక చేసుకోవడానికి వీలు కల్పించడం.
