1. Introduction
Rotors of agricultural machinery (threshing drums of combines, straw choppers, rotary mowers, etc.) rotate at high speeds and carry significant mass. Even a slight imbalance in such rotors can cause strong vibrations, affecting the operation of the entire machine. Balancing rotors is a crucial part of servicing combines and mowers, which determines the reliability and efficiency of the equipment. However, in practice, this aspect often receives insufficient attention. As a result, unbalanced units lead to accelerated wear of parts, unexpected breakdowns in the peak season, and even pose a safety threat. This material examines in detail why rotor balancing is so necessary, which units require it, what balancing methods exist, and how the modern device Balanset-1A helps to solve vibration problems. Real examples and economic calculations will show farmers and managers of farms that proper balancing is not an expense but an investment in uninterrupted operation and long service life of the equipment.
2. What is imbalance and its consequences
Rotor imbalance is an uneven distribution of mass relative to the axis of rotation. In other words, the rotor has a “heavy” side or section that causes vibrations when rotating. Two main types of imbalance are distinguished: static and dynamic.
Static imbalance occurs when the center of gravity of the rotor does not coincide with its axis of rotation. For example, if the rotor is freely suspended or mounted on horizontal prisms, it will turn with the heavy part down. To eliminate such imbalance, it is enough to add or remove weight in one plane until the center of gravity aligns with the axis of rotation.
Dynamic imbalance is more complex: it occurs when heavy sections are located on different rotor ends. In static, such a rotor may look balanced (heavy points on opposite ends seem to compensate each other), but when spun, centrifugal forces from these sections act in different planes, causing vibration. Dynamic imbalance cannot be eliminated by adding weight at one point – balancing in two planes is required (at each end of the rotor).
The consequences of imbalance appear quickly and negatively affect the equipment. Severe vibration from an unbalanced rotor leads to increased dynamic loads on the bearings and mounts, causing them to fail prematurely. Units that should last for years wear out in a matter of months – for example, bearings have to be replaced every 2-3 months.
Unbalanced rotating parts also cause metal fatigue in the frame and fastenings: cracks appear, bolts loosen, and mounts deform. The accumulation of such hidden damages can lead to a sudden serious breakdown – for example, the destruction of a unit’s housing or the detachment of a rotating part.
In addition, vibration reduces the performance and efficiency of the machine. Part of the energy is wasted on oscillations rather than useful work. It is estimated that equipment can lose up to 30% of productivity if its mechanisms are not balanced. A combine with a vibrating drum threshes and cleans grain worse, and crop losses may increase. For the operator, severe vibration means reduced comfort and fatigue; the cabin is noisy, and small parts rattle.
In some cases, imbalance also becomes a safety issue: a spun-up heavy fragment (e.g., a straw chopper knife when a fastener breaks) poses a danger, and excessive vibration can make it difficult to control the machinery. Therefore, imbalance is not just a slight vibration, but a serious problem leading to increased wear, accidents, reduced efficiency, and human risks.
3. Which Rotary Units of Combines and Mowers Require Balancing
Almost all rotating units in combines and rotary mowers, having significant mass or rotation speed, need balancing. Let’s consider the most critical units:
Threshing Drum of the Combine
This is the main rotor in a classic combine harvester, responsible for threshing grain. The drum usually has a large diameter, weighs hundreds of kilograms, and rotates at high speeds (e.g., 500–1000 rpm). Manufacturers balance the drum at the factory, but over time, the balance may be disturbed due to wear of beaters, dirt adhesion, part replacement after repair, etc. An unbalanced threshing drum causes vibration transmitted to the entire combine body, accelerating the wear of bearings and frame. The concave, drum beaters, and drive belts are especially affected. Regular dynamic balancing of the drum is necessary for the smooth operation and long service life of the combine (it is noted that after any work with the drum – beater replacement, shaft repair – rebalancing is required).

Beater and Rotor Systems of Threshing
In combines, besides the main drum, there are other rotating units of the threshing-separator device. In classic combines, behind the drum is a beater (throwing drum) that accelerates the passage of mass to the straw walker – it also rotates at high speed and causes vibrations when imbalanced. In rotary combines, instead of a drum, a long main rotor (axial rotor) is used, performing both threshing and separation. Such a rotor is essentially a long screw/drum that needs critical dynamic balancing. Any of these units (drum, beater, rotor) must be carefully balanced, otherwise vibration will reduce threshing efficiency and may disable costly components (straw walkers, sieves, bearings, etc.).
Straw Chopper
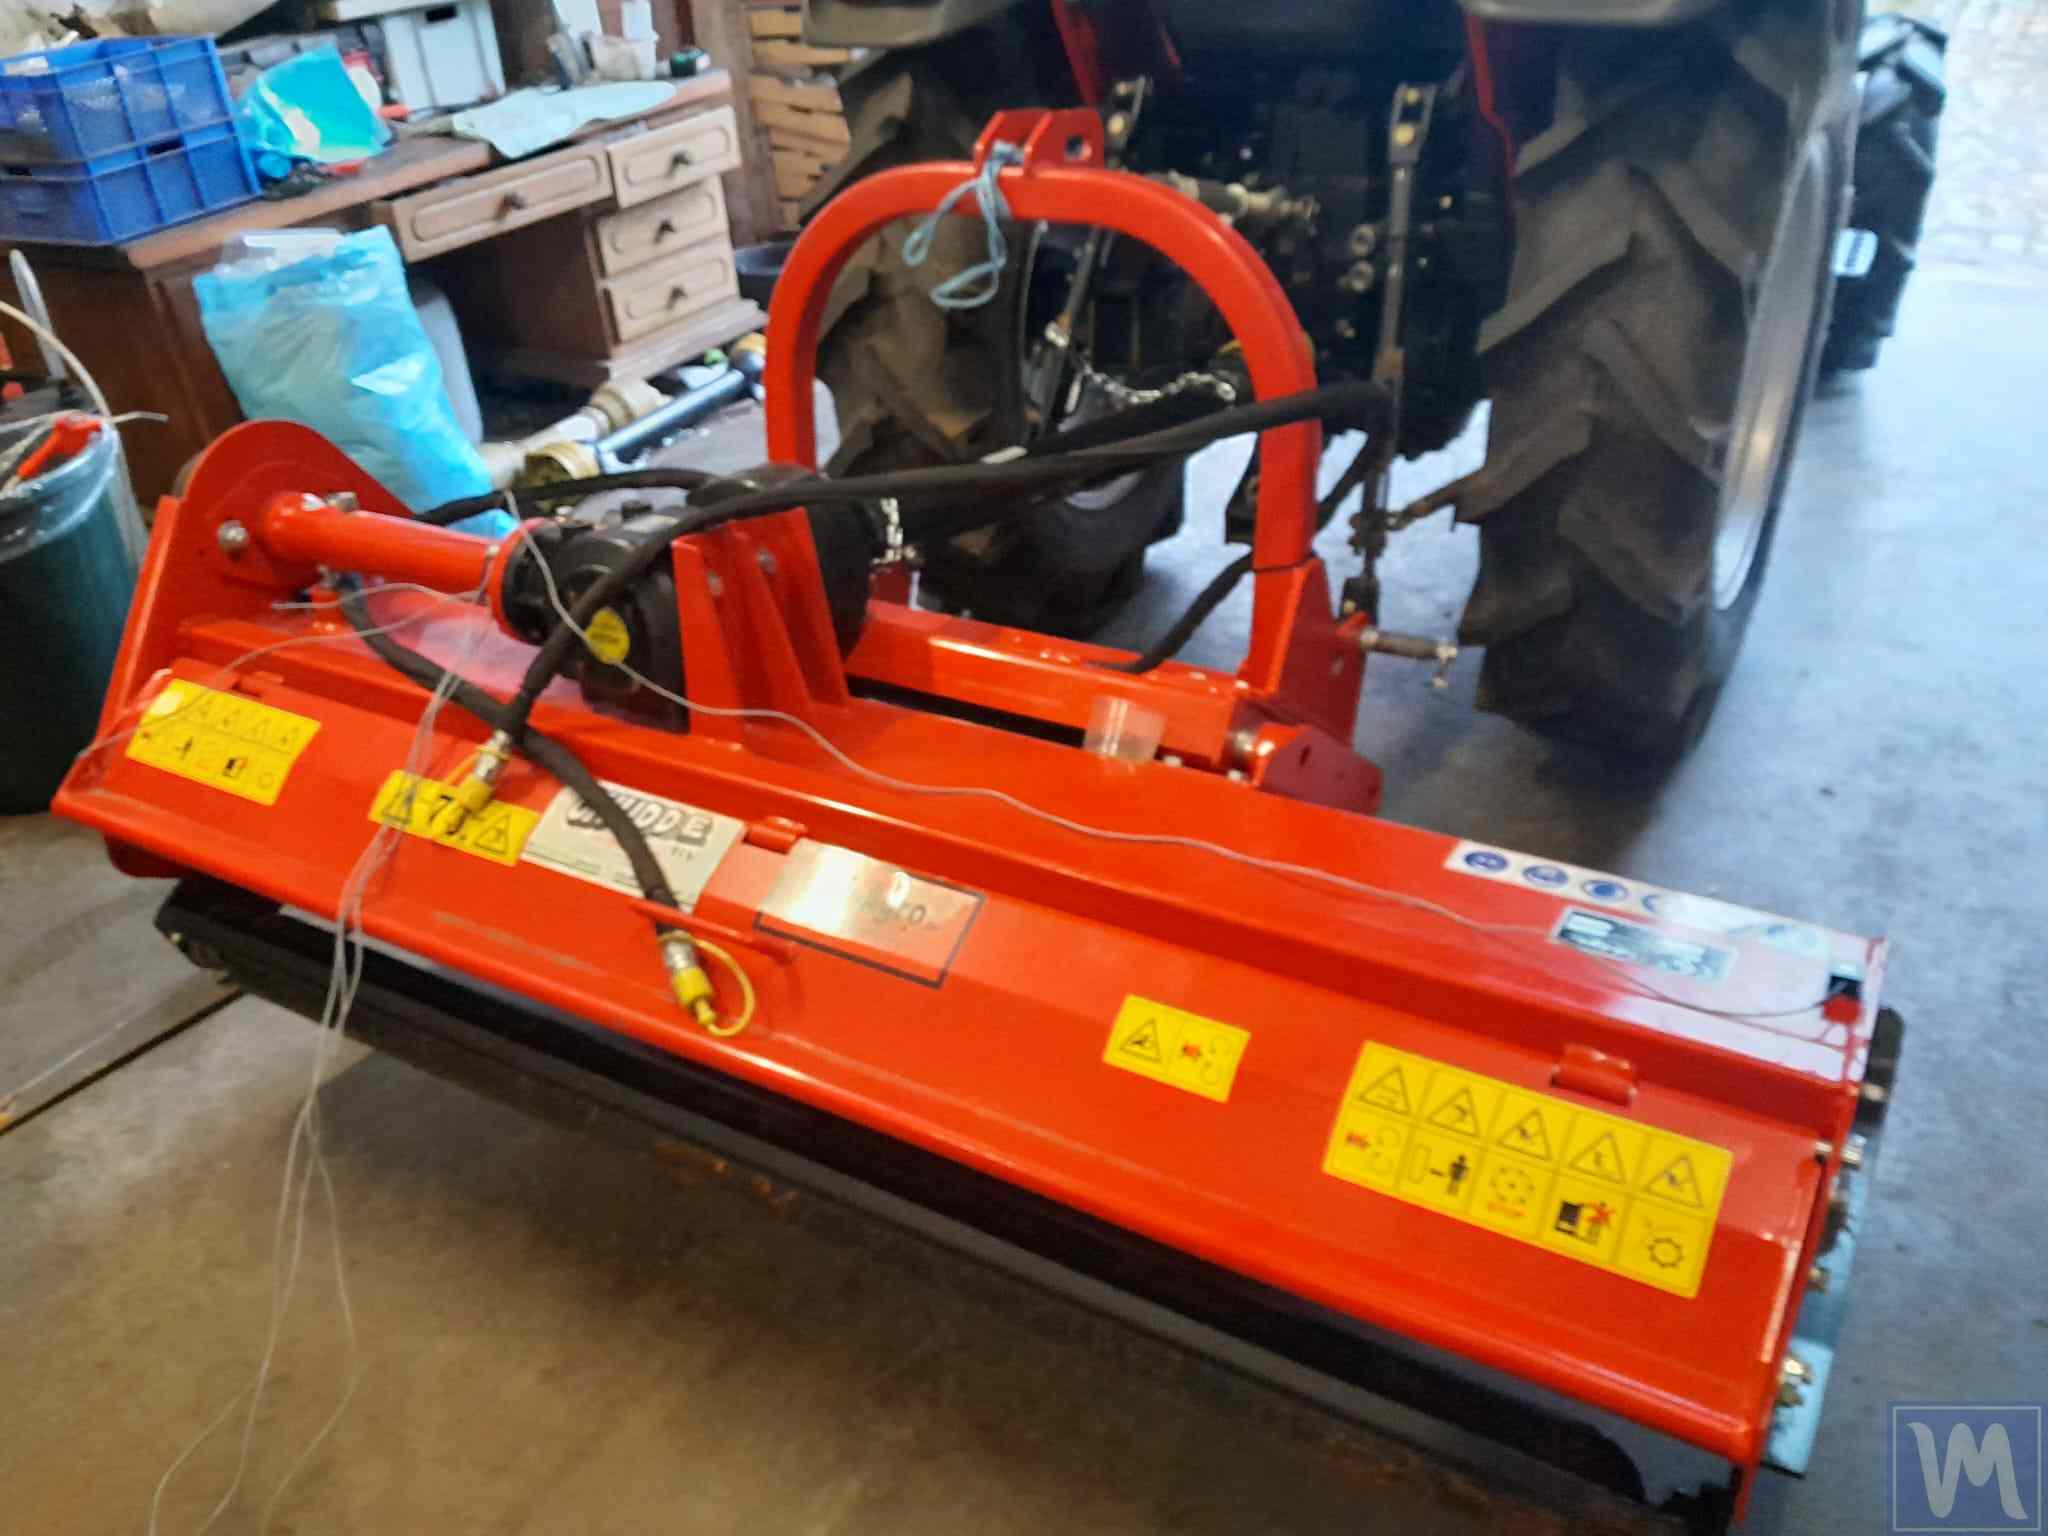
This unit is installed at the combine’s exit and serves to chop and scatter straw. The straw chopper rotor is usually a cylindrical shaft with rotary knives or hammers. It rotates very quickly (often 2500–4000 rpm) to finely chop straw. Imbalance of the chopper is one of the common causes of vibrations in the combine, as knives can become dull over time, have different weights (e.g., if some are new and others worn), and sometimes knives even break off, leading to a severe mass skew. Additionally, the chopper’s housing is relatively thin and may deform. An unbalanced straw chopper causes noticeable shaking of the combine’s rear part; this leads to fracture of fastenings, bearing destruction, and even breakage of the chopper housing itself. The straw chopper should be balanced during each major knife maintenance. The peculiarity of this unit is that due to structural flexibility (thin housing), attention should be paid to the absence of cracks and reliable fastening of all parts during balancing.
Rotary Mowers and Mulchers
The category of rotary mowers includes agricultural machines for mowing grass or chopping plant residues, where cutting tools rotate. This includes drum and disc mowers for hay, rotary mulchers, chopper mowers (on mounted or towed units). Any mower where there is a fast-rotating drum/shaft with knives is prone to imbalance problems. For example, a grass chopper or mulcher with a massive shaft and many pivotally suspended knives (like a combine’s straw chopper). When replacing knives or encountering foreign objects, this rotor easily loses balance. As a result, the mower begins to vibrate, which is dangerous for the tractor power take-off and for the aggregate’s frame itself – cracks appear in the housing, and support bearings fail. Balancing the mower rotor is as important as that of the combine. It is worth noting that attempts to balance a long mower shaft “by eye” (statically) are usually unsuccessful – dynamic balancing is required (see Balancing Methods section below). Regular inspection and balancing of mulchers and mowers prevent knife breakage, reduce vibration, making the tractor’s work smoother and extending the entire unit’s service life.
Other Units
Other rotating units where balancing improves performance include, for example, fans and centrifuges in equipment. A combine has a grain cleaning fan rotating at high speeds – dust adhesion or bent blades cause imbalance, reducing cleaning efficiency and destroying fan bearings. Additionally, chaff and straw spreaders (disc or blade, installed behind the chopper) should be balanced – usually, it is a pair of discs with blades, their imbalance causes vibration of the combine body. In grain processing equipment – augers, crusher drums, centrifuge rotors – balancing is also mandatory, although they go beyond the scope of the considered topic. The main principle: any massive part rotating at high speed should be balanced. This applies to both new parts (factory balancing) and especially units after repair or long operation. Ignoring the balancing of such a unit sooner or later leads to the problems described above.
4. Methods of Rotor Balancing
There are several approaches to rotor balancing, differing in execution conditions, accuracy, and required equipment. Let’s consider the main methods, their advantages, and disadvantages:
Factory Balancing
Almost all manufacturers of combines and mowers balance key rotary units at the factory. Specialized balancing machines are used, where the drum or rotor is installed, and with the help of sensitive sensors and test weights, the imbalance is determined. Then balancing weights are added to the rotor (e.g., plates are screwed on, washers are welded, or small holes are drilled in heavy areas for lightening). Factory balancing ensures that new parts meet strict vibration tolerances. Pros: high accuracy, use of stationary equipment, and quality control. Cons: imbalance can occur again during operation (e.g., due to wear or repair), and in the field, there is no possibility of a factory machine.
Static Balancing (on-site without equipment)
This is the simplest method, often used by farmers “the old-fashioned way.” The rotor is dismounted and placed on prisms or suspended on an axis, allowing it to rotate freely under gravity. The heavy side turns downward, after which weight is added to the opposite side (or removed from the heavy side, if possible). This is repeated until the rotor remains in any position without spontaneous turning – a sign that the center of gravity coincides with the axis of rotation.
Static balancing can balance discs or short drums where the imbalance is essentially concentrated in one plane. Pros of the method: simplicity, no need for expensive devices – a makeshift stand is enough. Cons: it does not eliminate dynamic (moment) imbalance. For long rotors (length much greater than diameter), static balancing is insufficient. For example, a rotary mower shaft may have two heavy sections on opposite ends; statically, they mutually compensate, and the rotor seems balanced on prisms, but at working speed, strong vibration will occur. Thus, static balancing can be applied only to relatively small and narrow parts (pulleys, flywheels), and for long rotors of agricultural machines, it is ineffective.
Dynamic Balancing on a Machine
This method involves balancing the rotor in specialized workshops or service centers where there is a balancing machine. The rotor (e.g., a combine drum) is removed from the machine and installed in the machine, where it is spun to a certain speed. The machine’s sensors measure vibration and imbalance phase, allowing determination of how much mass and where to add (or remove) for compensation. Dynamic balancing is conducted in at least two correction planes (at the ends of the rotor) – this eliminates both static and dynamic (moment) imbalance.
A trial weight method is often used: first, a known weight is attached in test positions, vibration change is measured, and based on these changes, the program calculates the required corrective masses. Then weights are fixed on the rotor (e.g., with bolts or welding) in specified places and vibration is rechecked. Advantages: high accuracy of dynamic balancing – minimal residual vibrations can be achieved according to standards (GOST, ISO, etc.). Specialists also often diagnose the rotor’s condition simultaneously – identifying shaft runout, curvature, cracks – and can immediately address these issues before balancing. Disadvantages: the need to completely disassemble the rotor and deliver it to a workshop, which is not always possible promptly. During peak harvest, removing a threshing drum or mulcher shaft can be labor-intensive and lead to equipment downtime for several days. Additionally, the presence of a service nearby with a balancing machine suitable for the rotor’s dimensions and weight is required.
In-situ Balancing
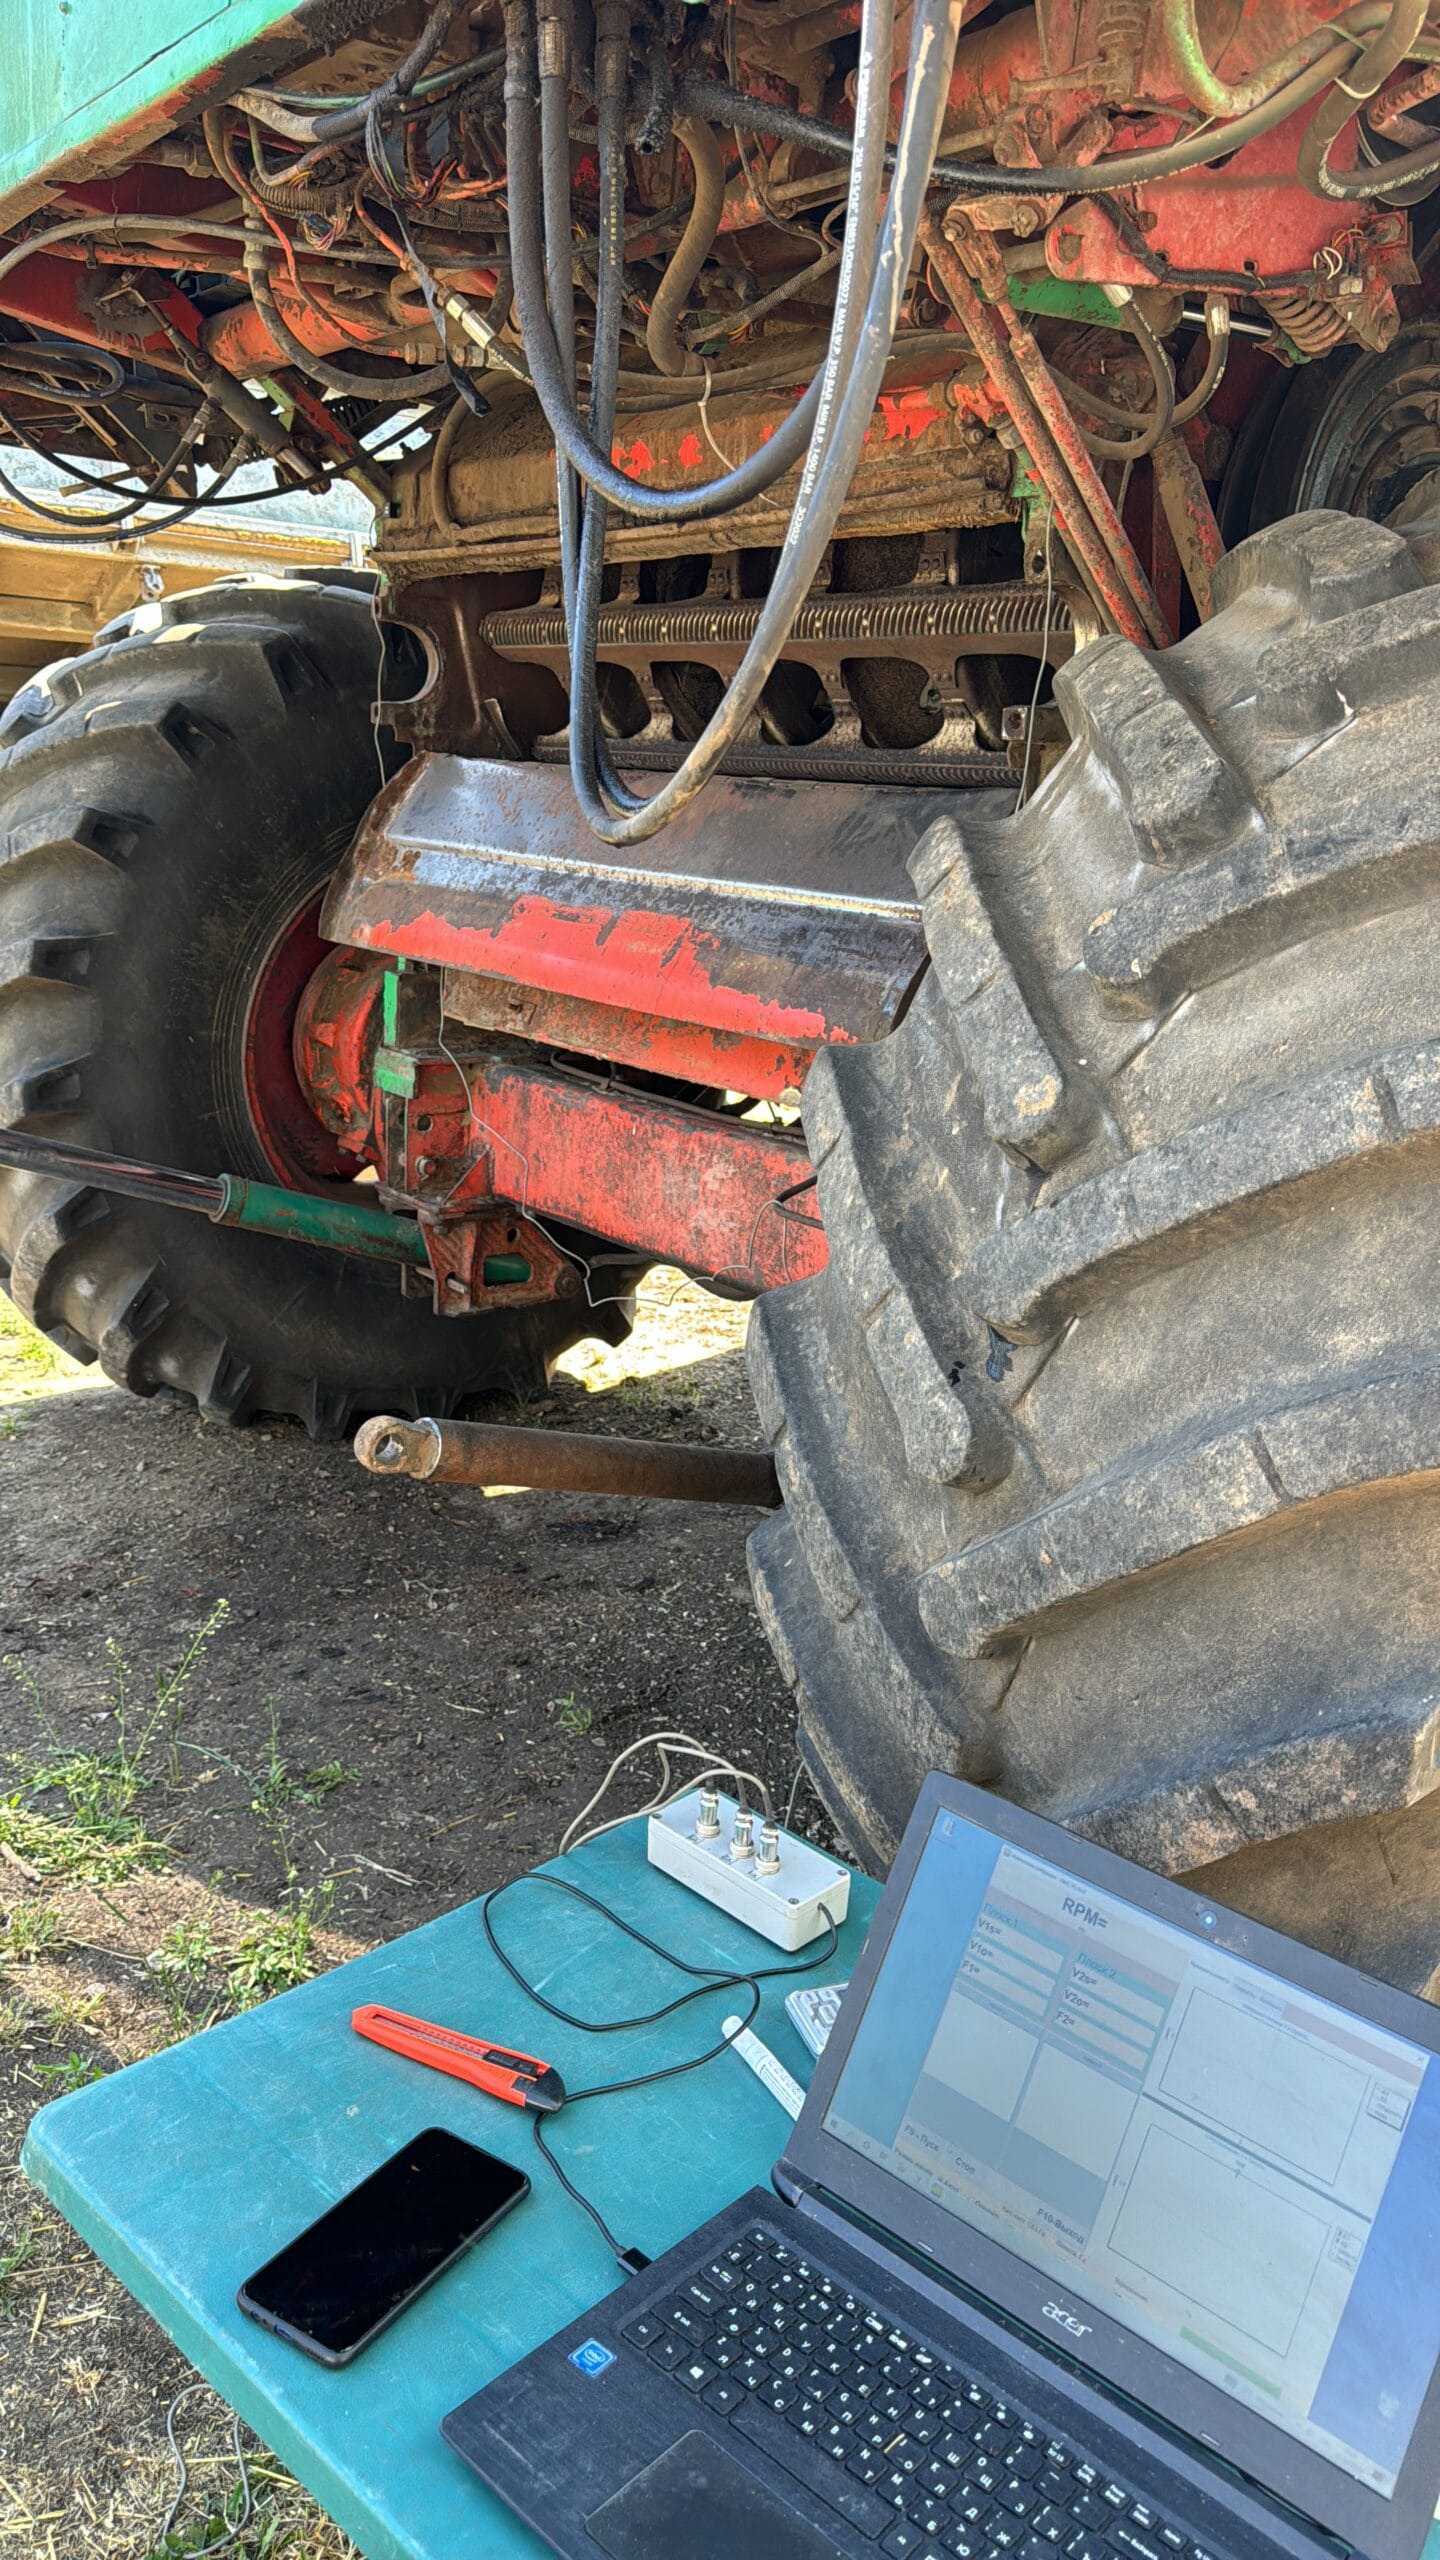
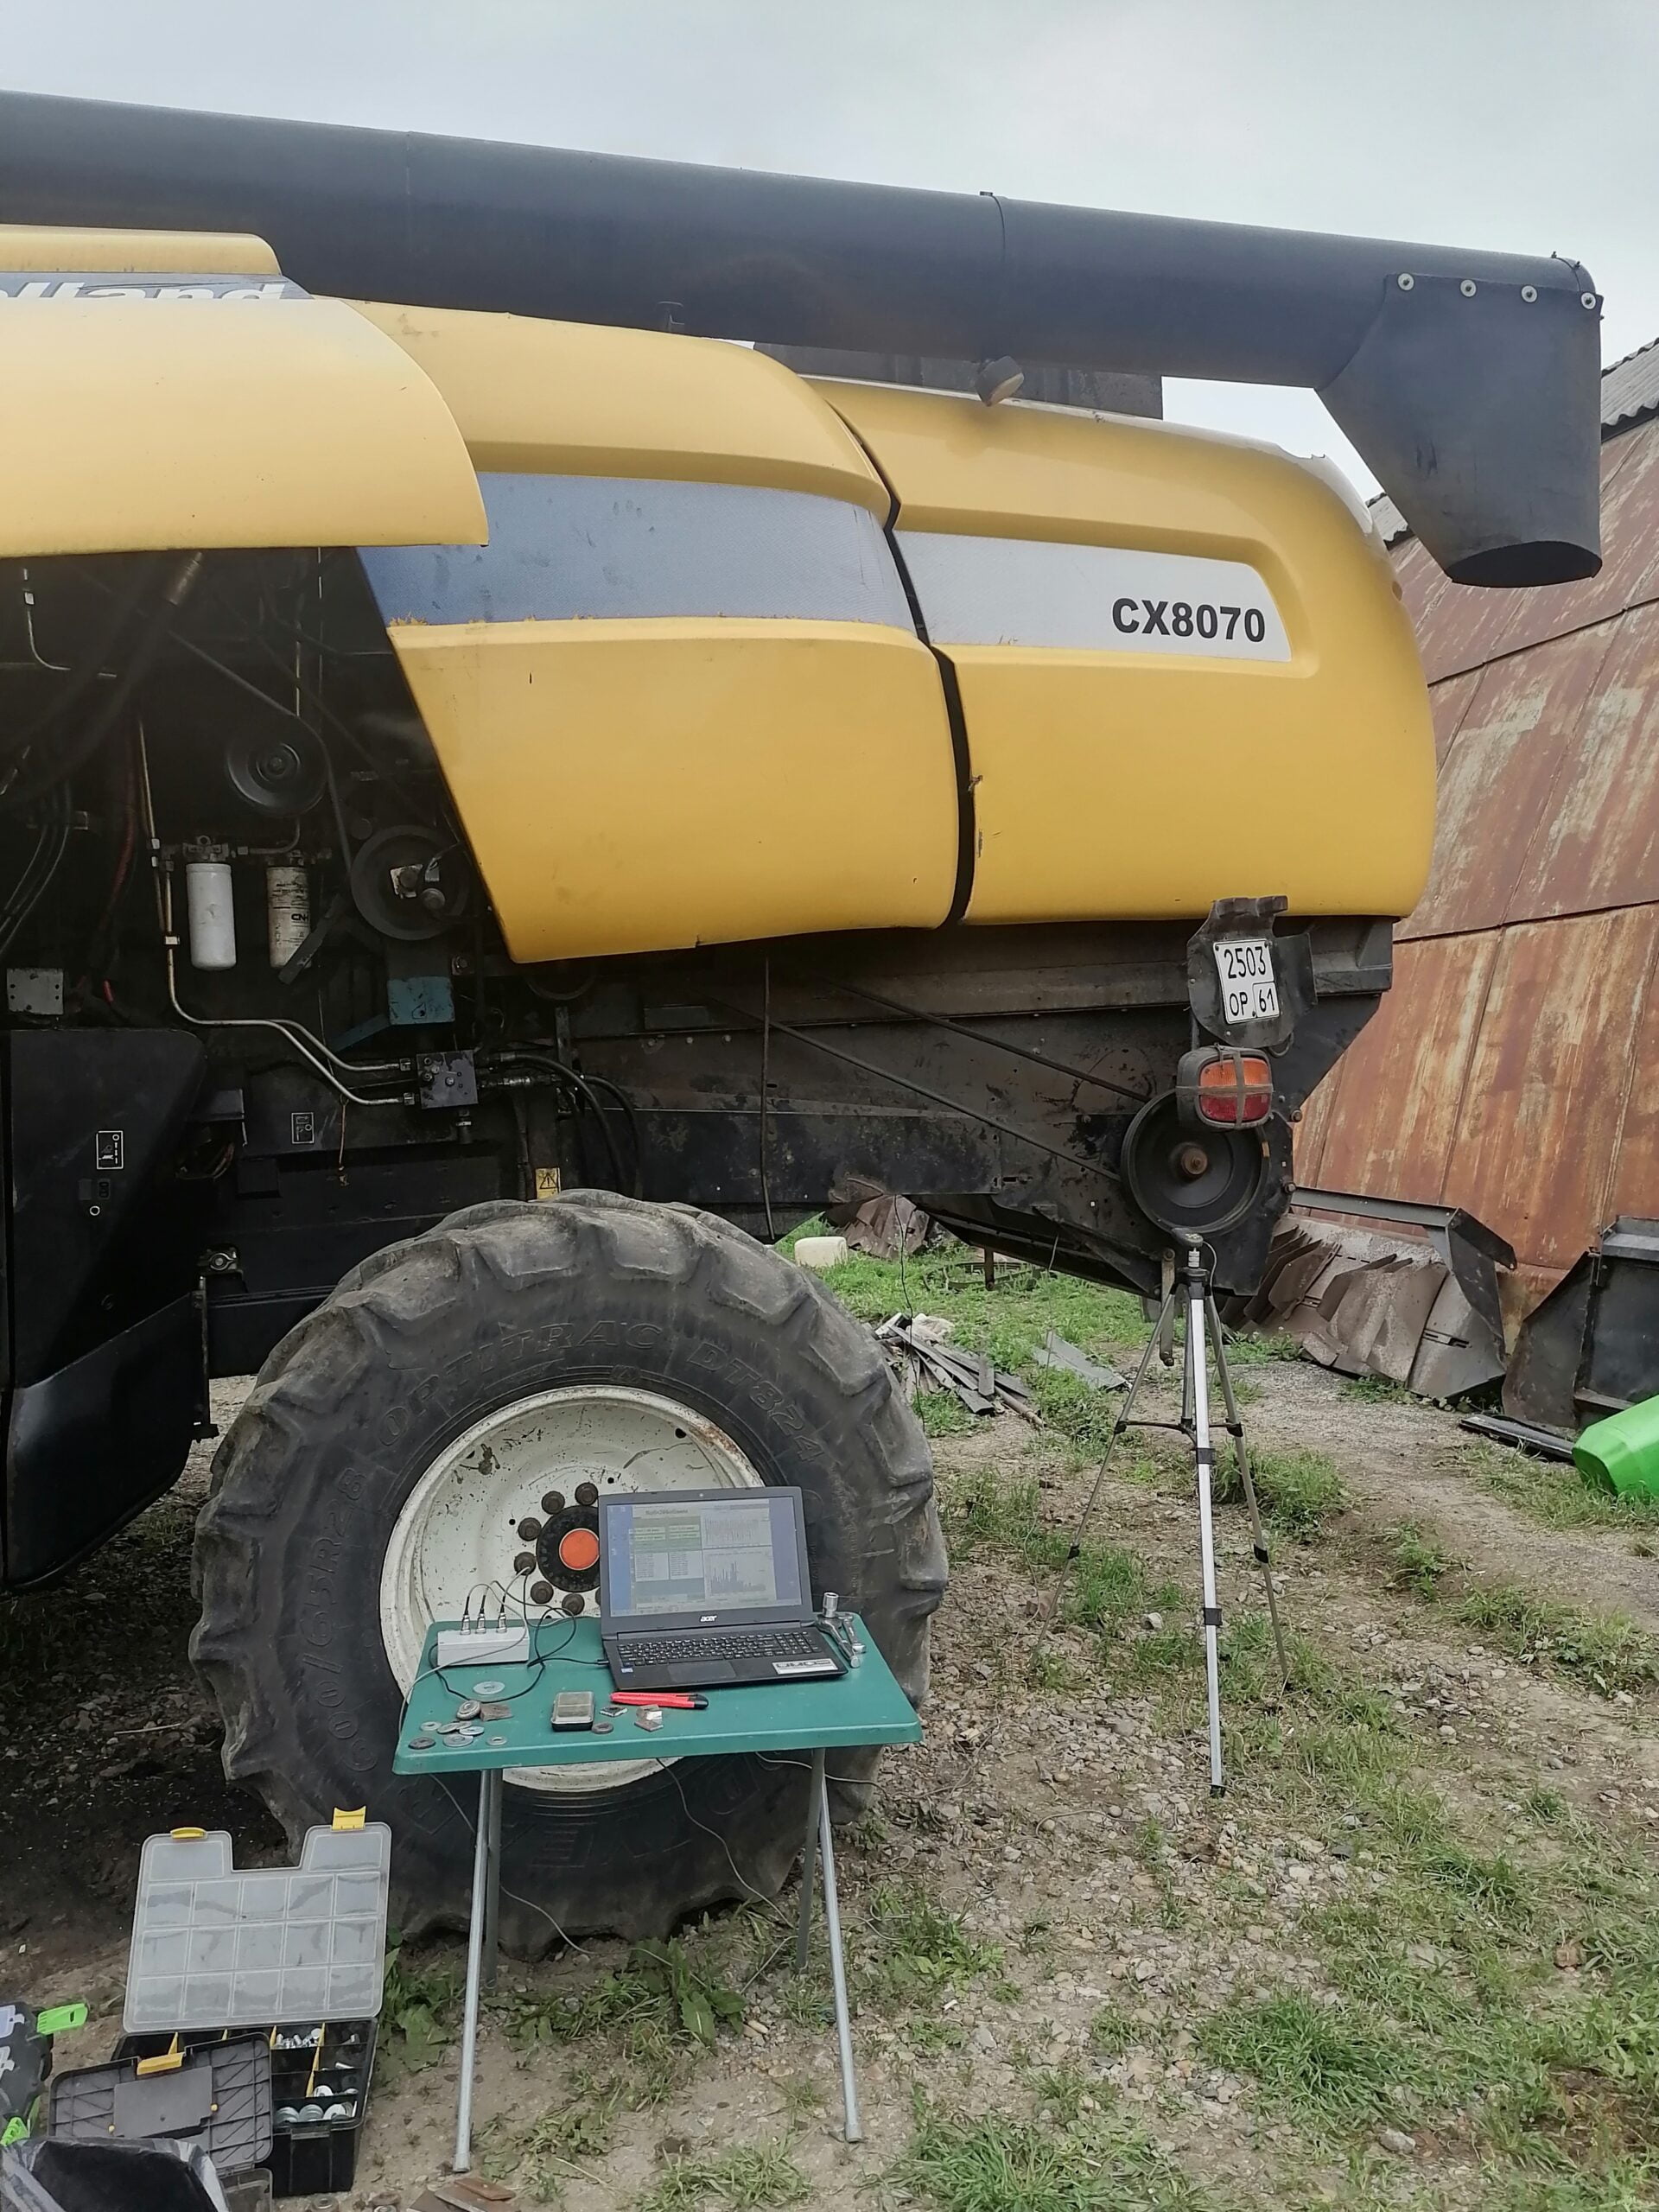
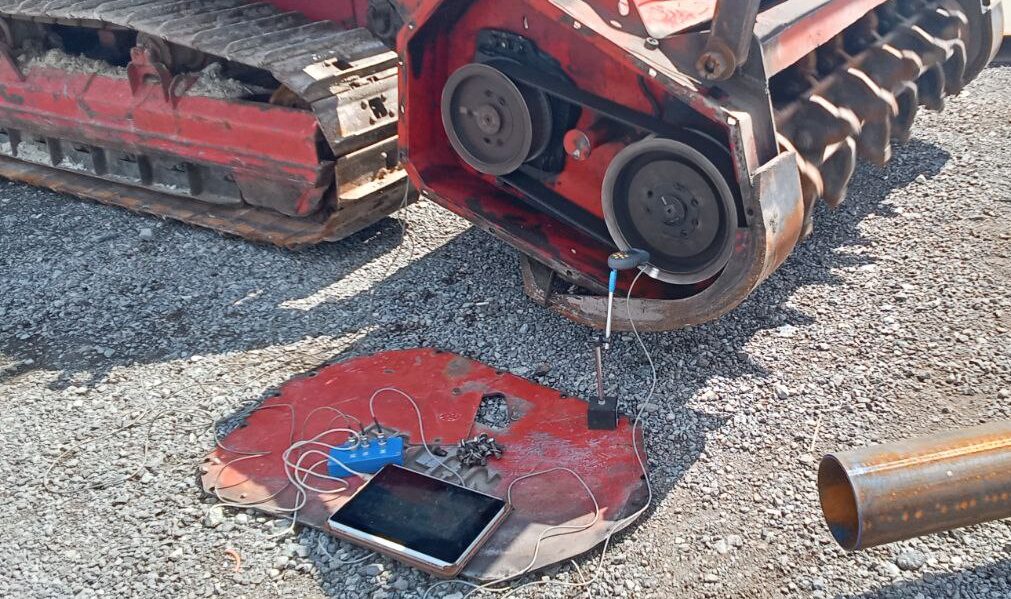
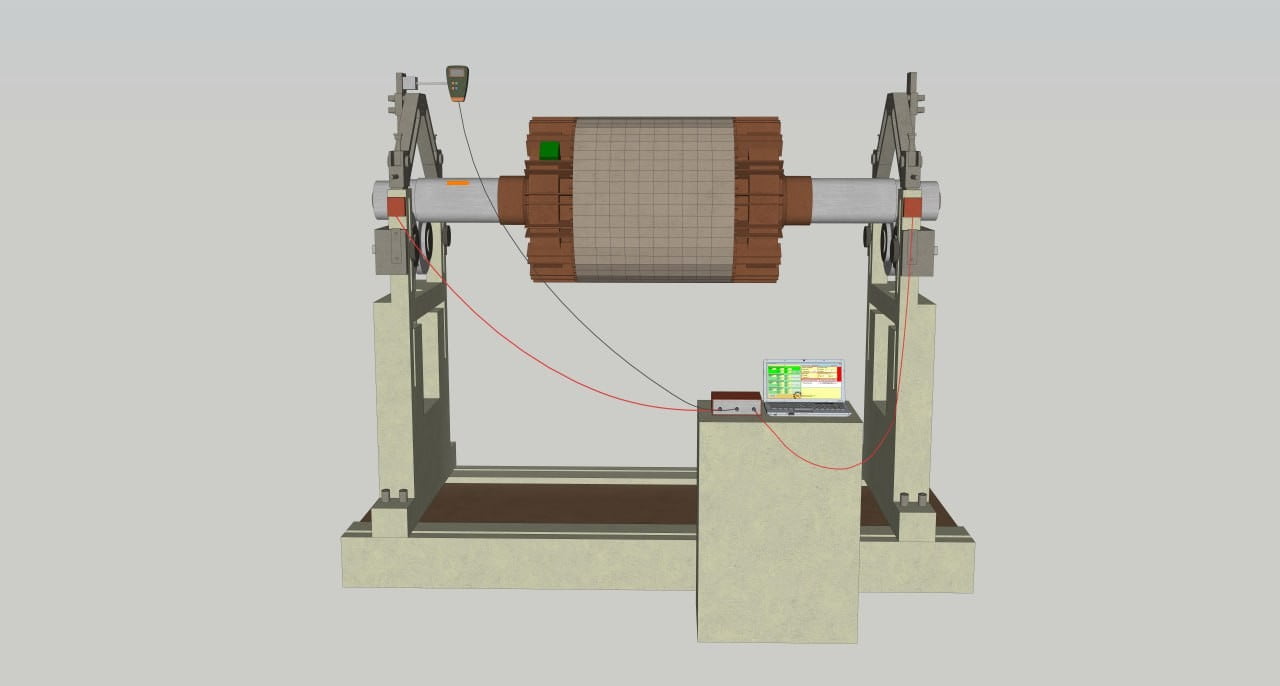
This is a modern and very convenient approach, where the rotor is balanced directly on the machine without complete disassembly. It is implemented using portable dynamic balancing devices. Such devices (e.g., Balanset-1A, detailed in the next section) include vibration sensors and a tachometer, which are attached to the rotor’s bearing housing, and an electronic unit with a computer for vibration analysis.
The procedure is similar to balancing on a machine: the rotor is spun by the machine’s standard drive (e.g., from the combine engine or tractor PTO if it’s a mower), the device measures vibration amplitude and phase, then using trial weights, the imbalance is calculated and locations for corrective weights are indicated. “On-site” balancing allows eliminating exactly the imbalance present in real assembly conditions – everything is considered, including coupling joints, knives, bolts, which also affect balance. Pros of the method: minimal disassembly, time-saving – often the balancing device allows balancing, for example, a straw chopper in an hour or two right on the farm, whereas taking it to the factory would take days. Large rotors, which are difficult to disassemble and transport, can be balanced. The method is accessible – it is enough to have the device itself or invite a specialist with it. Cons: caution and safety precautions are required (rotors are balanced on-site, the work area needs to be fenced off). Accuracy somewhat depends on the operator’s qualification, although modern devices are quite simple to use. Overall, dynamic balancing in its own bearings is today recognized as the optimal solution for large agricultural machinery – it provides virtually factory-quality balancing without prolonged equipment downtime.
Comparison of Methods
To summarize, static balancing is suitable only for the simplest cases with narrow rotors and does not solve the vibration problem of even moderately wide rotors. Dynamic balancing is the only reliable way to eliminate all types of imbalance on high-speed rotors. Balancing in service workshop conditions ensures high accuracy but is associated with downtime and logistics. Portable on-site balancing allows quickly returning equipment to operation and is sufficiently accurate for most tasks. The best approach for a farm is regular preventive balancing: inspect and balance rotors before vibration leads to a breakdown. For example, after replacing knives on a chopper or drum repairs, it is worth dynamically balancing it immediately, without waiting for strong runout to appear. Next, we will look in more detail at the on-site balancing technology using the modern Balanset-1A device.
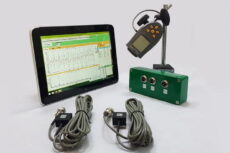
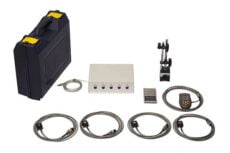
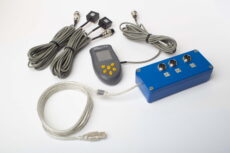
5. Balancing using the Balanset-1A Device
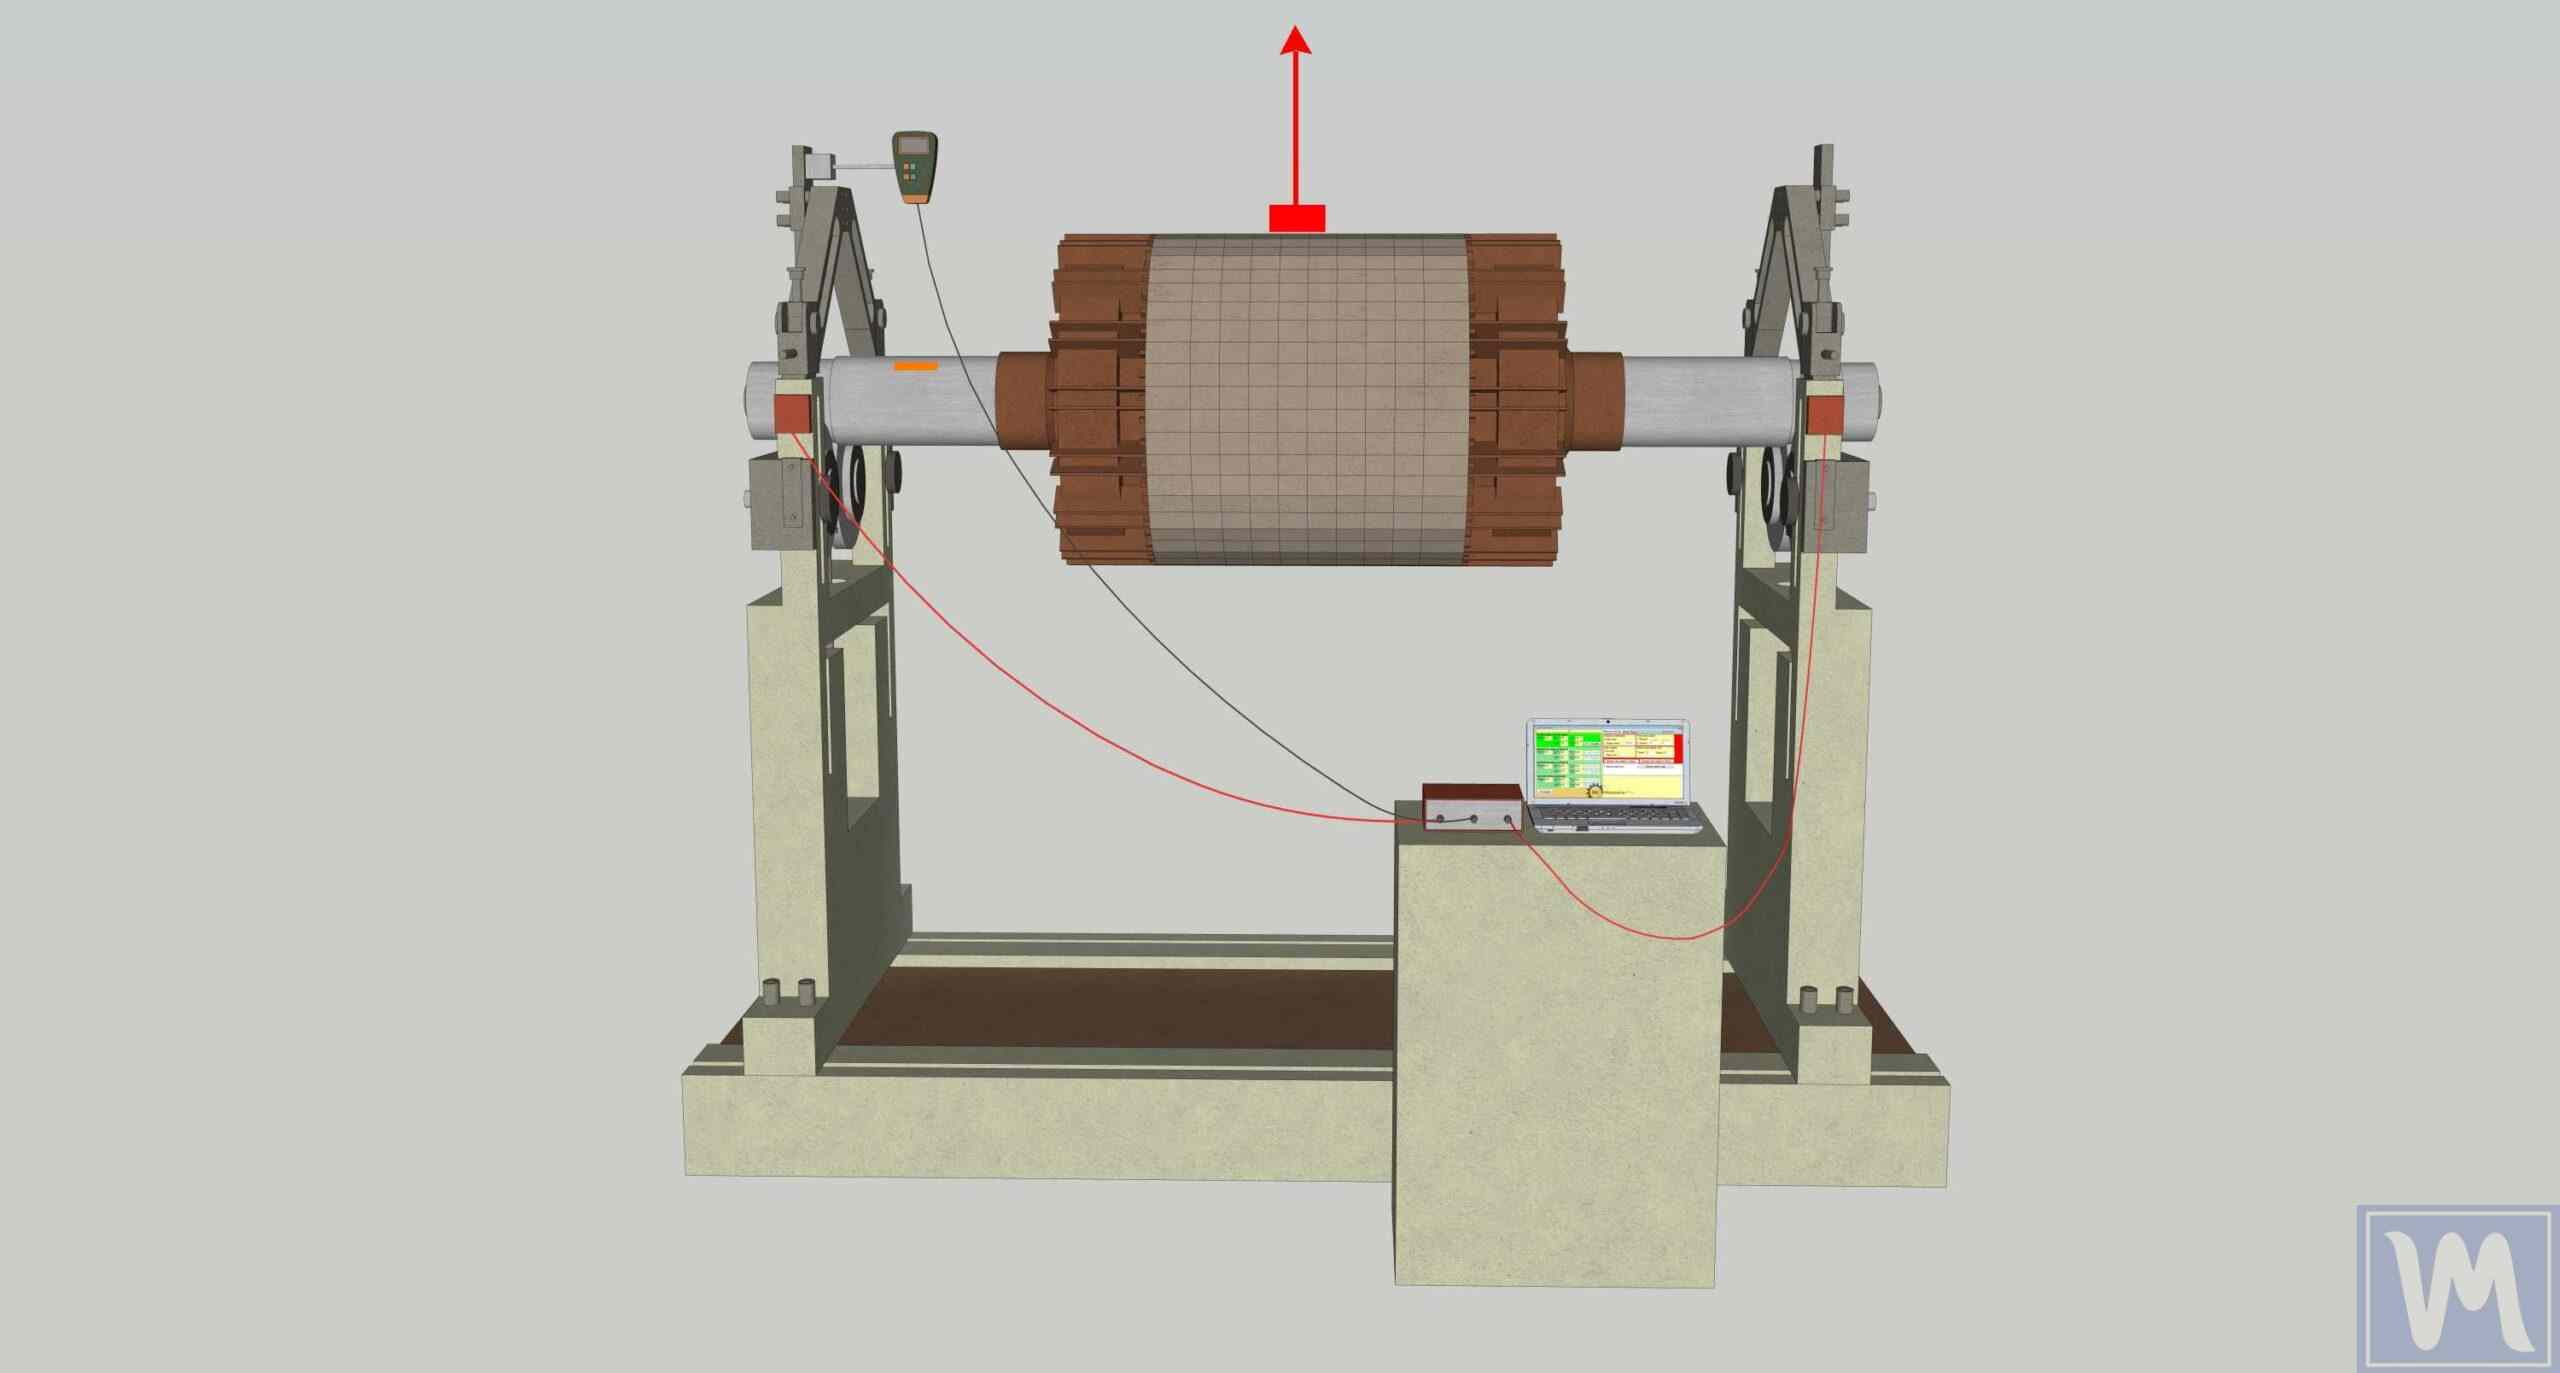
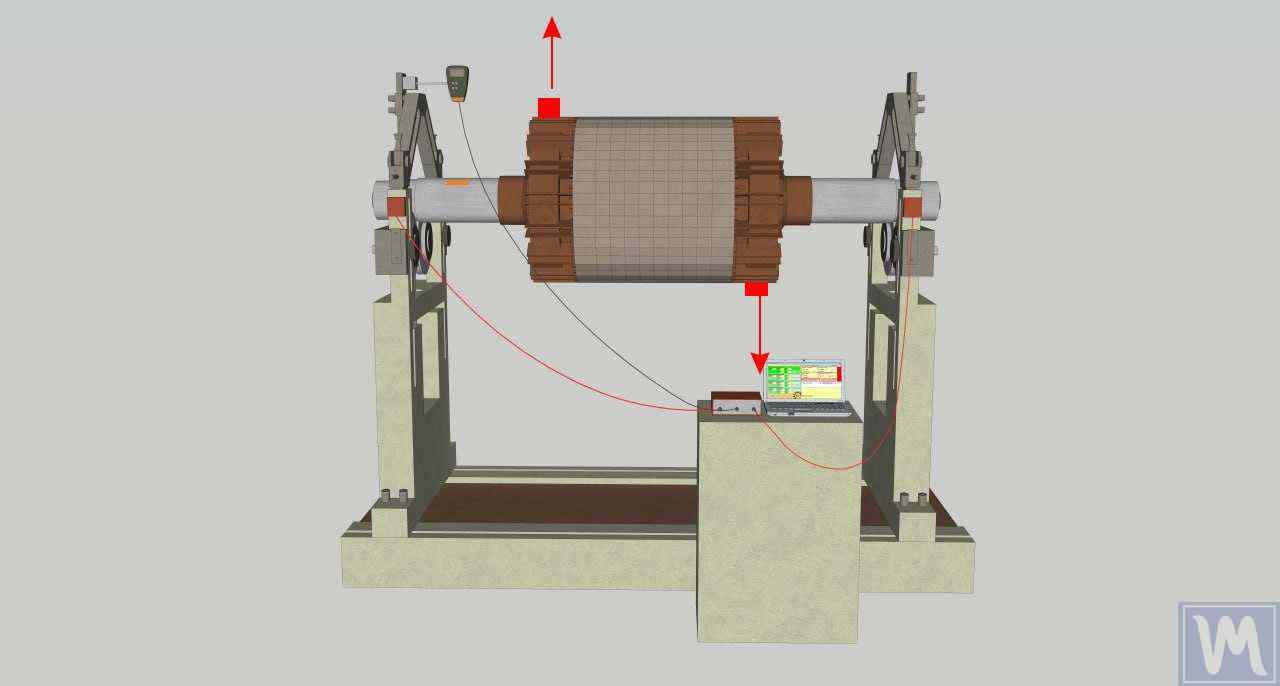
Balanset-1A is a portable vibrometer-balancer specifically designed for dynamic balancing of rotors directly at their place of operation. The device allows balancing in one plane (static) as well as in two planes (full dynamic) for a wide range of equipment types. It consists of a set of sensors and an electronic module connected to a laptop: the kit includes two vibration sensors (accelerometers) for measuring rotor vibration, an optical tachometer sensor for reading rotations and angular position, an interface block (vibration analyzer), and software. The entire kit weighs a few kilograms and is housed in a small case, making it easy to transport directly from farm to farm. Even an engineer without deep knowledge of vibration diagnostics can use the Balanset-1A: the device and software automate the measurement and calculation process, providing clear prompts to the user. The main philosophy of such a device is that rotor balancing should be achievable on-site by farm personnel without lengthy training and excessive costs.
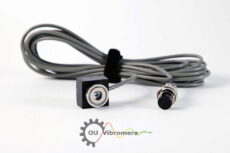
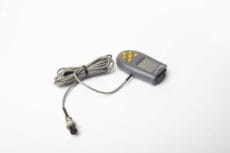
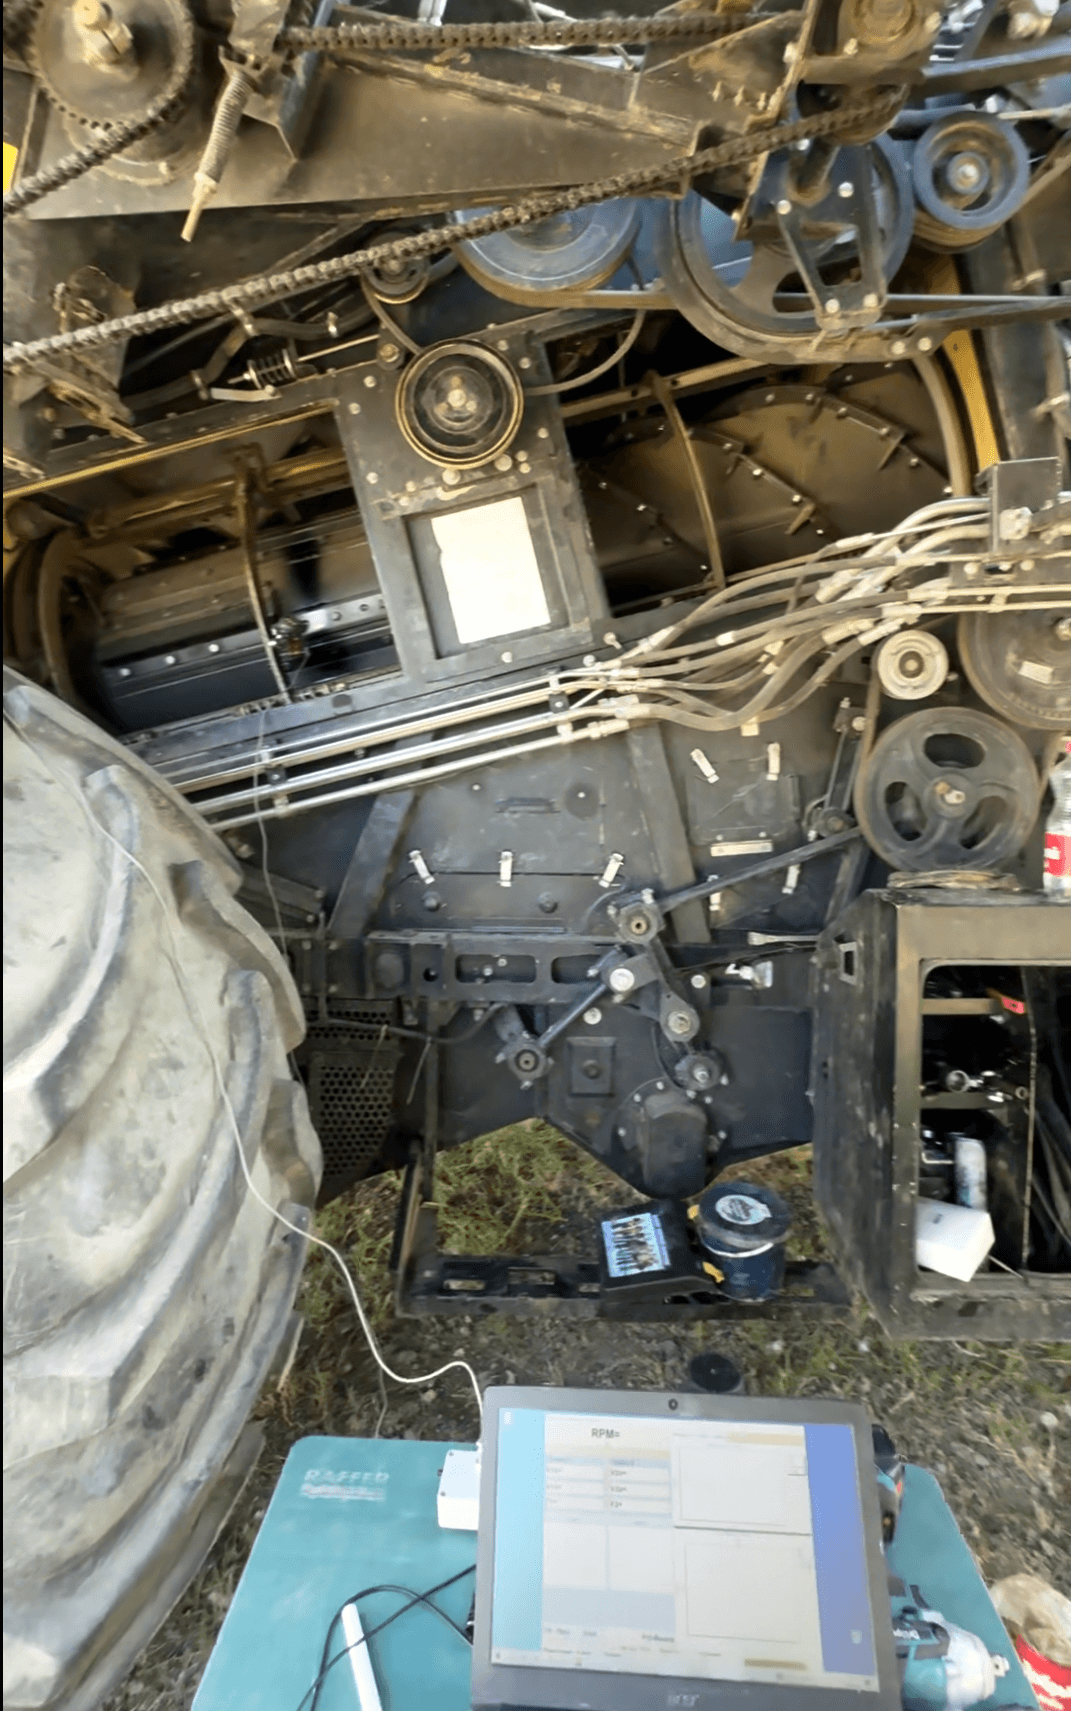
The balancing process using the Balanset-1A is as follows. First, the rotor is prepared: safety is paramount – the rotor is cleaned of dirt and straw, and it is checked that all knives or hammers are intact and rotate freely (especially in a straw chopper, where a stuck knife can periodically cause imbalance), and any foreign attachments are removed (for example, spreaders if they interfere). Then, vibration sensors are installed on the housing near the rotor supports – usually perpendicular to the axis of rotation, at each end of the housing where the bearings are located. A small reflective mark is attached to the rotor (e.g., on the pulley), and an optical sensor (tachometer) is placed opposite it on a magnetic stand. All sensors are connected to the Balanset-1A block, which is then connected to a laptop with the balancing program. The operator then sets the parameters in the program: the balancing mode is selected (usually two-plane for long rotors), and the characteristics of the trial weight (its mass and installation radius) are entered. Now the rotor can be started – either by starting the combine engine at the required thresher speed, or by engaging the tractor PTO for the mower, or using an electric motor if the rotor is removed and mounted on stationary supports. During the first run, the device measures the initial vibration level: amplitude (in mm/s) and phase of imbalance at each sensor. These values are saved as baseline.

The next step is the installation of trial weights. After stopping the rotor’s rotation, the operator secures a pre-prepared small weight (e.g., a metal plate or several washers) on the rotor in the first plane – closer to one end of the rotor where sensor number 1 is installed. Then the rotor is spun again to operating speed, and the device records new vibration parameters. If the change in amplitude and phase is significant enough (usually at least a 20% change is required for accurate calculations), the process continues.
Then the trial weight is removed and repositioned in the second plane – at the other end of the rotor – and the run with measurement is repeated.

As a result, the program receives data on the influence of the known weight on the imbalance in each plane. The device’s algorithm analyzes three data sets (without weight, with weight on plane A, with weight on plane B) and calculates the optimal balancing parameters. The operator receives recommendations on the screen: what mass of corrective weight needs to be added in each plane and at what angular position relative to the trial weight installation point.
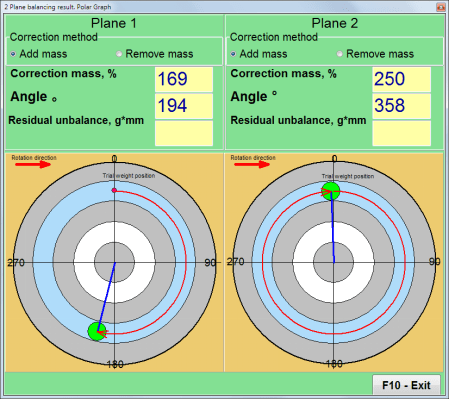
Fig. 7.37. Results of calculation of corrective weights – free position.
Polar diagram
For example, it may be calculated that 169 grams should be added to the left end of the rotor at an angle of 194°, and 250 grams to the right end at an angle of 358° from the trial weight installation point.
Next, corrective weights are installed: the device suggests where exactly to attach the weights. Typically, metal plates/washers of the required weight are screwed or welded on. If the rotor has special bolts or perforated flanges at the edges, the weight is attached to them (many combines originally have holes on the drum ends for balancing). In field conditions, a set of steel washers of different diameters is often used as convenient weights that can be screwed onto the knife mounting bolts or other rotor elements.
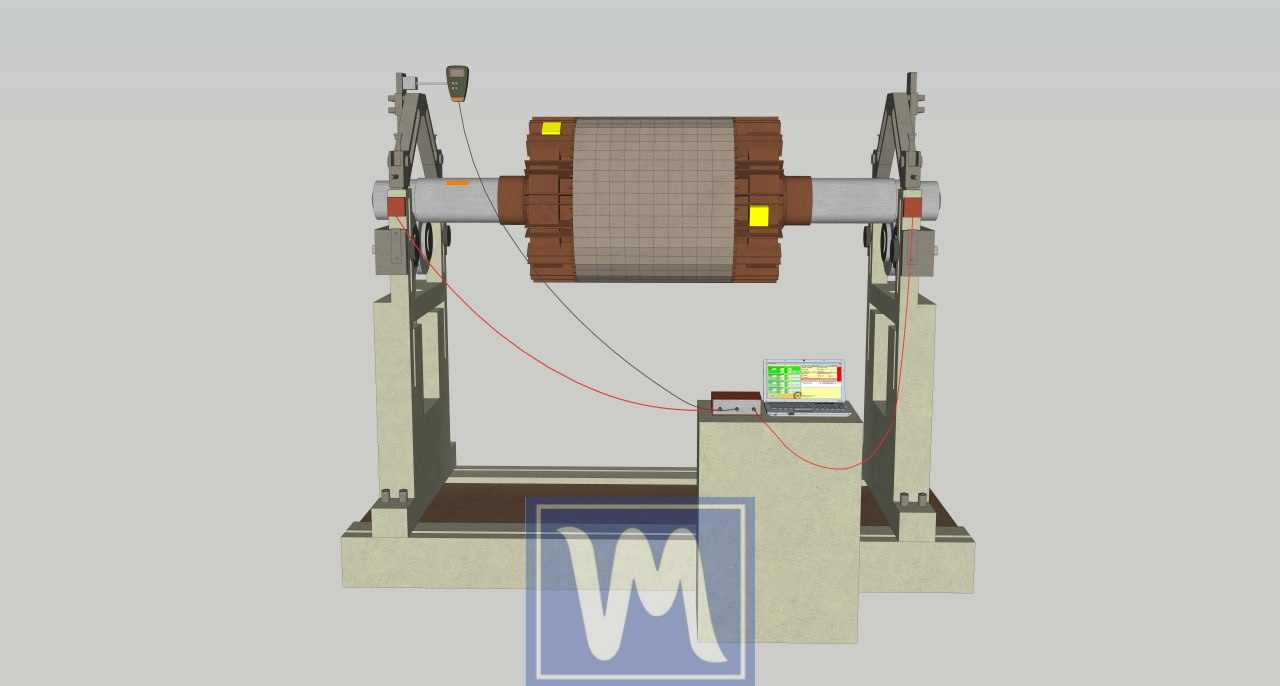
After installing the calculated weights, a test run is conducted: the rotor is spun again to operating speed, and vibration readings are taken. If the balancing is done correctly, the vibration level drops sharply and falls within acceptable limits (usually, the vibration speed decreases to a few mm/s). The device may show, for example, that the residual vibration is 1–2 mm/s – an excellent result for agricultural machinery. If the vibration still exceeds the allowable limit, the program may recommend adding additional small weights – they are added and checked again until a satisfactory result is achieved.
For severely unbalanced rotors, multi-step balancing is sometimes used: first, balance at a reduced speed, then repeat the procedure at a higher speed, and so on until reaching operating speed. This is necessary if it is dangerous to spin the rotor immediately at high imbalance – step by step, the main vibration is removed, and then it is brought to an ideal state at full rotation speed.
In practice, the use of the Balanset-1A has already helped many farms cope with complex vibrations. For example, owners of rotary choppers often tried to balance the rotor using homemade methods, placing the rotor on prisms (static balancing) but unsuccessfully – the vibration remained. With the help of the portable device, it was possible to completely eliminate the vibrations: after installing corrective weights, the mulcher’s operation became smooth, and the hum and shaking that hindered the tractor driver from working for long periods disappeared. A similar situation occurs with combines: if an imbalance appears after replacing the knives in the straw chopper, the farmer does not need to dismantle the entire chopper but can balance it directly on the combine in a couple of hours. A real example is the balancing of a chopper on a Claas combine: after the season, one of the hammers was lost, and the rotor began to vibrate strongly. The device showed a vibration speed of about 15–17 mm/s (which is noticeable on the frame). By securing two sets of washers with a total mass of about 90 grams on the opposite ends of the rotor, the vibration was reduced to less than 2 mm/s. The combine continued to operate without the risk of damaging the chopper’s bearings. In the figure below, the installed balancing washers on the straw chopper rotor after such a procedure are marked in green. They are screwed to the ends of the rotor opposite the former “heavy” spot. Thanks to this, the rotor’s rotation became uniform.
Advantages of Balancing with the Balanset-1A
- Speed and mobility: The device can be brought directly to the field or hangar, eliminating the need to transport heavy units to the workshop. Even a large drum can be balanced in its own bearings on the combine. During the harvest season, this is especially valuable – minimizing equipment downtime.
- Accuracy and completeness of balancing: Thanks to two-plane analysis, dynamic imbalance is eliminated, which cannot be achieved “by eye.” The results are comparable to factory standards: vibration is reduced to a level where harmful effects on components disappear. The device indicates the exact location and weight of the load, eliminating guesswork.
- Accessibility for personnel: Modern devices do not require deep specialized training. The Balanset-1A software interface is intuitive, and calculations are automated. A farm specialist, after brief training, can perform balancing independently, without involving external organizations.
- Versatility: The same Balanset-1A kit is suitable for numerous tasks: from balancing a straw chopper and a combine fan to a wood chipper rotor or an electric motor. It is a profitable acquisition for a large agricultural enterprise with diverse equipment.
6. Economic Benefits of Balancing
Regular rotor balancing is an investment that pays off in a short time by reducing costs and increasing efficiency. Let’s consider the main economic benefits:
- Reduction in repair and maintenance costs. As noted, imbalance significantly reduces the lifespan of bearings and other parts. If a rotor is unbalanced, the farm faces frequent replacements of bearings, shafts, belts, etc. These direct costs are substantial: for example, a set of bearings for a large drum plus the replacement work can cost hundreds of dollars or euros, and if done every couple of months, it adds up to a significant amount over the season. Balancing eliminates the root cause – vibration – thereby extending the lifespan of components. Bearings will last for years, the frame won’t crack, and knives won’t break from impact loads. The savings on spare parts are obvious. Moreover, balancing often identifies and addresses potential problems (cracks, loose fastenings), preventing serious accidents. A timely balancing can prevent a major breakdown that would cost hundreds of thousands of rubles.
- Minimization of downtime and preservation of the harvest. A combine breakdown at the height of the harvest can lead to crop losses, missed opportunities due to delayed harvesting, and costs for urgent repairs. An unbalanced rotor is a hidden danger that can strike at the most inopportune moment (e.g., a thresher bearing fails, and the combine stops). By timely servicing and balancing rotor units, farmers avoid emergency downtimes. Equipment operates reliably during the most critical periods. Even if using a mobile balancing service (which costs a certain amount), it is incomparably cheaper than keeping a backup combine or losing part of the harvest due to a breakdown.
- Increased work efficiency and fuel savings. Balanced mechanisms operate more smoothly and with less load. This means that engine energy is maximally used for useful work – threshing, cutting, shredding – rather than damping vibrations and noise. Across the farm, this has a noticeable effect: reduced specific fuel and energy consumption per ton of processed grain or feed. Exact figures are hard to achieve without measurements, but even a 2–5% fuel saving for large combines and tractors over a season results in tens of liters, saving money. Additionally, the operator can work at full optimal speed without fear of damaging the machine, completing the work faster. Indirectly, balancing also affects work quality: a smoothly operating combine threshes and cleans grain better, damages fewer grains, and loses less, which is also economically beneficial (more marketable yield).
- Extension of equipment lifespan. Vibration is the number one enemy of machinery, gradually “killing” the machine. A combine or mower without excessive vibrations will last longer than its standard service life, delaying the need for costly fleet updates. Buying a new combine is a huge capital investment, and it’s logical to maximize the use of what has already been purchased. Balancing is a relatively inexpensive activity that significantly extends the lifespan of rotors, and thus the entire equipment. Even outdated machines, with proper care, can be successfully operated, maintaining functionality.
- Benefit from owning balancing equipment. For large agricultural holdings and service enterprises, it is economically feasible to acquire their own portable balancer like the Balanset-1A. Its cost is comparable to the price of a set of tractor tires, and it constantly provides benefits. After saving several bearings and preventing accidents, the device fully pays for itself. Beyond that, it’s only savings and independence: no need to call expensive external specialists, all work is done independently and planned. For smaller farmers, there is the option of cooperation: jointly purchasing a device for several farms or attracting mobile teams with such equipment as needed.
In simple terms, balancing eliminates hidden money losses. The funds invested in it return through: reduced repair costs, absence of forced downtime, more efficient operation, and equipment longevity. This is especially important in conditions where the profitability of agribusiness depends on a clear schedule of fieldwork and cost optimization.
7. Conclusion
Balancing the rotors of combines and mowers is a prerequisite for the reliable and safe operation of agricultural machinery. Throughout the article, we have seen that imbalance, whether static or dynamic, leads to serious negative consequences: from severe wear of bearings and parts to accidents and reduced yield. Regular balancing of key units (threshing drums, straw choppers, mower rotors, etc.) helps avoid these problems. There are different methods – from simple static balancing to high-precision dynamic balancing. The best results are achieved with dynamic balancing, and modern equipment like the Balanset-1A makes it accessible right in the field, without long downtimes. The conclusion is simple: by saving time on balancing, we then lose much more on repairs and downtimes.
Therefore, it is recommended to include balance checks in the regular maintenance schedule of equipment. For example, before the harvest season, check the balance of the drum and chopper; when preparing the mower for haymaking, ensure there are no rotor vibrations, etc. If signs of imbalance are noticed (vibration, noise, uneven knife wear, frequent bearing failures), do not delay – conduct vibration diagnostics and balancing. Regular rotor balancing pays off in full: equipment operates smoothly and efficiently, breaks down less often, lasts longer, and the operator works in more comfortable conditions. Farmers and agribusiness enterprises should adopt balancing methods – whether it’s their own device or specialist services – and then vibration will turn from an enemy into a controllable factor. By keeping rotors balanced, you lay the foundation for a long and successful operation of your machinery fleet.