傳動軸動平衡校正:完整指南
自行為傳動軸做動平衡——車上直接進行,無需拆卸
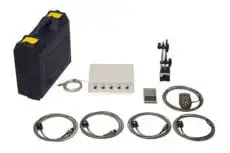
Balanset-1A是一台雙平面可攜式動平衡儀:振動感測器、雷射轉速表與軟體集於一套工具包中。它能在車上對傳動軸進行動平衡校正,也適用於風機、飛輪、破碎機以及任何在自身軸承中運轉的轉子。兩年保固,DHL / UPS全球發貨,無需訂閱。
想像您正在駕駛卡車,在加速或換檔時突然感到劇烈振動或聽到巨大的撞擊聲。這不僅僅是煩人的問題——它可能是傳動軸不平衡的跡象。對於工程師和技術人員來說,此類振動和噪音表明效率降低、部件磨損加速,如果不予處理,可能會導致昂貴的停機時間。
正在維修車輛?請參見 無需拆卸的車載傳動軸動平衡.
車上傳動軸動平衡校正:實例逐步演示
下面的照片來自一次真實的平衡作業,車輛架在舉升機上進行。傳動軸全程未拆卸:感測器直接安裝在車輛本體上,軸由引擎透過傳動系帶動旋轉,校正重塊從下方安裝。這樣傳動軸始終處於自身的軸承和工作角度中,因此結果能真實反映整套總成的實際運行狀態——這是台架式平衡機無法完全再現的。
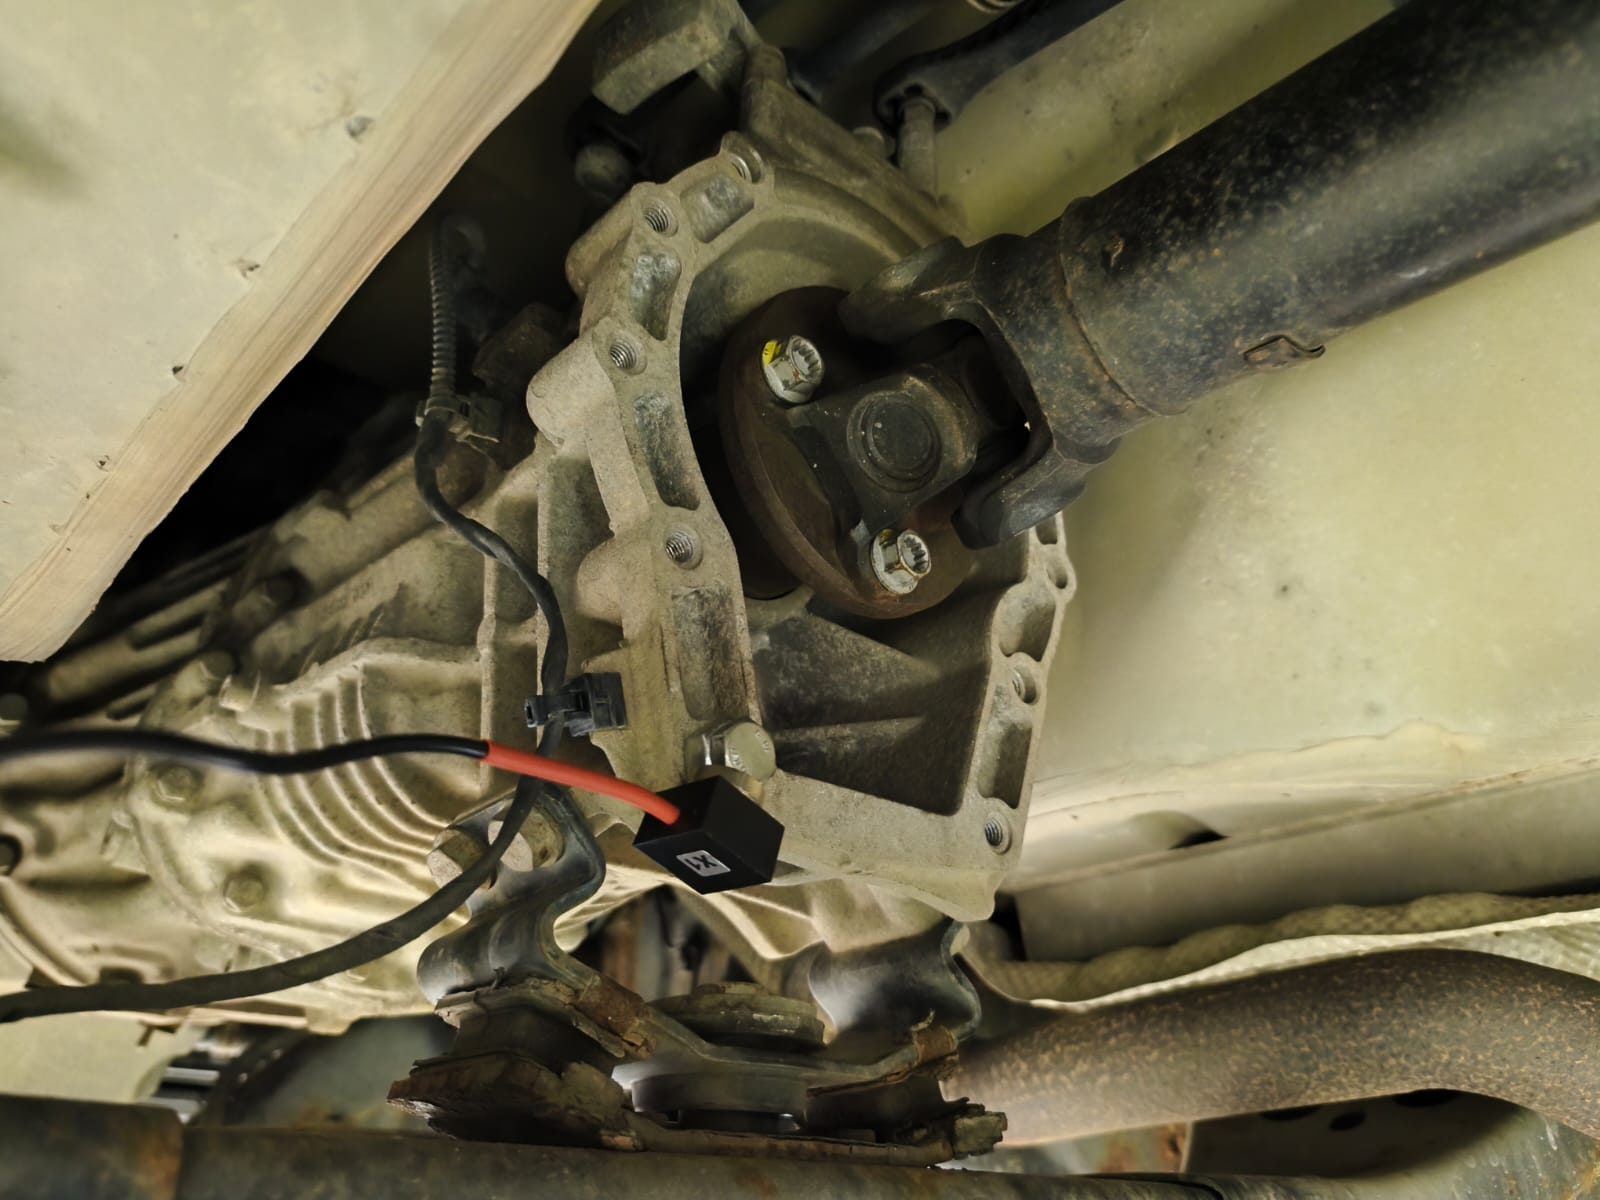
圖 24。振動感測器安裝於差速器殼體上,盡可能靠近傳動軸支撐軸承。
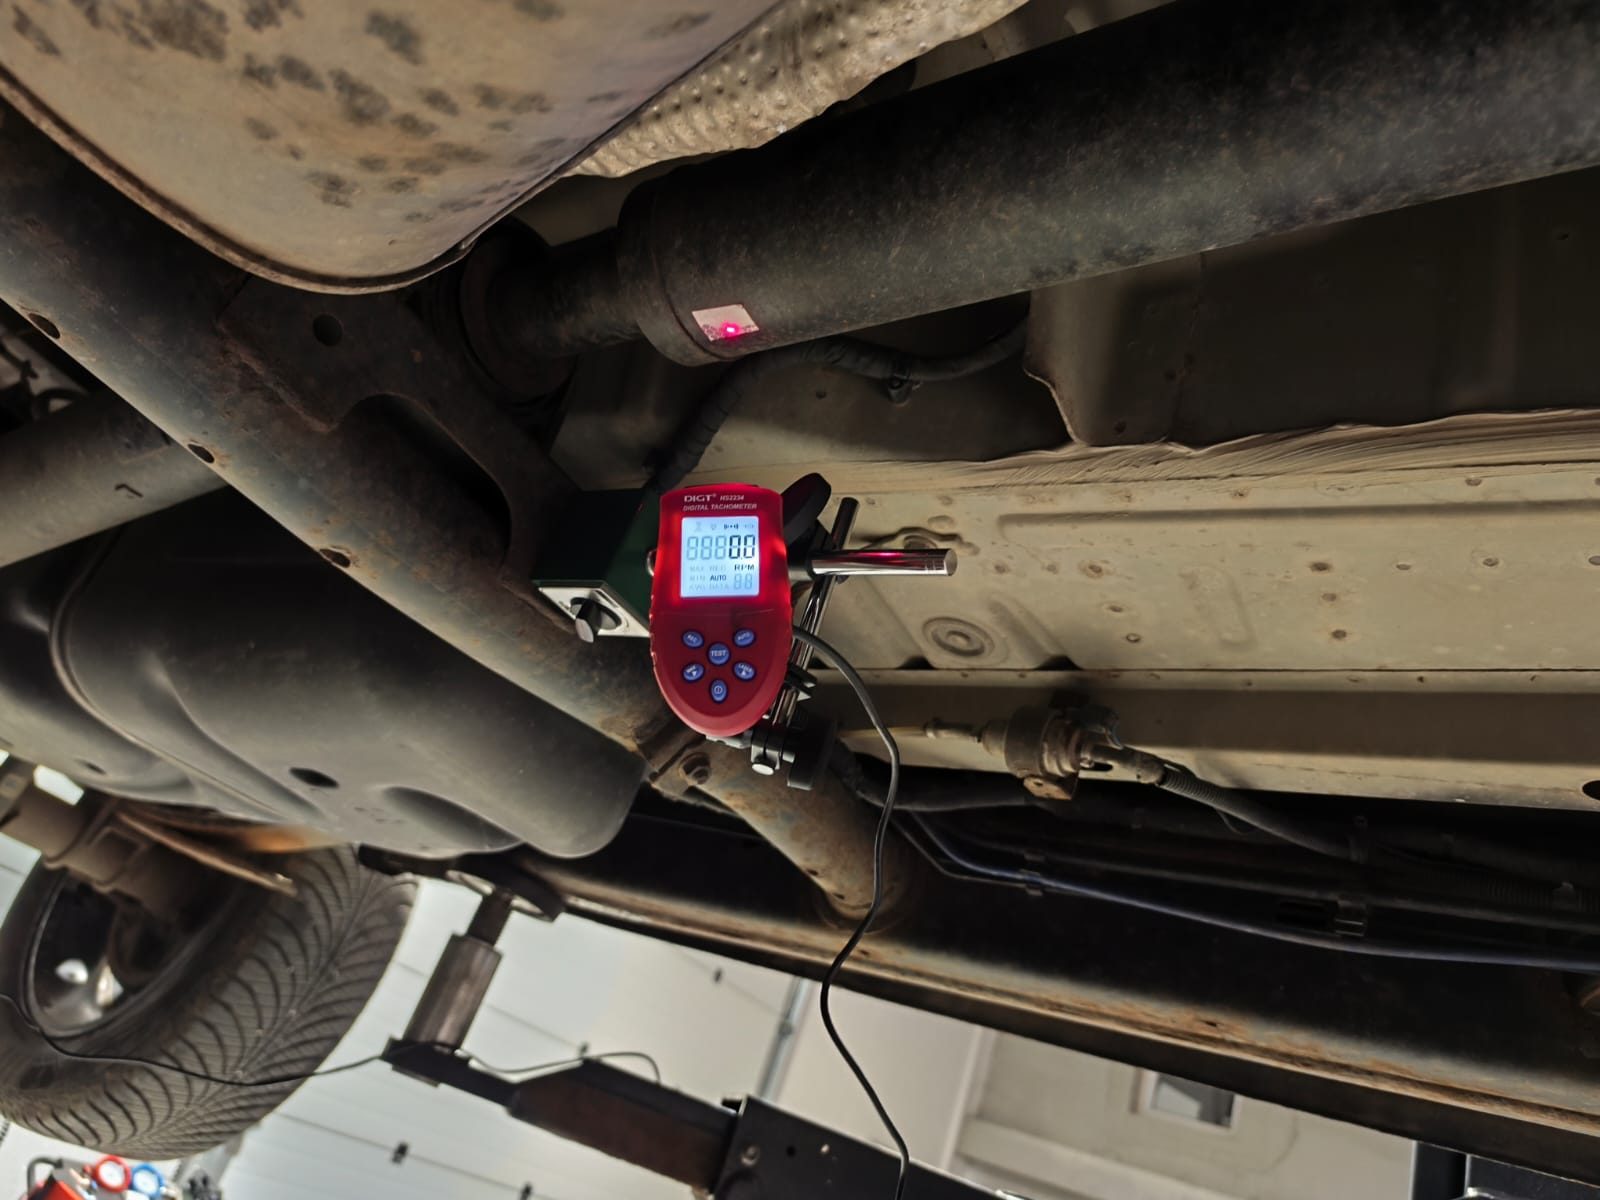
圖 25。雷射轉速計對準軸上的反光膠帶條——同時提供轉速與不平衡的相位角。
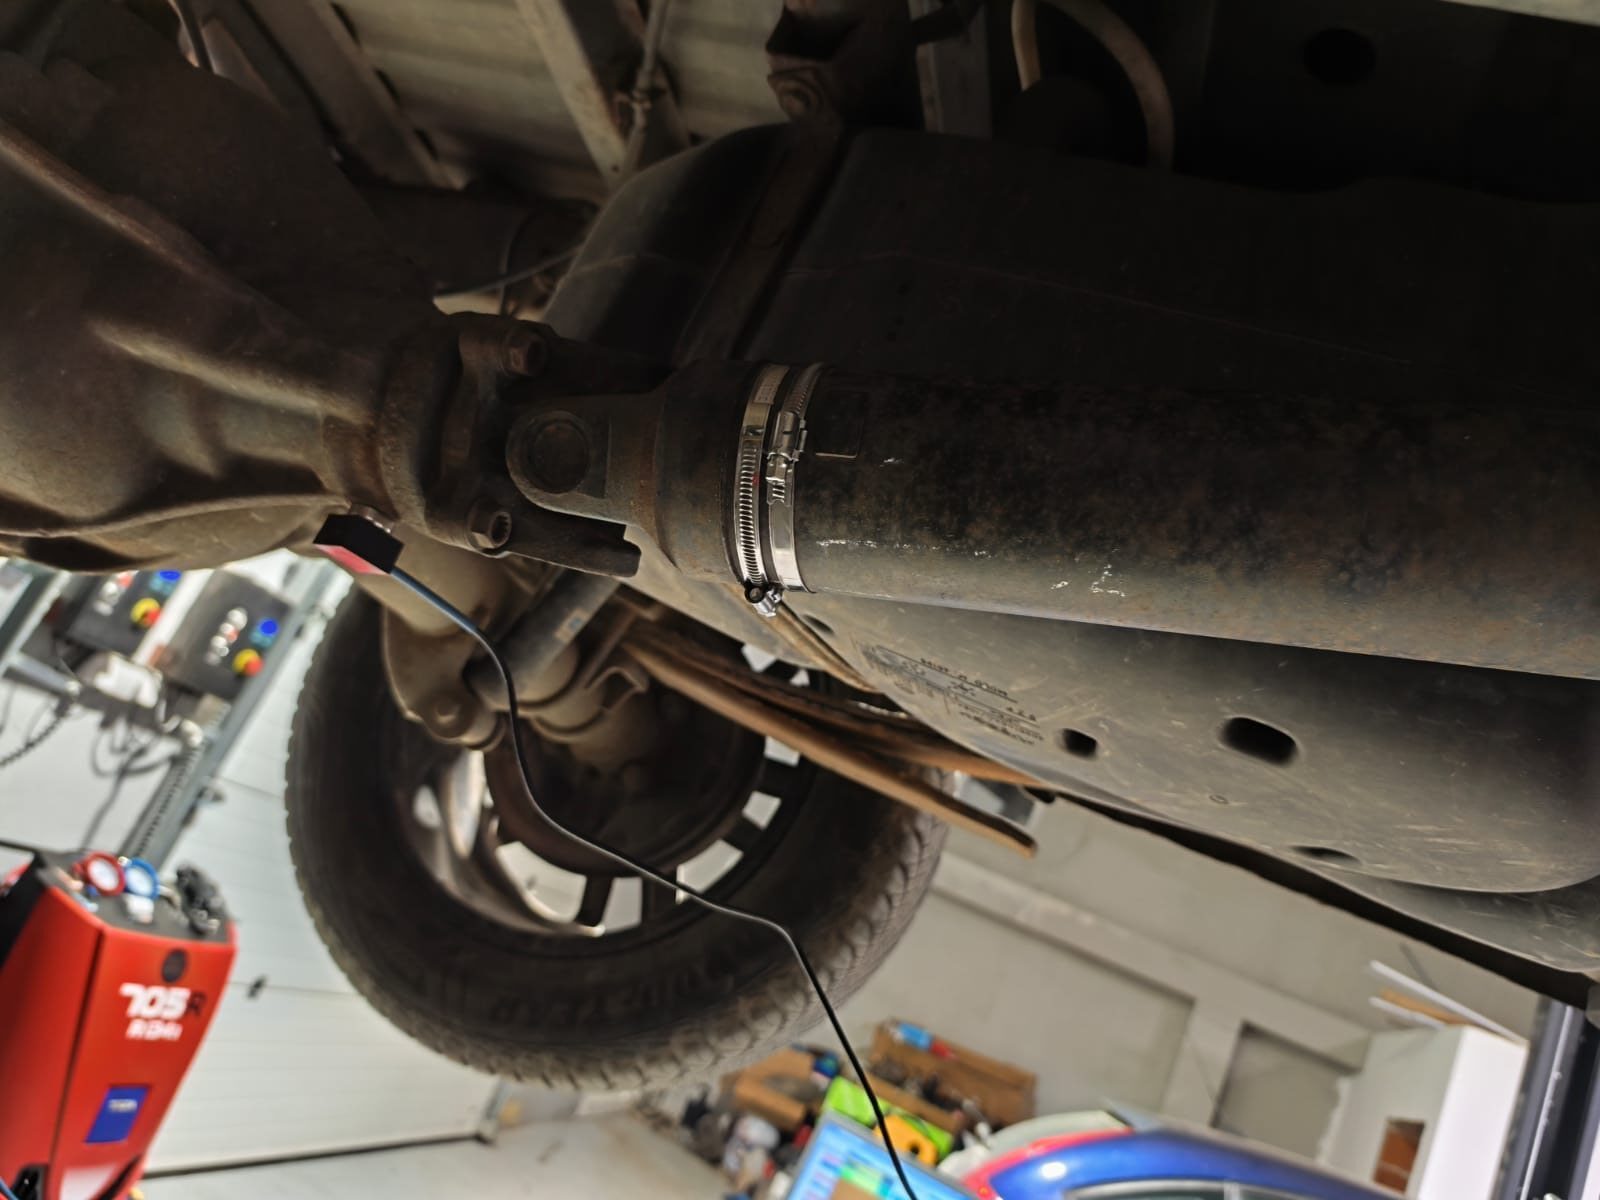
圖 26。以不鏽鋼喉箍,將校正重塊依軟體算出的角度與質量,固定在傳動軸管上。
完整流程——感測器安裝位置、安全試運轉、試重與殘餘振動檢查——說明於 無需拆卸的車載傳動軸動平衡.
在本完整指南中,我們提供傳動軸平衡問題的實用解決方案。您將了解什麼是傳動軸以及為什麼需要動平衡校正,識別導致振動或噪音的常見故障,並遵循清晰的逐步傳動軸動平衡校正過程。透過應用這些最佳實踐,您可以節省維修費用,減少故障排除時間,並確保您的機械或車輛以最小振動可靠運轉。
目錄
1. 驅動軸類型
萬向節驅動(驅動軸)是一種在相交於萬向節中心的軸之間傳遞扭矩的機構,這些軸可以以一定角度相對移動。在車輛中,驅動軸在傳統或四輪驅動配置下,將扭矩從變速箱(或分動箱)傳遞到驅動軸。對於四輪驅動車輛,萬向節通常將變速箱的輸出軸連接到分動箱的輸入軸,並將分動箱的輸出軸連接到驅動軸主傳動的輸入軸。
安裝在車架上的部件(如變速箱和分動箱)會因其支撐結構和車架本身的變形而產生相對移動。同時,驅動軸透過懸掛系統連接到車架,並會因懸掛彈性元件的變形而相對於車架及安裝在其上的部件產生移動。這種移動不僅會改變連接部件的傳動軸角度,還會改變部件之間的距離。
萬向節傳動裝置存在一個明顯的缺點,那就是:兩軸的旋轉並不均勻。如果其中一軸勻速旋轉,另一軸就無法做到勻速旋轉,而且這種不均勻的程度,會隨著兩軸之間夾角的增大而進一步增大。正是這一局限性,使得萬向節傳動裝置無法應用於許多場合,例如前輪驅動車輛的傳動系統,因為在這類應用中,主要的問題在於要將扭矩傳遞給正在轉向的車輪。這一缺點,可以透過在同一根軸上使用兩個萬向節的方式來部分補償——具體做法是,設定相等的接頭角度(γ1 = γ2),並使中間軸兩端的軛處於同一平面內(也就是同相位)。若兩個軛的相位相差90°,波動不但不會被抵消,反而會被疊加放大。然而,在那些確實需要勻速旋轉的應用場合,通常會改用等速萬向節(也就是CV接頭)來代替。CV接頭是一種設計上更為先進、但同時也更為複雜的方案,用來實現與前者相同的目的。
萬向節驅動可以由一個或多個通過驅動軸和中間支撐連接的萬向節組成。
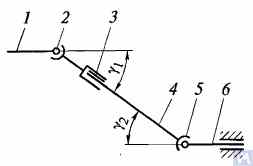
圖 1. 萬向節驅動示意圖:1, 4, 6 — 驅動軸;2, 5 — 萬向節;3 — 補償連接;u1, u2 — 軸間夾角
一般而言,萬向接頭傳動系統由萬向接頭 2 和 5、傳動軸 1、4 和 6 以及補償連接 3 組成。有時傳動軸安裝在連接到車輛車架橫樑的中間支撐上。萬向接頭確保在軸線以一定角度相交的軸之間傳遞扭矩。萬向接頭分為非等速和等速類型。非等速接頭進一步分為彈性和剛性類型。等速接頭可分為帶分槽的球型、帶分桿的球型以及凸輪型。它們通常安裝在導向控制輪的傳動系統中,此處軸之間的角度可達 45°,且萬向接頭的中心必須與輪子旋轉軸線及其轉向軸線的交點重合。
彈性萬向節,是依靠連接部件的彈性變形,在軸線相交呈2...3°夾角的兩根軸之間傳遞扭矩的。而剛性的非等速接頭,則是透過剛性部件之間的可動連接,把扭矩從一根軸傳遞到另一根軸上去的。它由兩個軛——也就是圖中的3號和5號——所組成,這兩個軛的圓柱形孔洞內,裝有連接部件——也就是十字軸4號——的四個端部A、B、C、D,並且是透過軸承來安裝固定的。這兩個軛,分別與軸1和軸2實現剛性連接。軛5,既可以繞十字軸的B–D軸線旋轉,同時又能夠與十字軸一起,繞A–C軸線旋轉,從而能夠在兩根軸之間的夾角不斷發生變化的情況下,依然把旋轉運動從一根軸傳遞到另一根軸上去。
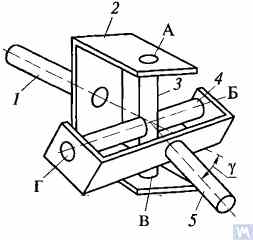
圖 2. 剛性不等速萬向節示意圖
如果軸1繞其軸線旋轉角度α,則軸2在同一時間內將旋轉角度β。軸1與軸2旋轉角度之間的關係由以下表達式確定 tanα = tanβ * cosγ,其中γ為兩根軸線之間的夾角。該表達式表明,角度β有時小於、等於或大於角度α。這兩個角度每隔軸1旋轉90°就會相等一次。因此,在軸1勻速旋轉的情況下,軸2的角速度是不均勻的,並按正弦規律變化。隨著兩軸軸線之間夾角γ增大,軸2轉動的不均勻程度也會加劇。
如果軸 2 的不均勻旋轉傳遞到單元軸,傳動系統中將產生額外的脈動負荷,並隨角度 γ 的增大而增加。為了防止軸 2 的不均勻旋轉傳遞到單元軸,萬向節驅動中使用兩個萬向節。它們的安裝方式使得角度 γ1 和 γ2 相等;固定在非均勻旋轉軸 4 上的萬向節叉頭應位於同一平面內。
萬向接頭傳動系統主要部件的設計如圖 3 所示。非等速萬向接頭由兩個透過十字軸 (3) 連接的叉頭 (1) 組成。其中一個叉頭有時帶有法蘭,而另一個則焊接到傳動軸管上或帶有花鍵端 (6)(或套筒)以連接到傳動軸。十字軸的軸頸安裝在兩個叉頭的孔眼中,並裝有滾針軸承 (7)。每個軸承都裝在殼體 (2) 中,並透過蓋子固定在叉頭的孔眼中,蓋子透過兩個螺栓固定在叉頭上,螺栓由墊片上的鎖片鎖定。在某些情況下,軸承透過卡環固定在叉頭中。為了在軸承中保留潤滑脂並防止水和灰塵進入,設有橡膠自緊密封件。十字軸的內部腔體透過潤滑脂嘴填充潤滑脂,潤滑脂嘴連通至軸承。十字軸通常設有安全閥,以保護密封件免受泵入十字軸的潤滑脂壓力損壞。花鍵連接 (6) 使用潤滑脂嘴 (5) 進行潤滑。
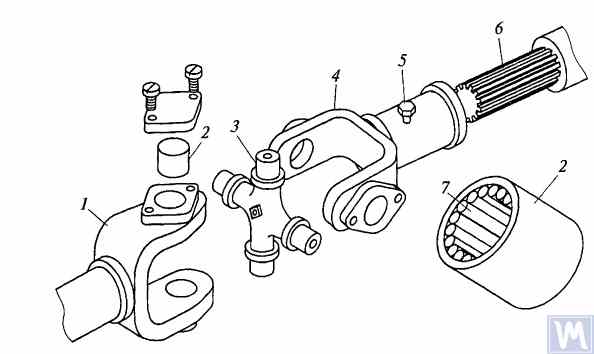
圖 3. 剛性不等速萬向節細節
由剛性不等速萬向節連接的兩軸之間的最大夾角通常不超過20°,因為夾角更大時效率會明顯下降。如果兩軸軸線之間的夾角在0~2°範圍內變化,十字軸的軸頸就會被滾針軸承壓出變形,導致萬向節很快失效。
在高速度履帶車輛的傳動系統中,經常使用齒輪聯軸器類型的萬向接頭,它們允許在軸線以高達 1.5...2° 角度相交的軸之間傳遞扭矩。
驅動軸通常採用管狀結構,使用特殊鋼材的無縫或焊接管。萬向節的叉頭、花鍵套筒或端頭焊接到管上。為了減少作用在驅動軸上的橫向負荷,在萬向節組裝後進行動平衡校正。不平衡通過在驅動軸上焊接平衡板或有時在萬向節軸承蓋下安裝平衡板來校正。萬向節驅動在工廠組裝和平衡後,花鍵連接部件的相對位置通常用特殊標籤標記。
萬向節驅動的補償連接通常採用花鍵連接形式,允許萬向節驅動部件的軸向移動。它由一個插入萬向節驅動花鍵套筒的花鍵端頭組成。潤滑脂通過潤滑脂嘴注入花鍵連接,或在組裝時塗抹,並在車輛長期使用後更換。通常安裝密封件和蓋板以防止潤滑脂泄漏和污染。
對於長驅動軸,萬向節驅動中通常使用中間支撐。中間支撐通常由一個螺栓固定在車輛車架橫樑上的支架組成,支架中安裝有橡膠彈性環內的球軸承。軸承兩側用蓋板密封並配有潤滑裝置。彈性橡膠環有助於補償組裝誤差和因車架變形可能產生的軸承不對中。
帶滾針軸承的萬向節(圖 4a)由叉頭、十字軸、滾針軸承和密封件組成。帶有滾針軸承的軸承杯安裝在十字軸的銷軸上並用密封件密封。軸承杯用卡環或用螺絲固定的蓋板固定在叉頭中。萬向節通過十字軸內的內鑽孔和潤滑脂嘴進行潤滑。安全閥用於消除萬向節內的過剩油壓。當驅動叉頭均勻旋轉時,從動叉頭旋轉不均勻:它在每轉中兩次超前和滯後於驅動叉頭。為了消除不均勻旋轉並減少慣性負荷,使用兩個萬向節。
在前驅動輪的驅動系統中安裝等速萬向節。GAZ-66 和 ZIL-131 車輛的等速萬向節驅動由叉頭 2、5(圖 4b)、四個鋼球 7 和中心鋼球 8 組成。驅動叉頭 2 與內軸一體成型,而從動叉頭與外軸鍛造成型,輪轂固定在外軸的末端。扭矩從叉頭 2 通過沿叉頭內圓形溝槽移動的鋼球 7 傳遞到叉頭 5。中心鋼球 8 用於叉頭定心,並由螺柱 3、4 固定。由於機構相對於叉頭的對稱性,叉頭 2、5 的旋轉頻率相同。軸長的變化由叉頭與軸的自由花鍵連接確保。
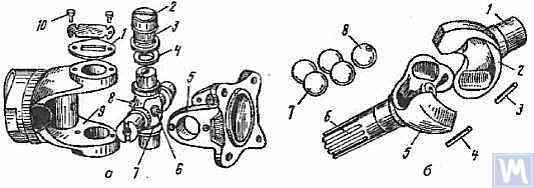
圖 4. 萬向節:a — 萬向節:1 — 蓋板;2 — 軸承杯;3 — 滾針軸承;4 — 密封件;5, 9 — 叉頭;6 — 安全閥;7 — 十字軸;8 — 潤滑脂嘴;10 — 螺絲;b — 等速萬向節:1 — 內軸;2 — 驅動叉頭;3, 4 — 螺柱;5 — 從動叉頭;6 — 外軸;7 — 鋼球;8 — 中心鋼球
2. 萬向節驅動故障
萬向節驅動故障通常表現為車輛行駛時萬向節內的劇烈敲擊聲,特別是在換檔和發動機曲軸轉速突然增加時(例如,從發動機制動過渡到加速時)。萬向節故障的跡象可能是其溫度升高到高溫(超過 100°C)。這是由於萬向節的襯套和銷軸、滾針軸承、十字軸以及花鍵連接嚴重磨損,導致萬向節不對中並對滾針軸承產生顯著的衝擊軸向負荷。萬向節十字軸的軟木密封件損壞會導致銷軸及其軸承迅速磨損。
在維護期間,通過手動向兩個方向劇烈旋轉驅動軸來檢查萬向節驅動。軸的自由旋轉程度決定了萬向節和花鍵連接的磨損情況。每 8-10 千公里,檢查變速箱輸出軸法蘭和主傳動齒輪輸入軸與端部萬向節法蘭的螺栓連接情況,以及驅動軸中間支撐的固定情況。同時檢查花鍵連接上的橡膠防護套和萬向節十字軸的軟木密封件的情況。所有固定螺栓必須完全擰緊(鎖緊扭矩 8-10 kgf·m)。
萬向節的滾針軸承使用傳動單元用的液態油進行潤滑;大多數車輛的花鍵連接使用潤滑脂(US-1、US-2、1-13 等)進行潤滑;嚴禁使用潤滑脂潤滑滾針軸承。在某些車輛中,花鍵連接使用傳動油進行潤滑。安裝在橡膠套筒中的中間支撐軸承實際上不需要潤滑,因為它在工廠組裝時已進行潤滑。ZIL-130 車輛的支撐軸承在定期維護(每 1100-1700 公里)期間通過壓力嘴用潤滑脂進行潤滑。
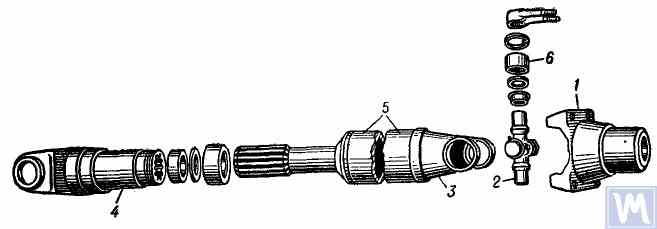
圖 5. 萬向節驅動:1 — 固定驅動軸的法蘭;2 — 萬向節十字軸;3 — 萬向節叉頭;4 — 滑動叉頭;5 — 驅動軸管;6 — 帶封閉端的滾針軸承
萬向節驅動由兩個帶滾針軸承的萬向節、連接它們的空心軸以及帶漸開線花鍵的滑動叉頭組成。為了確保可靠的防塵保護並提供良好的花鍵連接潤滑,連接到變速箱二軸 (2) 的滑動叉頭 (6) 放置在連接到變速箱殼體的延伸段 (1) 中。此外,這種花鍵連接的位置(在萬向節之間的區域之外)顯著增加了萬向節驅動的剛性,並減少了滑動花鍵連接磨損時軸振動的可能性。
傳動軸由薄壁電焊管 (8) 製成,兩端壓入兩個相同的叉頭 (9),然後透過電弧焊接。十字軸 (25) 的滾針軸承座 (18) 壓入叉頭 (9) 的孔眼中,並透過彈簧卡環 (20) 固定。每個萬向接頭軸承包含 22 根滾針 (21)。沖壓蓋 (24) 壓入十字軸突出的軸頸上,並安裝軟木環 (23)。軸承透過旋入十字軸中心螺紋孔的角向潤滑脂嘴 (17) 進行潤滑,該潤滑脂嘴連通至十字軸軸頸的貫通通道。在萬向接頭十字軸的相對側,中心設有一個安全閥 (16),用於在填充十字軸和軸承時釋放過剩的潤滑脂,並防止運行期間十字軸內部壓力積聚(閥門在約 3.5 kg/cm² 的壓力下啟動)。必須包含安全閥的原因是,十字軸內部壓力過高會導致軟木密封件損壞(擠出)。
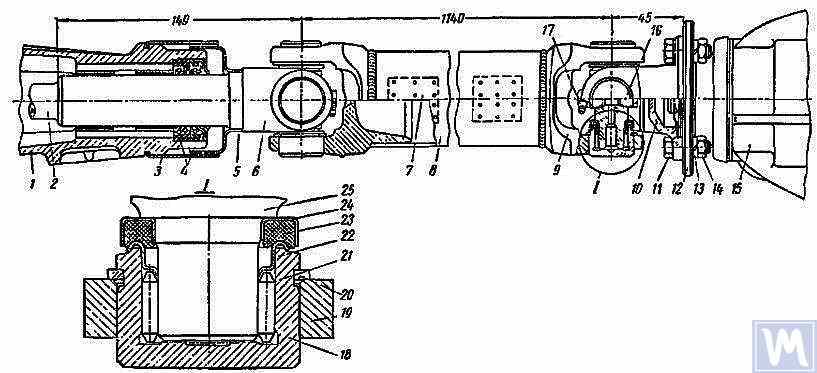
圖 6. 驅動軸組件:1 — 變速箱延伸段;2 — 變速箱二軸;3 和 5 — 防塵擋板;4 — 橡膠密封件;6 — 滑動叉頭;7 — 平衡板;8 — 驅動軸管;9 — 叉頭;10 — 法蘭叉頭;11 — 螺栓;12 — 後橋主傳動齒輪法蘭;13 — 彈簧墊片;14 — 螺母;15 — 後橋;16 — 安全閥;17 — 角向潤滑脂嘴;18 — 滾針軸承;19 — 叉頭孔;20 — 彈簧卡環;21 — 滾針;22 — 帶環形端墊片;23 — 軟木環;24 — 衝壓蓋板;25 — 十字軸
裝配好兩個萬向接頭的傳動軸,透過在管上焊接平衡板 (7) 對兩端進行仔細的動平衡校正。因此,在拆卸軸時,必須仔細標記其所有部件,以便能重新組裝到原始位置。不遵循此說明會破壞軸的平衡,導致可能損壞傳動系統和車身的振動。如果個別部件磨損,特別是如果管因衝擊而彎曲,且在組裝後無法對軸進行動平衡校正,則必須更換整個軸。
可能的驅動軸故障、原因及解決方案
| 故障原因 | 解決方案 |
|---|---|
| 驅動軸振動 | |
| 1. 軸因撞擊障礙物而彎曲 | 1. 校直並對組裝後的軸進行動平衡校正,或更換組裝後的軸 |
| 2. 軸承與十字軸磨損 | 2. 更換軸承與十字軸,並對組裝後的軸進行動平衡校正 |
| 3. 伸長管襯套與滑動叉磨損 | 3. 更換伸長管與滑動叉,並對組裝後的軸進行動平衡校正 |
| 啟動與滑行時的敲擊聲 | |
| 1. 滑動叉花鍵或變速箱二軸磨損 | 1. 更換磨損零件。更換滑動叉時,需對組裝後的軸進行動平衡校正 |
| 2. 固定法蘭叉至後橋驅動齒輪法蘭的螺栓鬆動 | 2. 鎖緊螺栓 |
| 萬向節密封處甩油 | |
| 萬向節密封處的軟木環磨損 | 更換軟木環,重新組裝時保持所有傳動軸零件的相對位置。若十字軸與軸承有磨損,則更換軸承與十字軸,並對組裝後的軸進行動平衡校正 |
3. 驅動軸動平衡校正
傳動軸修復並組裝後,需在平衡機上進行動平衡校正。圖 7 展示了一種平衡機的設計。該機台由底板 (18) 與安裝在四根垂直彈性桿 (3) 上的擺錘框架 (8) 組成,確保其在水平面內擺動。支架與前頂針座 (9) 安裝在支架 (4) 上,並固定在擺錘框架 (8) 的縱向管上。後頂針座 (6) 位於可移動橫梁 (5) 上,允許對不同長度的傳動軸進行動平衡校正。頂針座主軸安裝在精密滾珠軸承上。前頂針座 (9) 的主軸由安裝在機台底座內的電動機透過 V 帶驅動與中間軸驅動,中間軸上裝有刻度盤 (10)。此外,機台底板 (18) 上還安裝有兩個帶有可伸縮鎖定銷 (17) 的支架 (15),用於根據傳動軸前端或後端的平衡需求,固定擺錘框架的前後端。
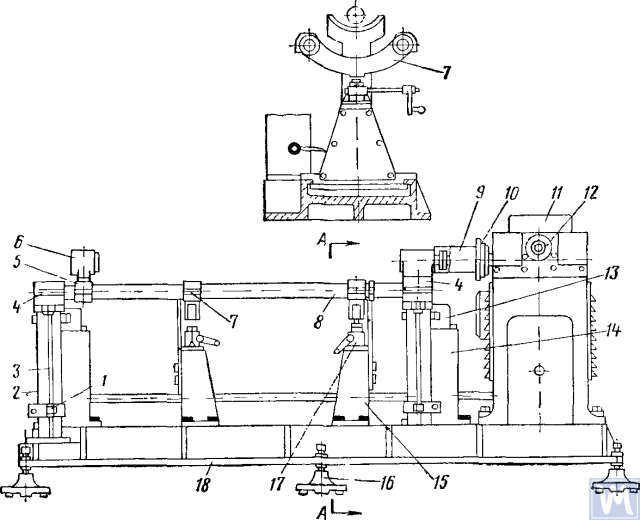
圖 7. 傳動軸動平衡機
1—夾具;2—減震器;3—彈性桿;4—支架;5—可移動橫梁;6—後頂針座;7—橫杆;8—擺錘框架;9—前驅動頂針座;10—刻度盤;11—毫伏計;12—換向器整流子軸臂;13—磁電感測器;14—固定支架;15—固定支架;16—支撐座;17—固定銷;18—支撐板
固定支架 (14) 安裝在機台底板後方,其上安裝有磁電感測器 (13),並透過桿件連接至擺錘框架末端。為防止框架產生共振,支架 (4) 下方安裝有填充油液的減震器 (2)。
在進行動平衡校正的過程中,需要先將帶有滑動軛的驅動軸總成,安裝到機器上並牢固地加以固定住。驅動軸的一端,是透過一個法蘭軛,連接至前驅動主軸箱的法蘭上的;而驅動軸的另一端,則是透過滑動軛的支撐頸,連接至後主軸箱的花鍵套筒上的。接下來,需要檢查驅動軸的旋轉是否順暢無阻,並使用固定器,將機器擺動架的一端固定住。啟動機器之後,需要將整流器的刻度臂,沿逆時針方向緩慢地旋轉,使毫伏表的指針達到其最大讀數值。此時,毫伏表上所顯示出來的讀數,對應的正是不平衡量的大小程度。毫伏表的刻度,是以克.公分,或者以配重的克數來標定的。繼續沿逆時針方向旋轉整流器的刻度臂,使毫伏表的讀數逐漸回到零位,然後將機器停止運轉。根據整流器刻度臂上所顯示的讀數,可以確定出角位移,也就是不平衡的位移角度;接著,透過用手轉動驅動軸,將這一角度數值設定到中間軸的刻度臂上去。平衡板的焊接位置,應當設在驅動軸的頂部,而配重的部分,則應設在校正平面的底部。隨後,將平衡板安裝到位,並在距離焊縫10毫米處,用一根細鐵絲將其綁紮固定住,再啟動機器,檢查裝有平衡板之後驅動軸端的平衡情況。此處的不平衡量,不應超過70克.公分,也就是700克.毫米。之後,鬆開擺動架的一端,同時用固定架,將擺動架的另一端固定住,再按照上文所描述的同樣工藝順序,對驅動軸的另一端進行動平衡校正處理。
傳動軸具有一些平衡特性。對於大多數零件,動平衡的基準是支撐軸頸(例如電機轉子、渦輪機、主軸、曲軸等),但對於傳動軸,基準則是法蘭。組裝過程中,不同連接處不可避免地存在間隙,導致不平衡。若在平衡過程中無法達到最小不平衡量,則該軸判定為不合格。影響平衡精度的因素如下:
- 傳動軸法蘭配合帶與左右支撐頂針座夾緊法蘭內孔之間的連接間隙;
- 法蘭基準面的徑向與端面偏擺;
- 鉸接和花鍵連接處的間隙。花鍵連接腔體內存在潤滑脂可能導致「浮動」不平衡。如果這妨礙達到所需的平衡精度,則在不加潤滑脂的情況下對傳動軸進行動平衡校正。
某些不平衡可能完全無法校正。若發現傳動軸萬向節摩擦增大,校正平面之間的相互影響將增加。這會導致平衡性能與精度下降。
根據 OST 37.001.053-74,制定了以下不平衡標準:帶有兩個接頭(兩支撐)的傳動軸進行動平衡校正,帶有三個(三支撐)的傳動軸與中間支撐一起組裝後進行校正;重量超過 5 kg 的傳動軸和聯軸器的法蘭(叉頭)在組裝軸或聯軸器之前進行靜平衡校正;傳動軸每端或三接頭傳動軸中間支撐的殘餘不平衡規範透過比不平衡量進行評估;
軸每端或中間支撐的最大允許比殘餘不平衡規範,以及三接頭傳動軸在平衡架上的任何位置,不應超過:乘用車和小負載卡車(高達 1 t)及極小巴士的傳動系統 – 6 g-cm/kg,其餘 – 10 g-cm/kg。傳動軸或三接頭傳動軸的最大允許殘餘不平衡規範應在平衡架上確保,旋轉頻率對應於車輛最高速度時傳動系統中的頻率。
說明:OST 37.001.053-74是1974年蘇聯汽車工業標準,此處僅作歷史參考引用。以現代標準換算,3,000 rpm下6 g·cm/kg大致對應G 19,10 g·cm/kg大致對應G 31——該OST要求介於G 16和G 40之間,與ISO 21940-11(原ISO 1940-1)針對傳動軸的等級要求是一致的。新的工作應按ISO 21940-11的等級來規定。
對於負載能力為 4 t 及以上的卡車、小型和大型巴士的傳動軸和三接頭傳動軸,允許將平衡架上的旋轉頻率降低至車輛最高速度時傳動軸旋轉頻率的 70%。根據 OST 37.001.053-74,傳動軸的平衡旋轉頻率應等於:
nb = (0.7 ... 1.0) nr,
其中 nb – 平衡旋轉頻率(應對應於架子的主要技術數據,n=3000 min-1); nr – 最大工作旋轉頻率,min-1.
在實際操作中,由於萬向節與花鍵連接處的間隙,傳動軸無法在推薦的旋轉頻率下進行平衡。在此情況下,需選擇另一旋轉頻率進行平衡。
4. 現代驅動軸平衡機
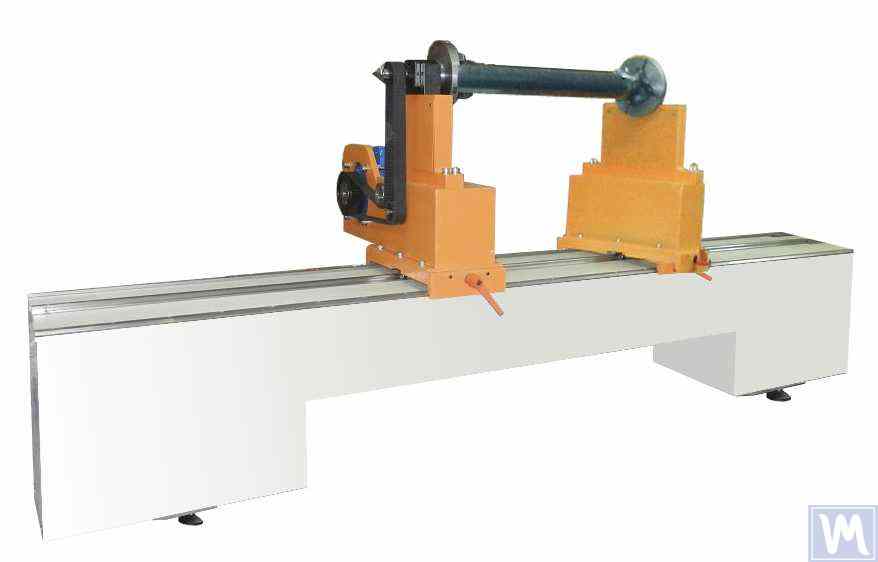
圖 8. 長度達 2 公尺、重量達 500 kg 的傳動軸平衡機
該型號配備 2 個支架,允許在 2 個校正平面進行平衡。
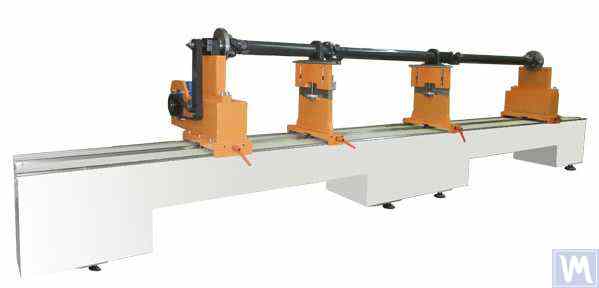
圖 9. 長度達 4200 mm、重量達 400 kg 的傳動軸平衡機
該型號配備 4 個支架,允許同時在 4 個校正平面進行平衡。
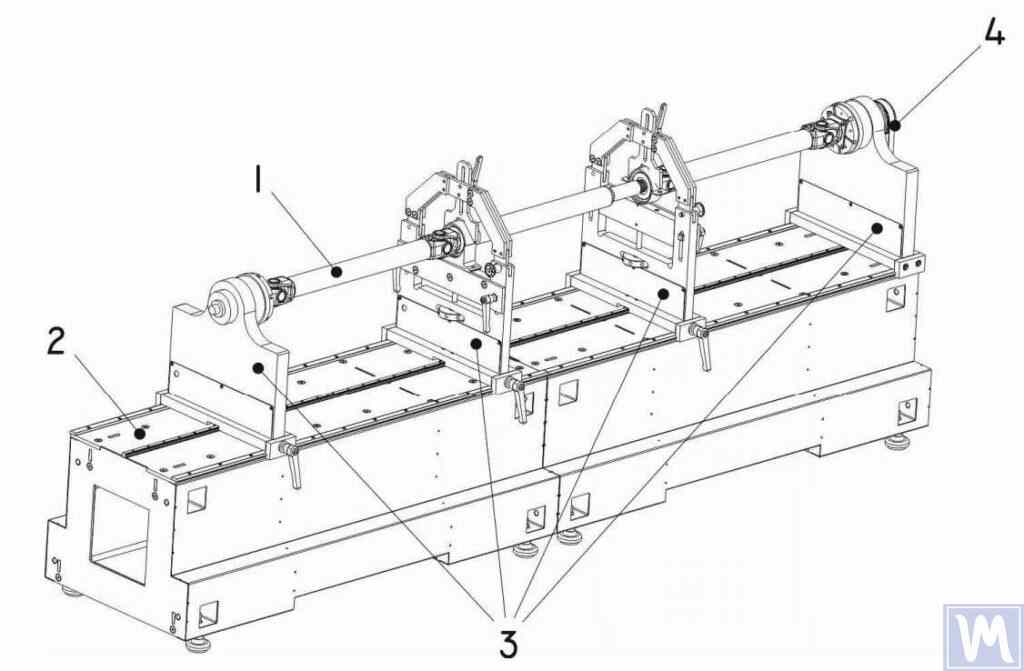
圖 10. 用於傳動軸動平衡校正的水平硬支撐平衡機
1 – 平衡物件(傳動軸);2 – 機台底座;3 – 機台支撐座;4 – 機台驅動;機台支撐座的結構元件如圖 11 所示。
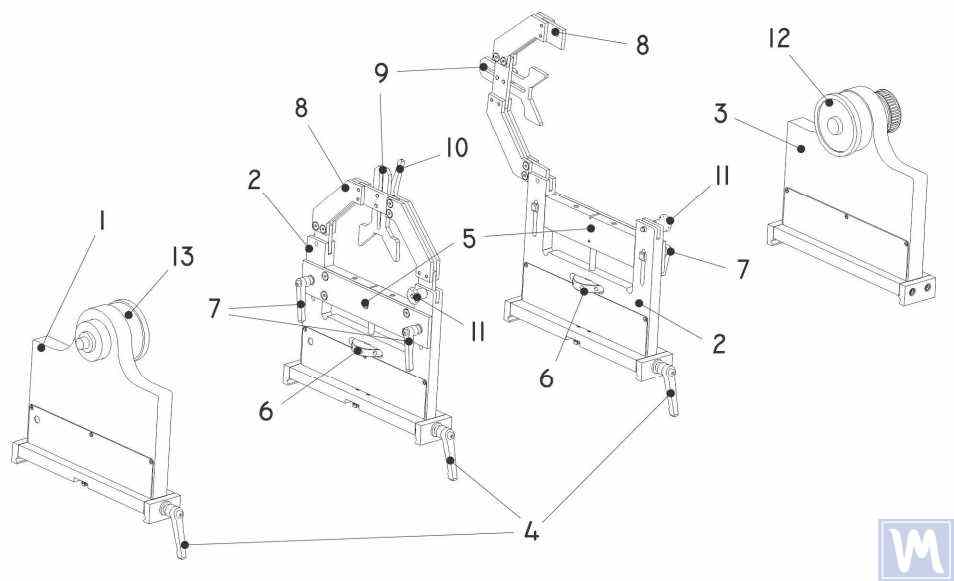
圖 11. 傳動軸動平衡校正機台支撐座元件
1 – 左側不可調支撐座;2 – 中間可調支撐座(2 個);3 – 右側不可調固定支撐座;4 – 支撐框架鎖定手柄;5 – 可移動支撐平台;6 – 支撐垂直調整螺母;7 – 垂直位置鎖定手柄;8 – 支撐夾緊支架;9 – 中間軸承可移動夾具;10 – 夾具鎖定手柄;11 – 夾緊支架鎖定;12 – 用於安裝物件的驅動(主動)主軸;13 – 從動主軸
5. 驅動軸動平衡校正準備
以下將介紹機台支撐座的設定與平衡物件(四支撐傳動軸)在機台支撐座上的安裝。
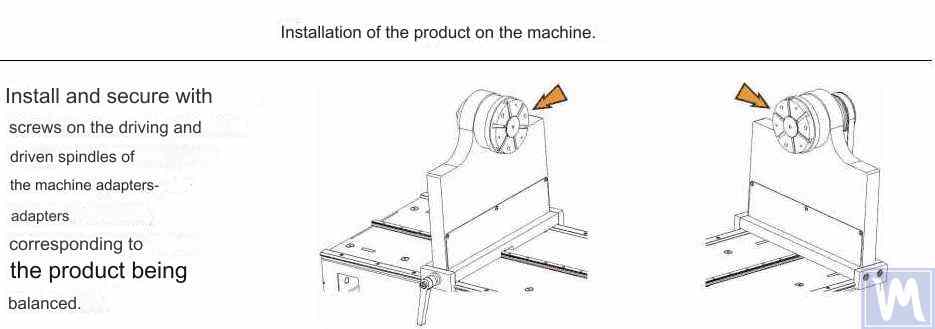
圖 12. 過渡法蘭在平衡機主軸上的安裝
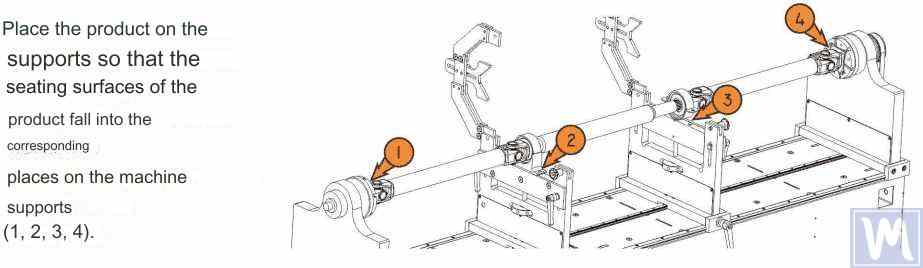
圖 13. 傳動軸在平衡機支撐座上的安裝
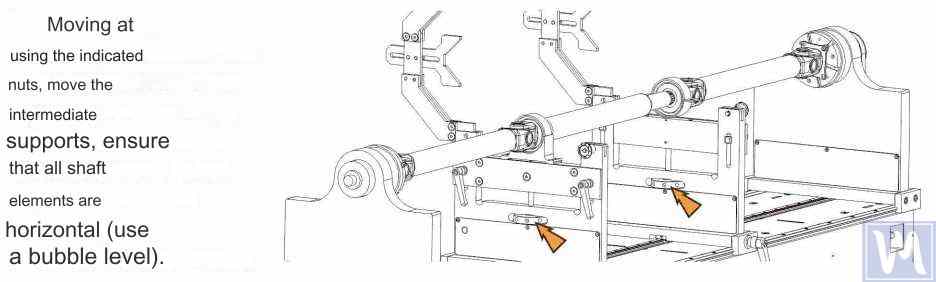
圖 14. 使用氣泡水平儀在平衡機支撐座上將傳動軸水平調平
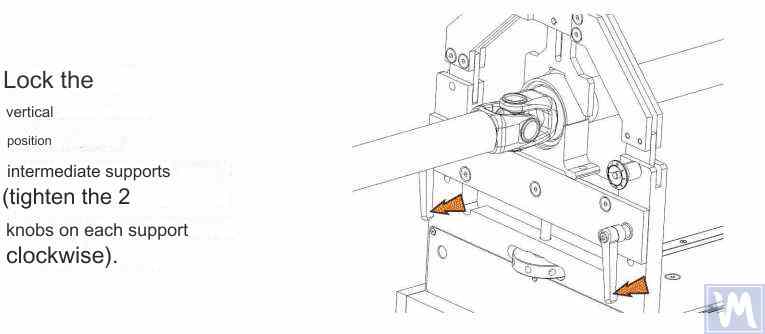
圖 15. 固定平衡機中間支撐座以防止傳動軸垂直位移
手動旋轉物件一整圈。確保其在支撐座上旋轉自由且無卡滯。完成此步驟後,機台的機械部分設定完成,物件安裝完畢。
6. 如何平衡傳動軸:逐步操作指南
我需要哪款套件? 採用兩支承、兩平面校正的機器(圖8)需要使用雙通道的Balanset-1A。採用四支承、同時進行四平面校正的機器(圖9,以及下面的流程)則需要四通道的Balanset-4A。測量和計算流程完全相同,僅通道數量不同。下面描述的流程針對四平面配置,而軟體截圖展示的則是兩平面Balanset-1A上的相同流程——在Balanset-4A上,同樣的畫面只是多了平面3和平面4。
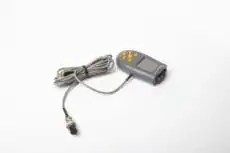
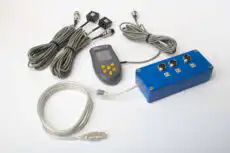
下面以Balanset-4A測量系統為例,介紹在平衡機上進行傳動軸平衡的過程。Balanset-4A是一款便攜式平衡套件,可對在自身軸承中旋轉或安裝在平衡機上的轉子進行一至四個校正平面的平衡。該設備最多包含四個振動感測器、一個相位角感測器、一個四通道測量單元,以及一台便攜式電腦。
整個動平衡校正過程,包括對校正配重的大小以及安裝位置這些資訊的測量、處理與顯示,全部都是自動完成的,使用者完全不需要具備說明書之外的任何額外技能或者專業知識。所有動平衡作業所得到的結果,都會被保存在動平衡校正檔案(Balancing Archive)當中,如果有需要的話,還可以把它們列印成報告。除了動平衡校正這項功能之外,Balanset-4A還可以當作一台普通的振動轉速計來使用,能夠在四個通道上,分別測量總振動的均方根值(RMS)、振動旋轉分量的均方根值,並且對轉子的旋轉頻率進行監控。
此外,該設備還可顯示振動速度隨時間變化的函數圖與振動頻譜,這對於評估已平衡機器的技術狀態非常有用。
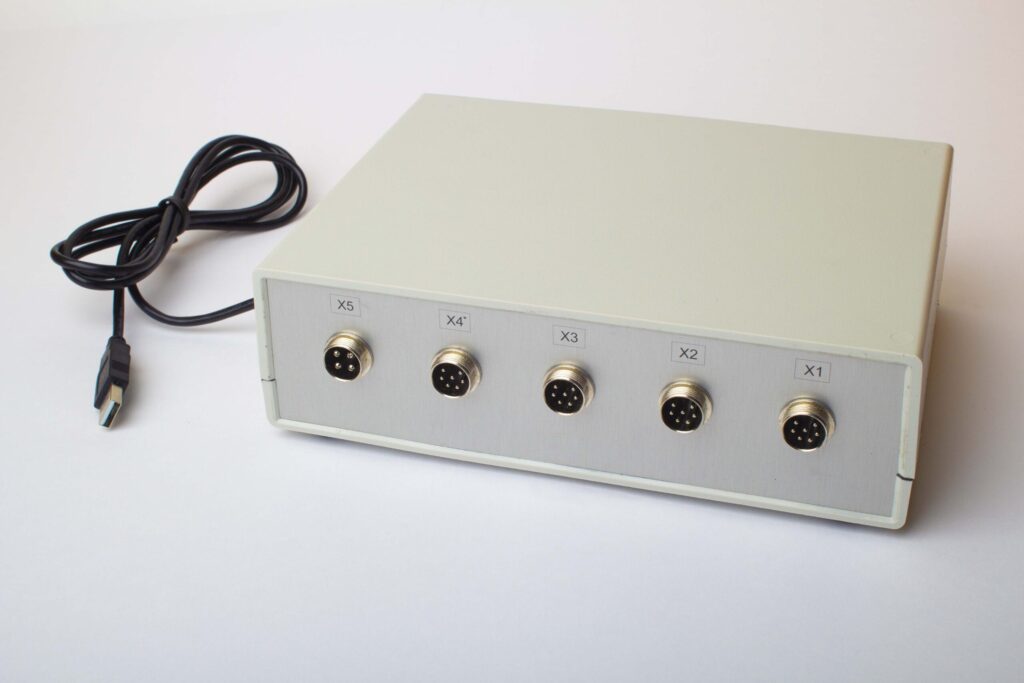
圖16. Balanset-4A裝置外觀圖,用作傳動軸平衡機的測量與計算系統
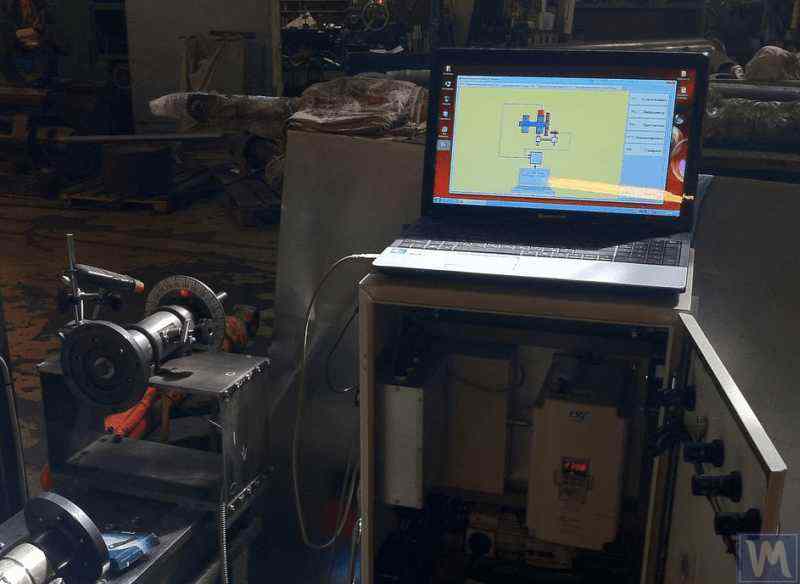
圖17. Balanset-4A裝置用作傳動軸平衡機測量與計算系統的使用範例
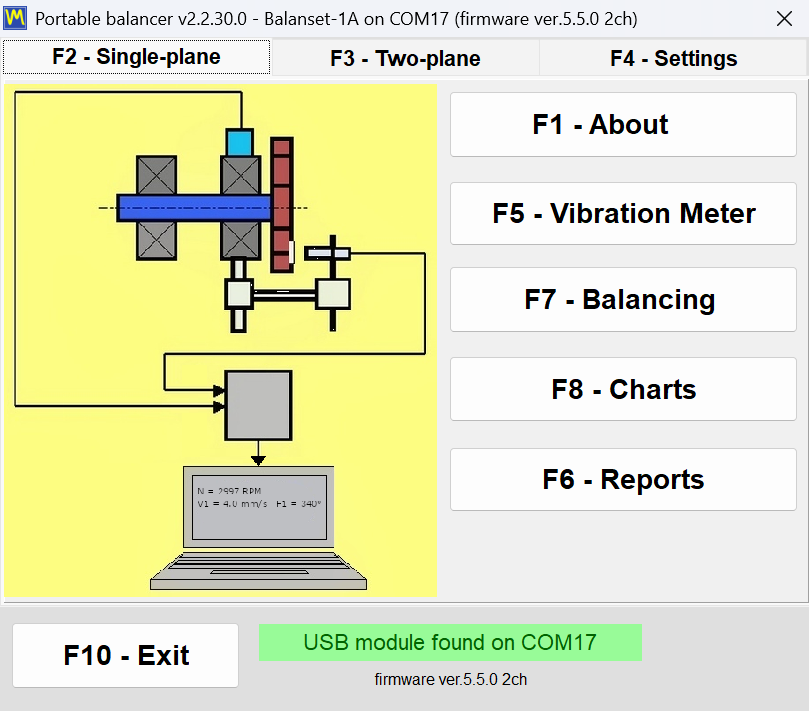
圖 18. Balanset 軟體主視窗:F1 - About、F5 - Vibration Meter、F6 - Balancing、F7 - Charts、F8 - Reports
Balanset-4A設備隨附振動傳感器。這些傳感器基於加速度計原理;軟體會對其訊號進行積分,並以mm/s RMS顯示振動速度。
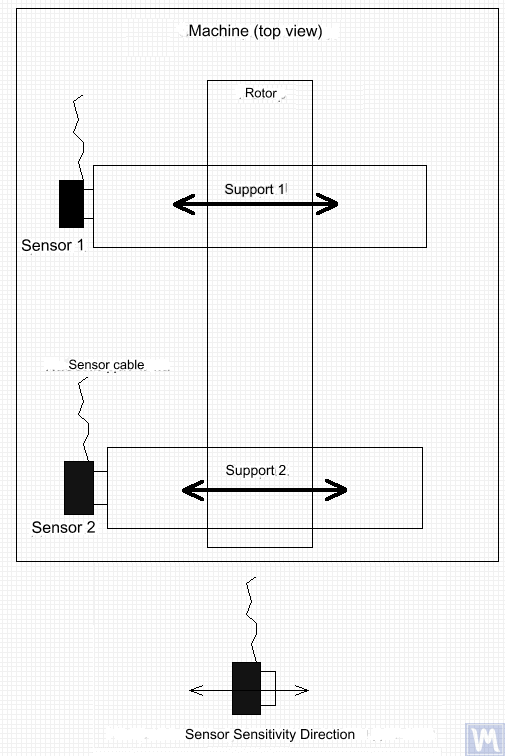
圖19. Balanset-4A振動感測器安裝於動平衡機支承上
傳感器靈敏軸的方向應與支座振動位移的方向一致,在本例中為水平方向。有關傳感器安裝的更多資訊,請參閱 在運轉條件下進行轉子動平衡.
- 將振動感測器 1、2、3、4 安裝在平衡機的支撐座上。
- 將振動感測器連接至接頭 X1、X2、X3、X4。
- 安裝相位角感測器(雷射測速儀)5,使被平衡轉子的徑向(或端面)表面與感測器外殼之間的標稱間隙在 10 至 300 mm 範圍內。
- 在轉子表面貼上寬度至少為 10-15 mm 的反射膠帶標記。
- 將相位角感測器連接至接頭 X5。
- 將測量單元連接至電腦的 USB 埠。
- 使用市電供電時,將電腦連接至電源供應器。
- 將電源供應器連接至 220 V、50 Hz 電網。
- 開啟電腦並啟動Balanset軟體。
- 點擊“F6 - Balancing”按鈕開啟平衡工作區,並在“Plane count”欄位中設定所需的校正平面數,以便連接到量測單元輸入端的振動感測器同時量測振動。
- 說明感測器與測量單元連接方式的示意圖會顯示在電腦螢幕上,如圖 18 所示。
在進行動平衡校正之前,建議先在測振儀模式(F5 按鈕)下進行測量。
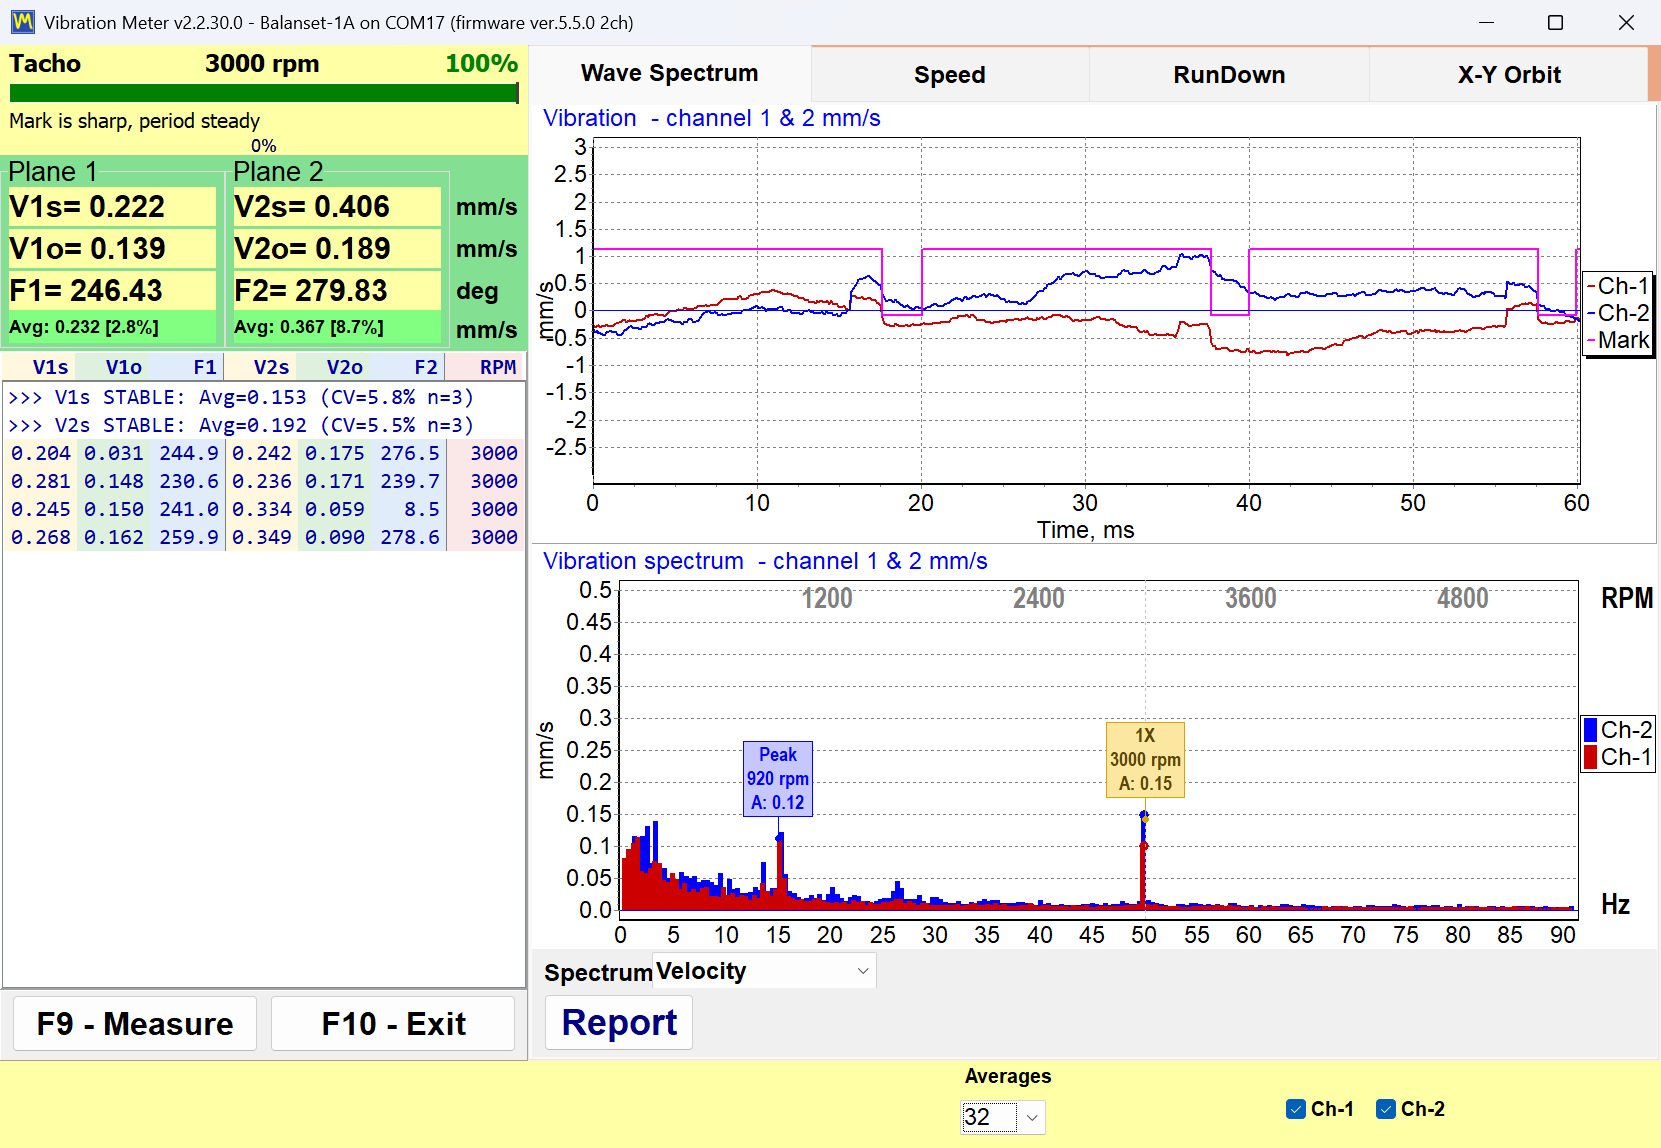
圖 20。振動計模式(F5):總振動 V1s、V2s 與轉頻分量 V1o、V2o,並附相位 F1、F2,以振動速度 mm/s RMS 顯示
如果總振動量 V1s (V2s) 大致匹配旋轉分量量 V1o (V2o),可以假設對機構振動的主要貢獻是由於轉子不平衡。如果總振動量 V1s (V2s) 顯著超過旋轉分量 V1o (V2o),建議檢查機構 – 檢查軸承狀況,確保在基礎上牢固安裝,驗證轉子在旋轉期間不接觸靜止部件,並考慮來自其他機構的振動影響等。
在圖表模式(“F7 - Charts”,“F5-Spectrum (Hz)”分頁)中研究時間函數圖和振動頻譜,在此可能很有幫助。
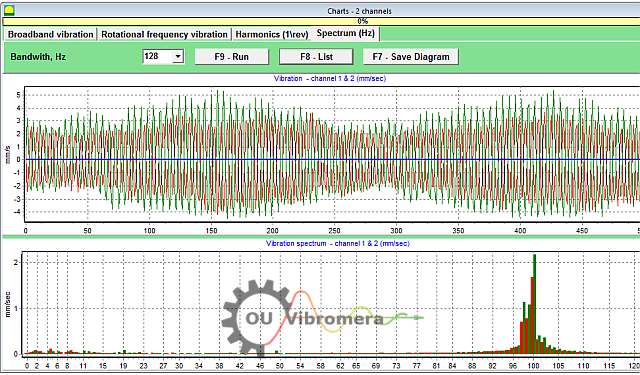
圖 21. 振動時間函數與頻譜圖
圖表顯示在哪些頻率下振動水平最高。如果這些頻率與被平衡機構轉子的旋轉頻率不同,則必須識別這些振動分量的來源,並在動平衡校正之前採取措施消除它們。
解讀傳動軸的頻譜:1x為不平衡,2x則可能是萬向節本身的問題。 旋轉頻率(1x)處的主峰指向不平衡——這正是平衡所要消除的問題。旋轉頻率二倍頻(2x)處的主峰,尤其是伴隨強烈的軸向振動時,則指向萬向節角度、磨損的十字軸或花鍵,或者 不對心:以角度 γ 工作的萬向節會使從動叉每轉兩次出現超前與滯後,因此即使軸完全平衡,也會產生 2x 分量。平衡無法消除它——請使兩個萬向節的角度相等(γ1 = γ2),並先檢查萬向節。在圖表模式(“F7 - Charts”)中,“F5-Spectrum (Hz)”分頁顯示頻譜,“F3-1x vibration”分頁顯示旋轉分量;在 3000 min-1 1x = 50 Hz,2x = 100 Hz。
此外,還應注意測振儀模式下讀數的穩定性 – 測量期間振動的振幅與相位變化不應超過 10-15%。否則,機件可能正在共振區域附近運轉。在此情況下,應調整轉子轉速。
在對新轉子進行四平面平衡時,需要進行五次標定運轉,以及至少一次修正運轉(Run T)。第一次不加試重的機器運轉,在平衡工作區中作為Run 0進行振動測量。隨後的各次運轉均加裝試重,依次將試重安裝在傳動軸的每個校正平面上(即每個平衡機支承處)。
在每次後續運轉之前,應採取以下步驟:
- 停止已平衡機器轉子的旋轉。
- 移除先前安裝的試重。
- 在下一個平面安裝試重。
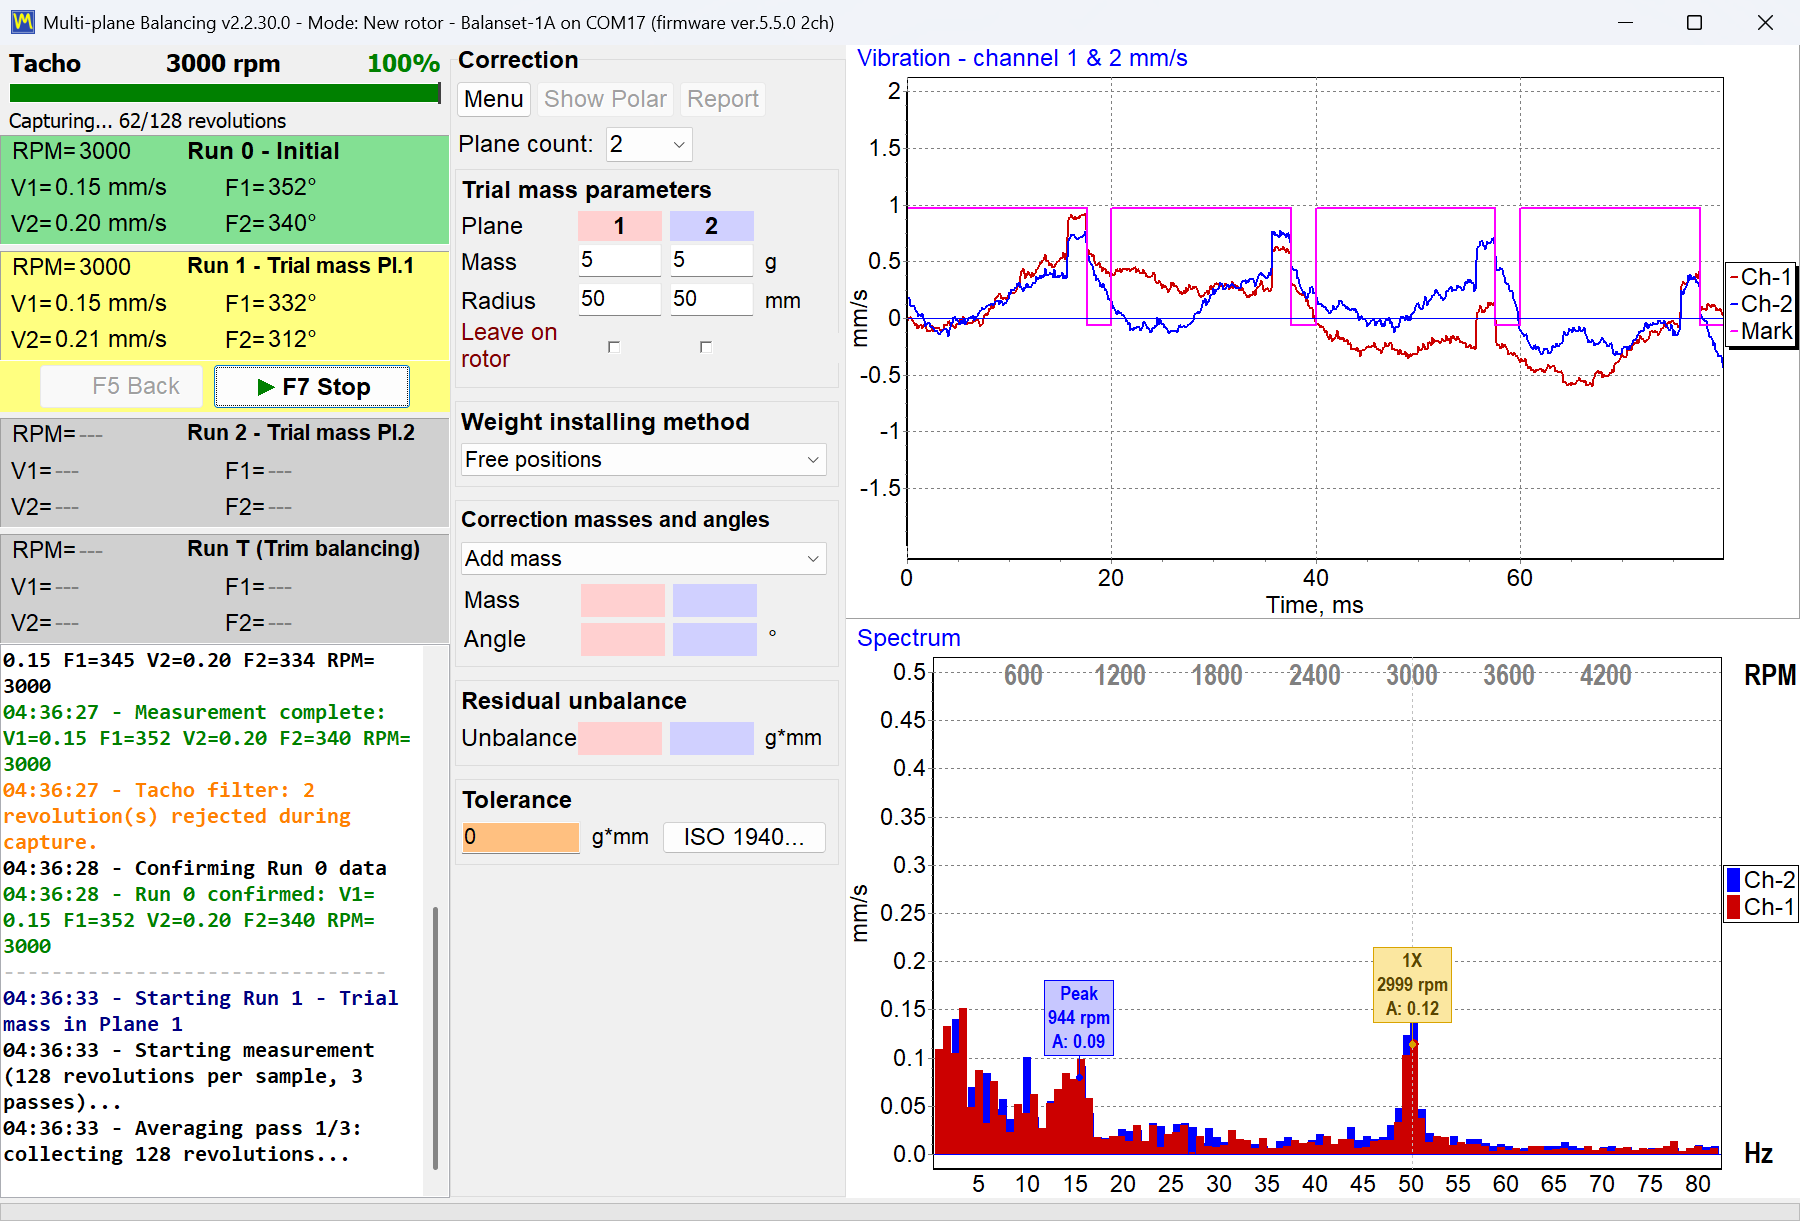
圖 22. 量測運轉期間的平衡工作區(“F6 - Balancing”):Run 0 - Initial、試重運轉 Run 1 和 Run 2,以及微調運轉 Run T
每次測量完成後,轉子旋轉頻率 (Nob) 以及被平衡轉子旋轉頻率下的振動有效值 (Vo1,Vo2,Vo3,Vo4) 與相位 (F1, F2, F3, F4)會儲存在程式視窗中對應的欄位。完成第五次運轉(Weight in Plane 4)後,會顯示附有極座標圖(見圖23)的動平衡校正結果,呈現計算所得的質量值(M1, M2, M3, M4) 與安裝角度 (f1,f2,f3,f4) 的計算值。
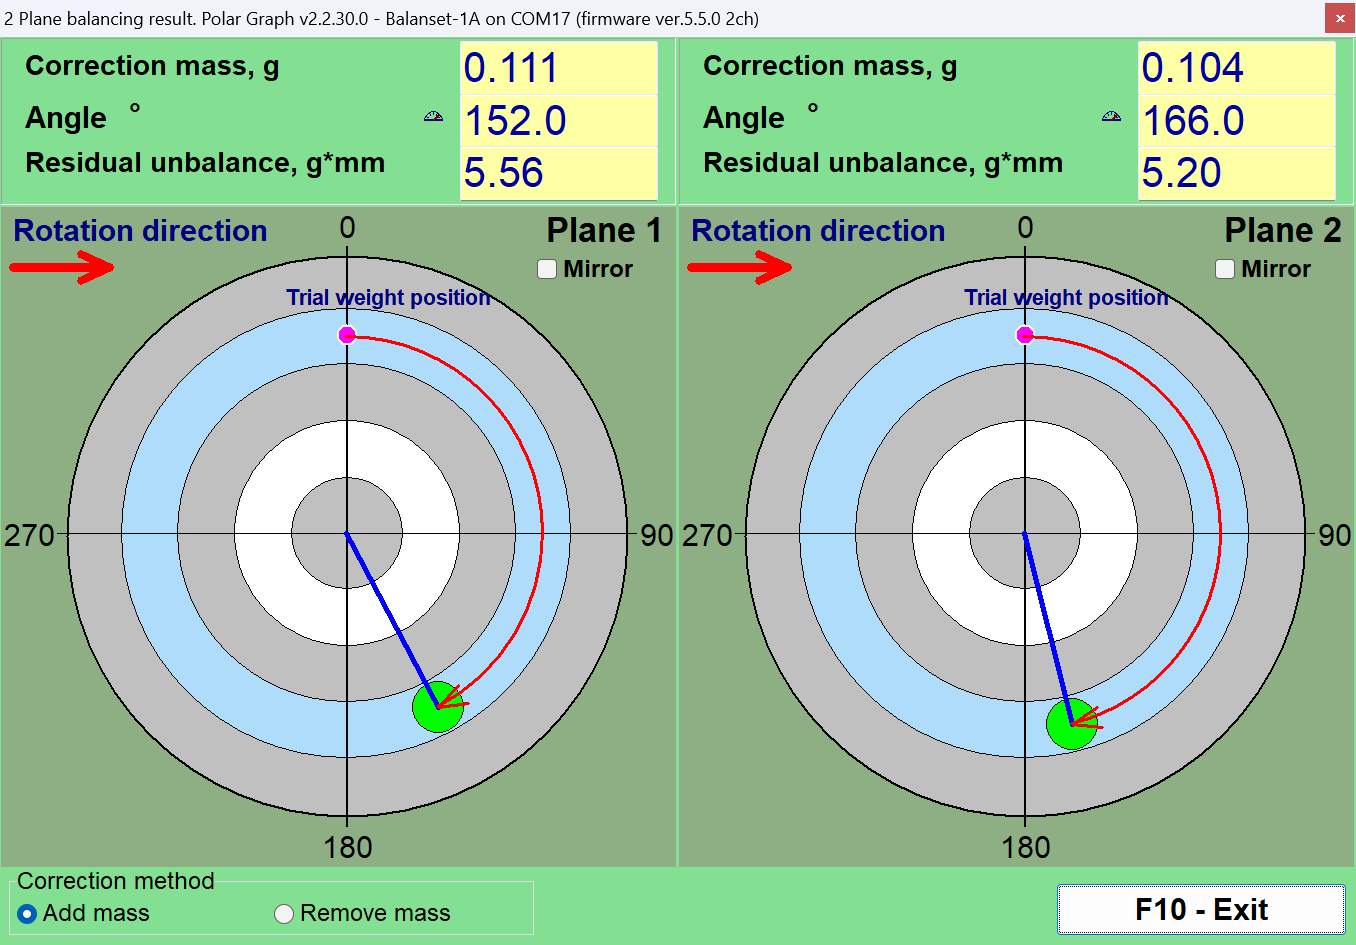
圖 23。動平衡校正結果的極座標圖:各平面計算出的校正配重與角度,自試重位置沿旋轉方向量測
注意! 在第五次已平衡機器運轉的測量過程完成後,必須停止轉子旋轉並移除先前安裝的試重。只有在完成這些步驟後,才能繼續在轉子上安裝(或移除)校正配重。
在極座標系統中,於轉子上添加(或移除)校正配重的角位置是從試重安裝位置開始測量的。角度測量方向與轉子旋轉方向一致。若採用葉片平衡法,已平衡轉子中 условно 視為第 1 片葉片的位置與試重安裝位置重合。電腦顯示器上指示的葉片編號方向遵循轉子的旋轉方向。
在這個版本的程式中,預設假定校正重塊是以增加質量的方式安裝在轉子上,這一點由“Add mass”(增加質量)欄位中的標記體現。如果需要透過去除質量(例如鑽孔)來校正不平衡,可用滑鼠在“Remove mass”(去除質量)欄位中設置標記,此後校正重塊的角度位置會自動改變180度。
在被平衡的轉子上安裝校正配重後,進行微調運行(Run T),以檢查平衡作業的效果。完成微調運行後,轉子轉速的結果(Nob) 與有效值 (Vo1,Vo2,Vo3,Vo4) 與相位 (F1, F2, F3, F4)平衡轉子在其旋轉頻率處所測得的振動數值,將會被保存下來,記錄於程式視窗當中對應的欄位裡。與此同時,動平衡校正結果(參見圖23)也會隨之更新,顯示出需要在轉子上安裝(或拆除)的附加校正配重的各項計算參數,以便用來補償其殘餘不平衡量。除此之外,這個工作區介面,還會顯示出經過動平衡校正之後所達到的殘餘不平衡數值。如果這台被校正轉子的殘餘振動數值,以及/或者殘餘不平衡數值,符合技術文件當中所規定的公差要求,那麼就可以完成整個動平衡校正過程;反之,則可以繼續進行校正作業。這種方法,可以透過逐次逼近的方式,去修正在被校正轉子上安裝(或者拆除)校正配重時,有可能出現的各種誤差。
如果平衡過程仍需繼續,則必須根據平衡結果中顯示的計算參數,在被平衡的轉子上安裝(或拆除)額外的校正配重。
根據五次校準運行結果計算得出的轉子平衡係數(動態影響係數)會保存在電腦記憶體中,在平衡同類型轉子時可透過「Load Coefficients」功能重複使用。
7. 剛性轉子推薦平衡精度等級
以下等級為 ISO 1940-1 的平衡品質等級 G,其數值在 ISO 21940-11:2016 中未經更動即予取代沿用。該等級定義為 G = eper·Ω,其中eper 為允許比不平衡量(g·mm/kg = µm),Ω = 2πn/60 為運轉角速度(rad/s)。允許殘餘不平衡量則為 Uper = 9549·G·M/n [g·mm],於各校正平面之間分配。詳見我們的 ISO 1940-1 詞彙表條目。
公路車輛傳動軸的預設等級為G 40;若圖面或原廠規格有特殊要求,則適用G 16。請注意,殘餘不平衡與振動是兩項獨立的驗收標準:整機組裝後的振動需依ISO 20816(原ISO 10816)進行評估——詳見我們的 ISO 10816-1 詞彙表條目。
G等級表僅適用於剛性轉子——即工作轉速保持在第一階彎曲臨界轉速的約0.5~0.7倍以下的轉子。較長的傳動軸(2公尺及以上,以及任何帶中間支撐的軸)可能接近這一極限:應同時對照工作轉速和平衡轉速檢查軸的第一階臨界轉速。如果軸在該轉速下表現為柔性,應採用模態/多轉速平衡程序(ISO 21940-12)——按剛性轉子的兩平面校正方法將不起作用。
表 2. 剛性轉子推薦平衡精度等級。

| 機器類型(轉子) | 平衡精度等級 | 平衡品質等級 G = eper·Ω, mm/s |
|---|---|---|
| 大型低速船用柴油機驅動曲軸(結構不平衡)(活塞速度低於 9 m/s) | G 4000 | 4000 |
| 大型低速船用柴油機驅動曲軸(結構平衡)(活塞速度低於 9 m/s) | G 1600 | 1600 |
| 安裝在隔振器上的驅動曲軸(結構不平衡) | G 630 | 630 |
| 安裝在剛性支撐上的驅動曲軸(結構不平衡) | G 250 | 250 |
| 裝配用於轎車、卡車及機車的往復式引擎 | G 100 | 100 |
| 安裝於隔振器上的驅動曲軸(結構平衡) | G 40 | 40 |
| 汽車車輪、輪圈、輪組、傳動軸(萬向軸) | G 40 | 40 |
| 農業機械 | G 16 | 16 |
| 安裝於剛性支撐上的驅動曲軸(已平衡) | G 16 | 16 |
| 破碎機 | G 16 | 16 |
| 有特殊要求的傳動軸(螺旋槳軸/萬向軸) | G 16 | 16 |
| 航空渦輪機 | G 6.3 | 6.3 |
| 離心機(分離機、沉降機) | G 6.3 | 6.3 |
| 軸高至少 80 mm 的電動機與發電機,最大額定轉速達 950 min-1 | G 6.3 | 6.3 |
| 軸高小於 80 mm 的電動機 | G 6.3 | 6.3 |
| 風機 | G 6.3 | 6.3 |
| 齒輪傳動 | G 6.3 | 6.3 |
| 通用機械 | G 6.3 | 6.3 |
| 金屬切削機床 | G 6.3 | 6.3 |
| 造紙機械 | G 6.3 | 6.3 |
| 泵浦 | G 6.3 | 6.3 |
| 渦輪增壓器 | G 6.3 | 6.3 |
| 水輪機 | G 6.3 | 6.3 |
| 壓縮機 | G 6.3 | 6.3 |
| 電腦控制傳動 | G 2.5 | 2.5 |
| 軸高至少 80 mm 的電動機與發電機,最大額定轉速超過 950 min-1 | G 2.5 | 2.5 |
| 燃氣與汽輪機 | G 2.5 | 2.5 |
| 金屬切削機床傳動 | G 2.5 | 2.5 |
| 紡織機械 | G 2.5 | 2.5 |
| 音響與視訊設備傳動 | G 1 | 1 |
| 研磨機驅動裝置 | G 1 | 1 |
| 高精度設備的主軸與傳動 | G 0.4 | 0.4 |
驅動軸動平衡校正常見問題
什麼是傳動軸動平衡校正?
驅動軸動平衡校正是校正驅動軸中任何質量不平衡的過程,使其能夠平穩旋轉而不產生振動。這涉及測量軸在哪一側較重,然後添加或移除少量配重(例如焊接平衡配重)以抵消該不平衡。平衡後的驅動軸運轉均勻,可防止車輛組件過度振動和磨損。
為什麼傳動軸動平衡校正很重要?
不平衡的驅動軸可能導致強烈振動,特別是在某些速度下,並可能在加速或換檔時產生撞擊聲。隨著時間推移,這些振動可能會損壞軸承、萬向接頭和其他傳動系統組件。對驅動軸進行動平衡校正可消除這些振動,確保行駛更平穩,減少零件負擔,並防止昂貴的損壞或停機。
傳動軸不平衡的常見症狀有哪些?
不平衡或有故障的驅動軸的典型症狀包括在車輛地板或座椅上感覺到的明顯振動或顛簸,特別是在速度增加時。您可能還會在換檔或加速和減速時聽到敲擊或鬆動聲。在某些情況下,萬向接頭可能因不平衡而過熱。若觀察到這些跡象,很可能驅動軸需要動平衡校正或維修。
如何對傳動軸進行動平衡校正?
傳動軸平衡通常使用專用的平衡機來完成。傳動軸被安裝好並以高速旋轉,感測器同時檢測任何不平衡。技術人員隨後根據機器的讀數,在特定位置為傳動軸加裝小重塊(或去除材料)。這一過程會不斷重複,直到傳動軸旋轉時不再產生明顯振動為止。像Balanset-4A這樣的現代系統,能夠引導整個過程,並精確計算出應在何處加裝多少重量,以實現精確平衡。
結論
總之,正確的驅動軸動平衡校正對於安全性、性能和成本節省至關重要。 透過偵測並校正不平衡,可以避免零件不必要的磨損、避免造成損壞的故障,並維持機器的最佳性能。像我們的Balanset-1A和Balanset-4A這類現代動平衡系統,讓這個過程變得高效,即使是小型維修廠也能達到專業水準的結果。
若您面臨持續的驅動軸振動或需要可靠的平衡解決方案,請不要猶豫,立即採取行動。應用本指南概述的步驟或諮詢我們的專家以獲得協助。憑藉正確的方法和設備,您可以確保驅動軸在未來數年平穩可靠地運轉。 聯絡我們 以了解更多資訊或探索最適合您需求的驅動軸動平衡校正設備。


Nikolai Shelkovenko
Nikolai Shelkovenko是一名振動分析工程師,也是Vibromera的創辦人兼執行長。 15年多來,他一直在現場——而非在試驗台上——為旋轉設備進行動平衡校正:粉碎機、工業風機、破碎機、離心機、軸與主軸。正是這些實際工作催生了Balanset系列儀器——它們被設計為一種專業人員可以隨身攜帶到機器旁、在現場獨立使用的工具,而非實驗室設備。 Vibromera成立於2017年,自2023年起總部設於葡萄牙波爾圖。Balanset系列產品的研發、組裝與支援均在此完成。旗艦產品是Balanset-1A,一款用於單平面及雙平面動平衡校正與振動診斷的可攜式分析儀。 Nikolai親自參與客戶支援工作,處理各種棘手的動平衡校正案例,並參與軟體開發。他以任何語言為全球客戶提供服務。


0 則迴響